Some Laravel Homestead tips
Homestead is a pre-packaged Vagrant box that includes a good development environment. It was made and is maintained by Taylor Otwell, the creator of Laravel. In this post I'd like to share some tips regarding this box.
Map all sites at once
For every project a directory needs to be mapped from the host to the guest in folders-section of the yaml file. Let's make that a bit easier. Instead of adding a specific project to the folders-section you can add the folder where all projects reside in. I personally store all sites I'm working on in the `~/dev/sites` folder. So by adding that folder to the yaml file, no new mappings are needed when creating a new site.folders:
- map: ~/dev/sites
to: /home/vagrant/sites
Avoid having to edit the hosts file
When adding a site to homestead you have to map an url to a public folder in the sites-section of the yaml-file. To make this work the url should be pointed to the ip address of the homestead box by adding it to your hosts file:.192.168.10.10 url-to-your-homested-project.com #default ip of the homestead box
You can avoid having to edit the hosts file by using a xip.io-url. Xip.io is a special domain created by Basecamp. The nameserver of that domain will resolve all urls to the ip-address that is specified inside the url. For example: "myproject.192.168.10.10.xip.io" will resolve to 192.168.10.10. If you use such an url in your homestead configuration there's no need to edit your hosts file.
sites
    - map: spatie.192.168.10.10.xip.io #no need to put this url in your hosts file
      to: /home/vagrant/sites/spatie.be/public
The downside of using a xip.io-url is that such url's are quite long. This can be improved by installing a local dns server. The local dns server will resolve all lookups of a given top level domain to the ip address of the homestead box. Here's a nice article that explains how to resolve all *.dev requests to a specified ip adress.
On OSX these steps can be used to install and configure dnsmasq to point all *.dev requests to homestead.
# Install dnsmasq
brew install dnsmasq
# Copy the default configuration file.
cp $(brew list dnsmasq | grep /dnsmasq.conf.example$) /usr/local/etc/dnsmasq.conf

# Copy the daemon configuration file into place.
sudo cp $(brew list dnsmasq | grep /homebrew.mxcl.dnsmasq.plist$) /Library/LaunchDaemons/

# Start Dnsmasq automatically.
sudo launchctl load /Library/LaunchDaemons/homebrew.mxcl.dnsmasq.plist
echo "address=/dev/192.168.10.10" >> /usr/local/etc/dnsmasq.conf

#restart dnsmaq
sudo launchctl stop homebrew.mxcl.dnsmasq
sudo launchctl start homebrew.mxcl.dnsmasq

#make osx use dnsmasq
sudo mkdir -p /etc/resolver
sudo tee /etc/resolver/dev >/dev/null <<EOF
nameserver 127.0.0.1
EOF
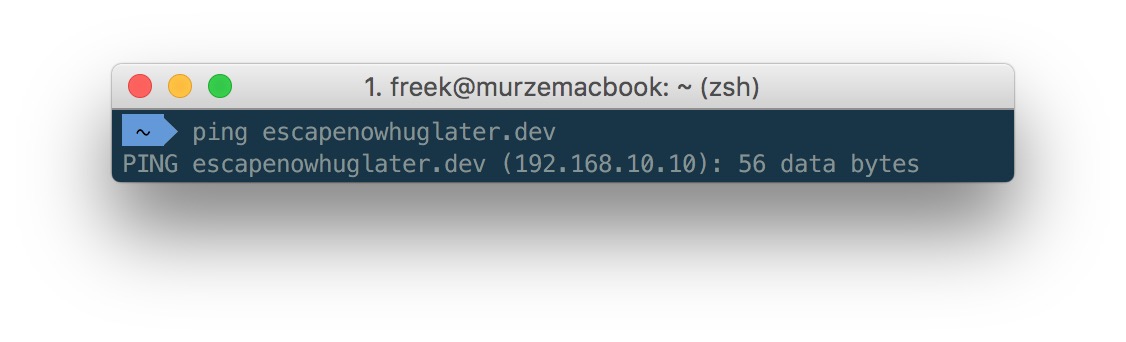
After performing these steps you need to restart your mac. If you know some better way to active dnsmasq besides rebooting, let me know.
When your mac comes back up try pinging a random .dev domain.
 With dnsmasq up and running you can .dev domains can be used in the homestead yaml file:
sites
    - map: spatie.dev #no need to put this url in your hosts file
      to: /home/vagrant/sites/spatie.be/public
Use a bash function to work with a globally installed homestead
You can opt to use a seperate homestead box for every project. I personally prefer one homestead box for all projects. In the Laravel 4.2 days the Laravel documentation covered a PHP tool to easily work with a homestead box. This section has been removed in the 5.X documentation, so I assume that development of the tool has been stopped. Fortunately all functionality that the PHP tool provided can be performed by this small bash function:function vm() {
cd ~/homestead
command="$1"
if [ "$command" = "edit" ]; then
open ~/.homestead/homestead.yaml
else
if [ -z "$command" ]; then
command="ssh"
fi
eval "vagrant ${command}"
fi
#switch back to directory where command was performed in
cd -
}
When this function is loaded these commands can be executed from every directory.
- `vm up`: start the homestead machine
- `vm halt`: stop the homestead machine
- `vm`: ssh into the homestead machine
- `vm edit`: edit the yaml file in the default text editor
- `vm provision`: provision the homestead machine
Map your dotfiles directory
Terminal users often save their most used functions, aliases and general configuration in a dotfiles repository. This dotfiles-directory is generally cloned in the home folder on a development machine. When that directory is mapped to homestead as well the custom functions and aliases can be used from inside homestead.folders
- map: ~/.dotfiles
to: /home/vagrant/.dotfiles
Syncing the folder is not enough. The steps you need to perform to load the dotfiles on the host machine should be executed in homestead as well. In case of my dotfiles, the minimum that should be done is symlinking the .zshrc-file
ln -s $HOME/.dotfiles/shell/.zshrc $HOME/.zshrc
This is the result when using my dotfiles:
[caption id="attachment_1937" align="alignnone" width="1224"]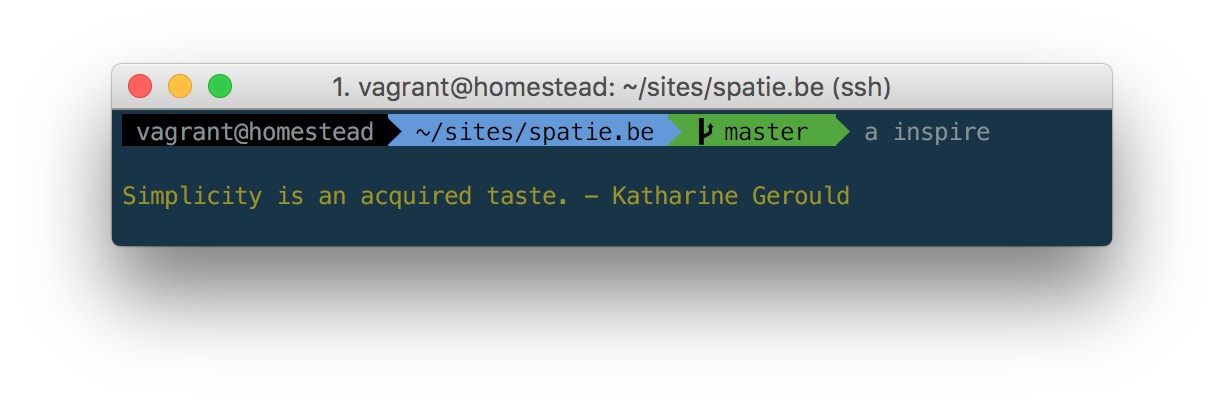 My custom zsh promt is visible inside homestead. The "a"-alias (short for "php artisan" is working)[/caption]
Do you have some homestead tips to share? Let me know in the comments below.