🚀 Mailcoach Cloud is now available: affordable email marketing for bloggers, Artisans, and entrepreneurs original
We're proud to announce that Mailcoach Cloud has been launched. Using Mailcoach, you can create beautiful email campaigns, set up drip campaigns (or any email automation), and send transactional emails.
Mailcoach works well, whether your email list has 5 or 500 000 subscribers (yes, Mailcoach has been used for lists of that size), or even more. And thanks to our sharp pricing, Mailcoach is the most affordable solution compared to our competitors in most scenarios.
Privacy-minded people will appreciate that open- and click tracking is off by default. And to people that require full GDPR compliance, we can proudly say that everything is hosted on EU servers owned by EU companies.
If you decide to subscribe, you can use this coupon code for one month free: ONEMONTHFREE. You can help us get the word out, by retweeting our launch tweet, or upvoting us on Product Hunt.
In this blog post, I'd like to share why we've built Mailcoach, how you can use it, and how we have built it.
Let's dig in!
Why we built Mailcoach Cloud
Phase one: feeling the pain
Building Mailcoach is a clear-cut case of scratching my own itch. A few years ago, I started to send a newsletter on Laravel, PHP, JavaScript, and whatever keeps me busy.
For the first few editions, I just used Mailchimp, and everything was fine. People seemed to like the content, and my subscriber base grew over 2 000. If a list grows larger than that number Mailchimp isn't free anymore, and you'll have to pay $29,99 a month.
For a business, that cost could be acceptable, but for a personal newsletter that doesn't make any revenue on its own, paying $359,88 a year is too much. For a while, I lived with this. But when my newsletter grew even more and yearly costs grew to $600, it was time to move to something else.
I found an alternative in Sendy, a self-hosted solution for sending out newsletters. It uses AWS to send emails, which is cheaper than Mailchimp. An email sent using AWS only costs $0,0001. So my yearly bill suddenly dropped from $600 to only a few dollars. Sendy doesn't look nearly as polished as Mailchimp, but the low costs for sending emails made me stick with it. For a while, everything was fine again.
As time passed by, my email list kept growing. A few months ago, my server started having problems whenever I sent out a newsletter. Until today, I'm not 100% sure what caused this problem, but I have a heavy suspicion that it was caused by the large number of incoming requests to track opens and clicks right after a newsletter was sent out.
I decided to investigate the problem inside the Sendy code base. But after opening a few source files, I quickly gave up. With all due respect to the creators of Sendy (they launched quite a successful product), this is PHP code from a different era. Each screen is handled by its own PHP file, there is PHP code mixed with raw SQL queries and HTML, and includes are used all over the place.
Immediately after looking at the Sendy source code, I thought, how hard can this problem be? I opened PhpStorm and started building my own solution.
Phase two: from a hobby project...
I tend to create an open-source solution for every problem that I encounter. My initial idea was to create a Laravel package called laravel-email-campaigns. Scratching your own itch is fun!
In the span of a few weeks, I fleshed out all functionality. Sending the mails via external email service providers (like SES, Postmark, etc...), tracking opens, tracking links, tracking unsubscribes, and so on... I don't want to take all the credit for it. I got feedback on the open-source parts from my colleagues, which improved the package.
At the start of October 2019, I thought the package was done, so before actually releasing it, I started using it myself for a couple of things. At that time, there was no UI; everything had to be done in code. This quickly became old, so I started working on a UI.
Maybe it's because I lack experience, but generally, I feel that creating a UI is much more work than coding up backend logic. People on my team can do a much better job than me, so I asked for their help.
Phase three: ... to a full product
Even for my front-end colleagues, creating a beautiful, polished UI can take quite some time. It was clear that if this package remained open-source, it would take a very long time to complete. So, we decided to make a full-fledged product. laravel-email-campaigns is an OK package name, but it falls short as a product name that speaks to the imagination. My colleague Willem came up with the name Mailcoach, and he built a small promotional site that we shared with the world.
And on the 30th of January 2020, Mailcoach was released as a Laravel package capable of transforming any Laravel app into an affordable email marketing platform.
Phase four: to the stars, errr... cloud and beyond!
When you launch a new product, no matter how much heart or marketing effort you put into it, you're never sure if it'll be a success or not.
Mailcoach proved to be a big success. It's one of our best-selling products at Spatie, with thousands of licenses sold. This success allowed us to continue improving Mailcoach. The initial version of Mailcoach only covered sending newsletters. In subsequent releases, we added many cool features such as email automation (so you can send drip campaigns), support for transactional mail, integration with more email service providers, and many refinements.
As Mailcoach got more known over time, interest in Mailcoach by non-technical people grew. PHP / Laravel developers had no problems getting started with Mailcoach, but Mailcoach was hard to install for people without a technical background.
We tried to accommodate the non-technical people by offering a pre-configured Laravel app and a 1-click Digital Ocean Droplet installer. Still, this was a bridge too far for people not comfortable spinning up servers.
That's why we decided to go all-in and started building the hosted version of Mailcoach, which we call Mailcoach Cloud.
The self-hosted version of Mailcoach (spatie/laravel-mailcoach) is already battle-tested by thousands of users, so we wanted to use that as a foundation for our new servers. Behind the scenes, Mailcoach Cloud uses the spatie/laravel-mailcoach at its core. To make laravel-mailcoach work in the context of multiple users and teams, Mailcoach Cloud uses our own multitenancy package. Later in this post, I'll give some more details on how Mailcoach works behind the scenes.
Getting started with Mailcoach
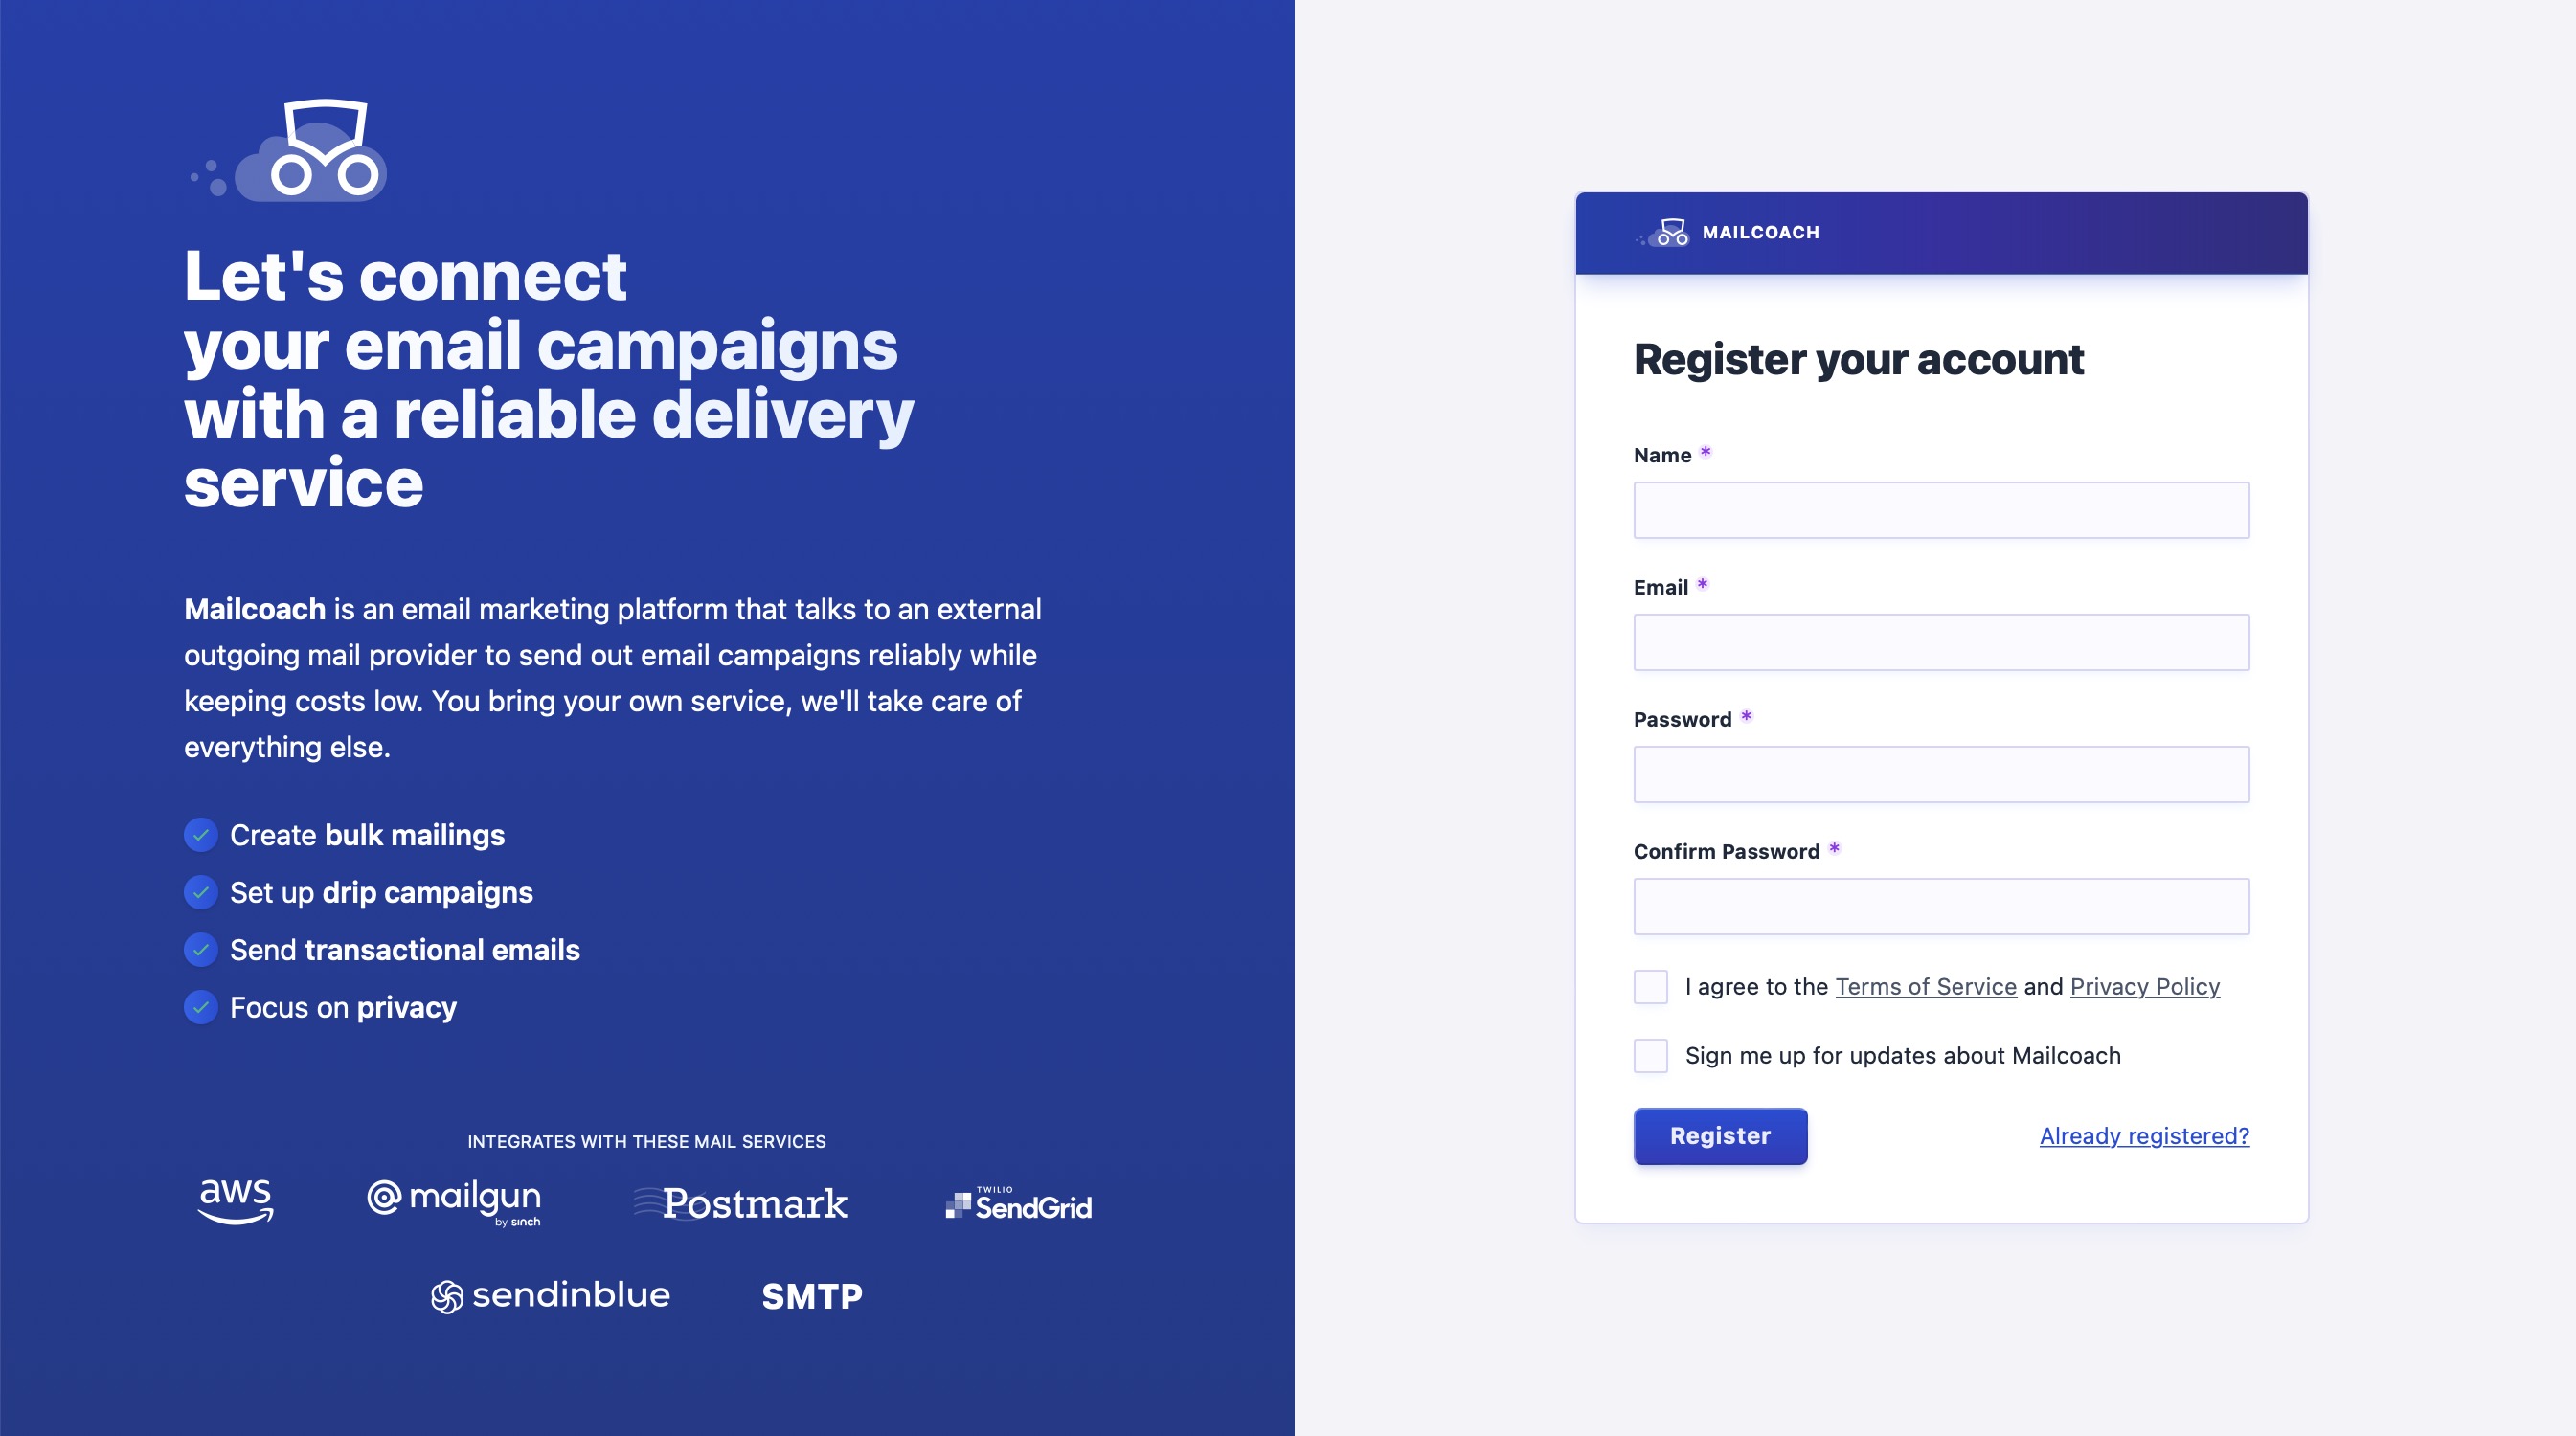
Let's take Mailcoach for a spin! If you want to try it out for yourself, register your account to start a free trial.
Sending email campaigns
Our Mailcoach Cloud project aims to make it easy, even for non-technical people, to get started using Mailcoach. After registering your account, we'll guide you through the entire process using a little checklist.
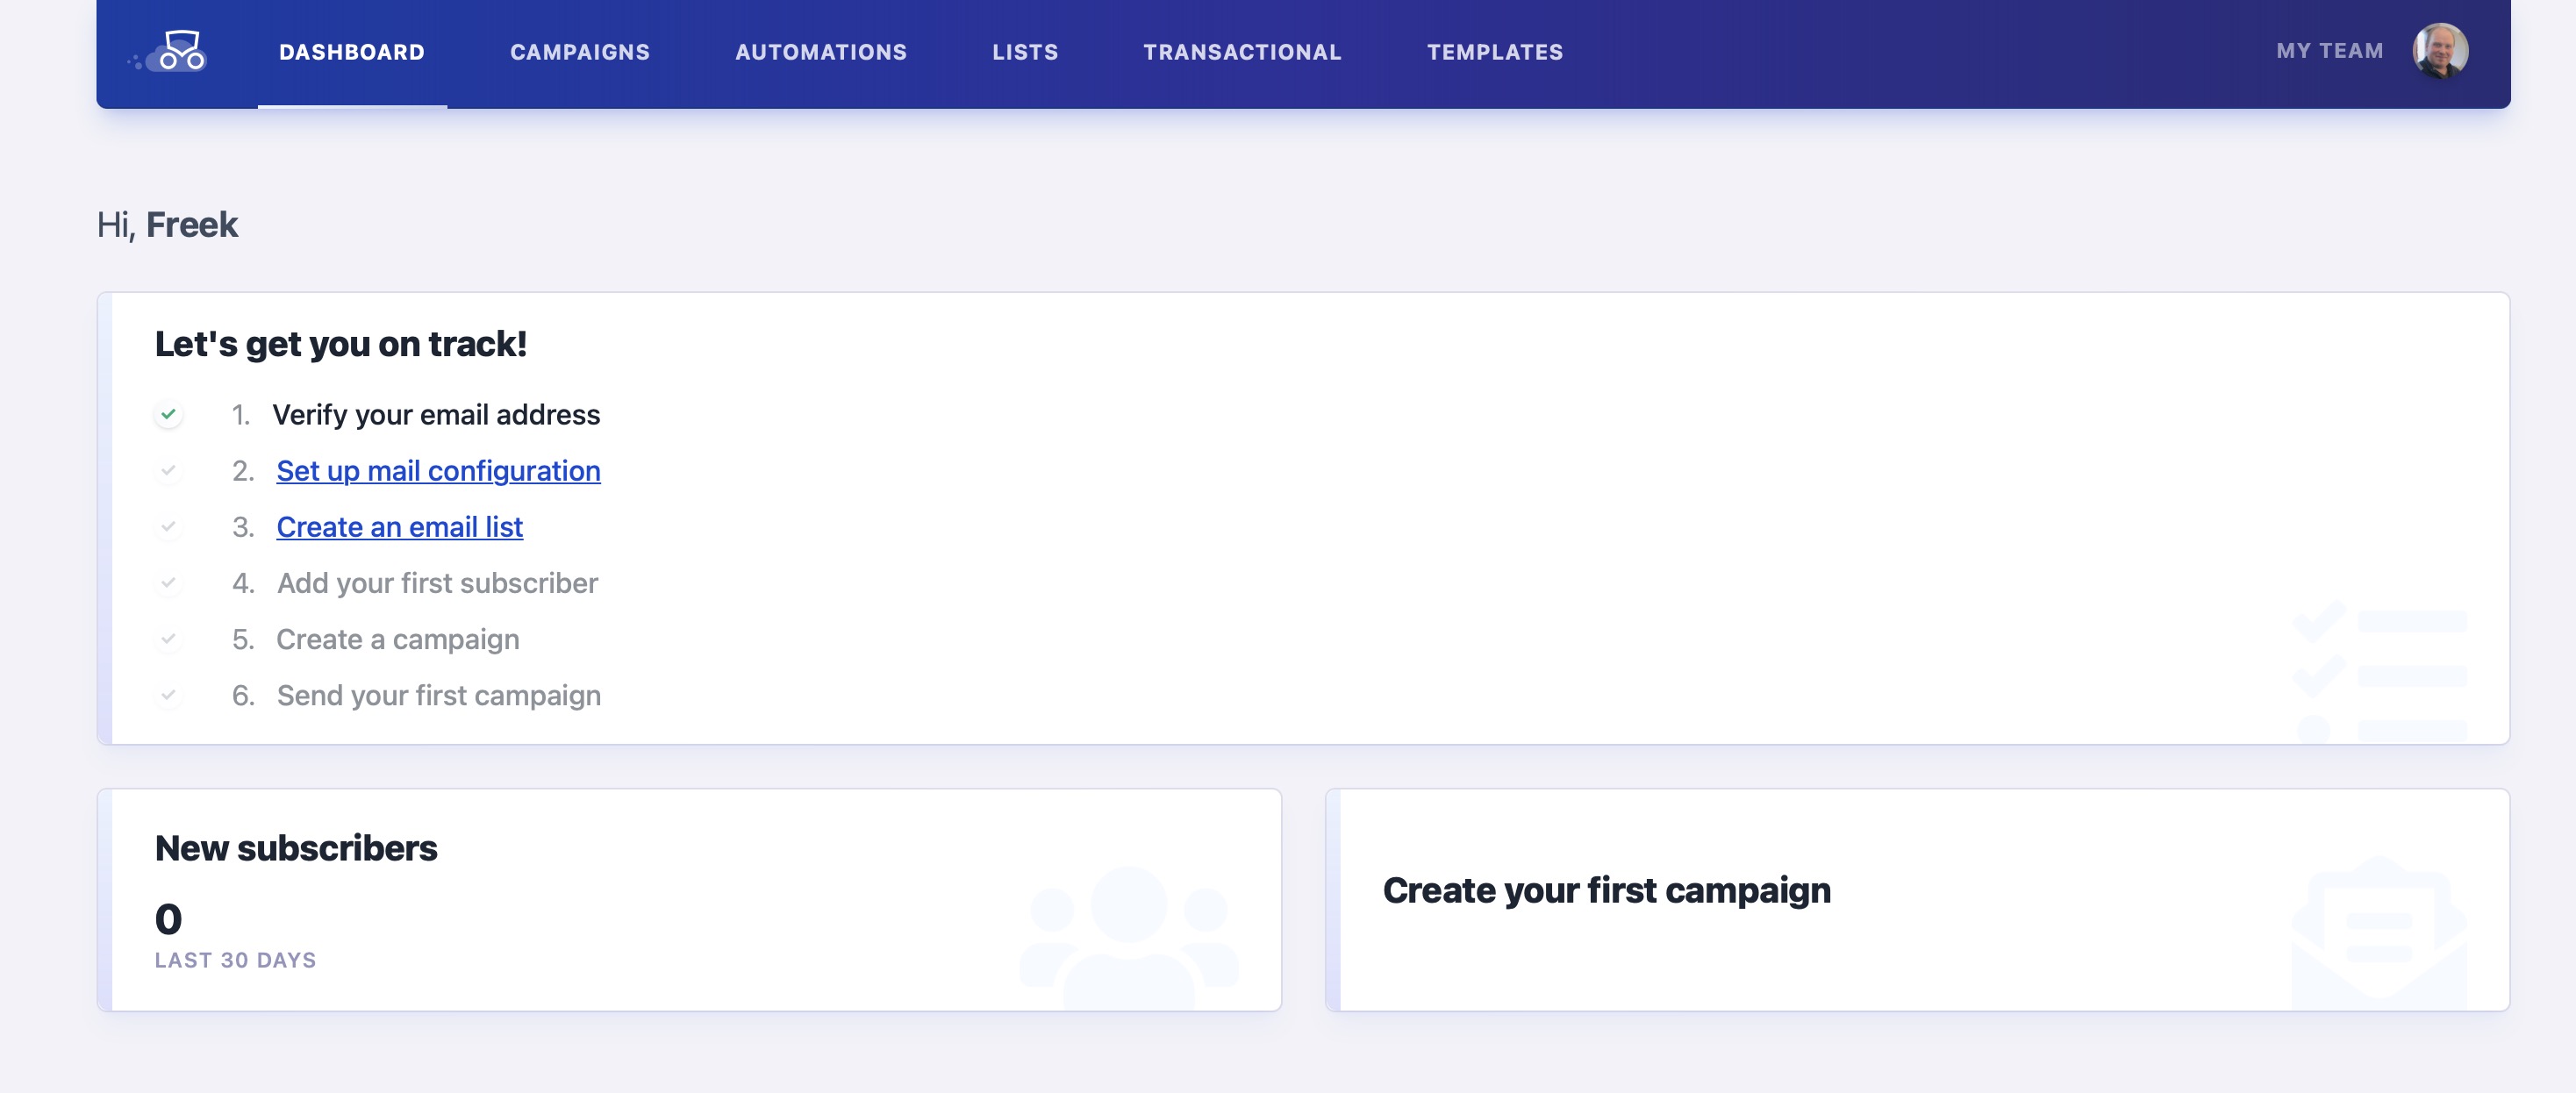
The first thing that we require is that you verify your email address. We'll send you a mail that contains a link that you should click. That's it!
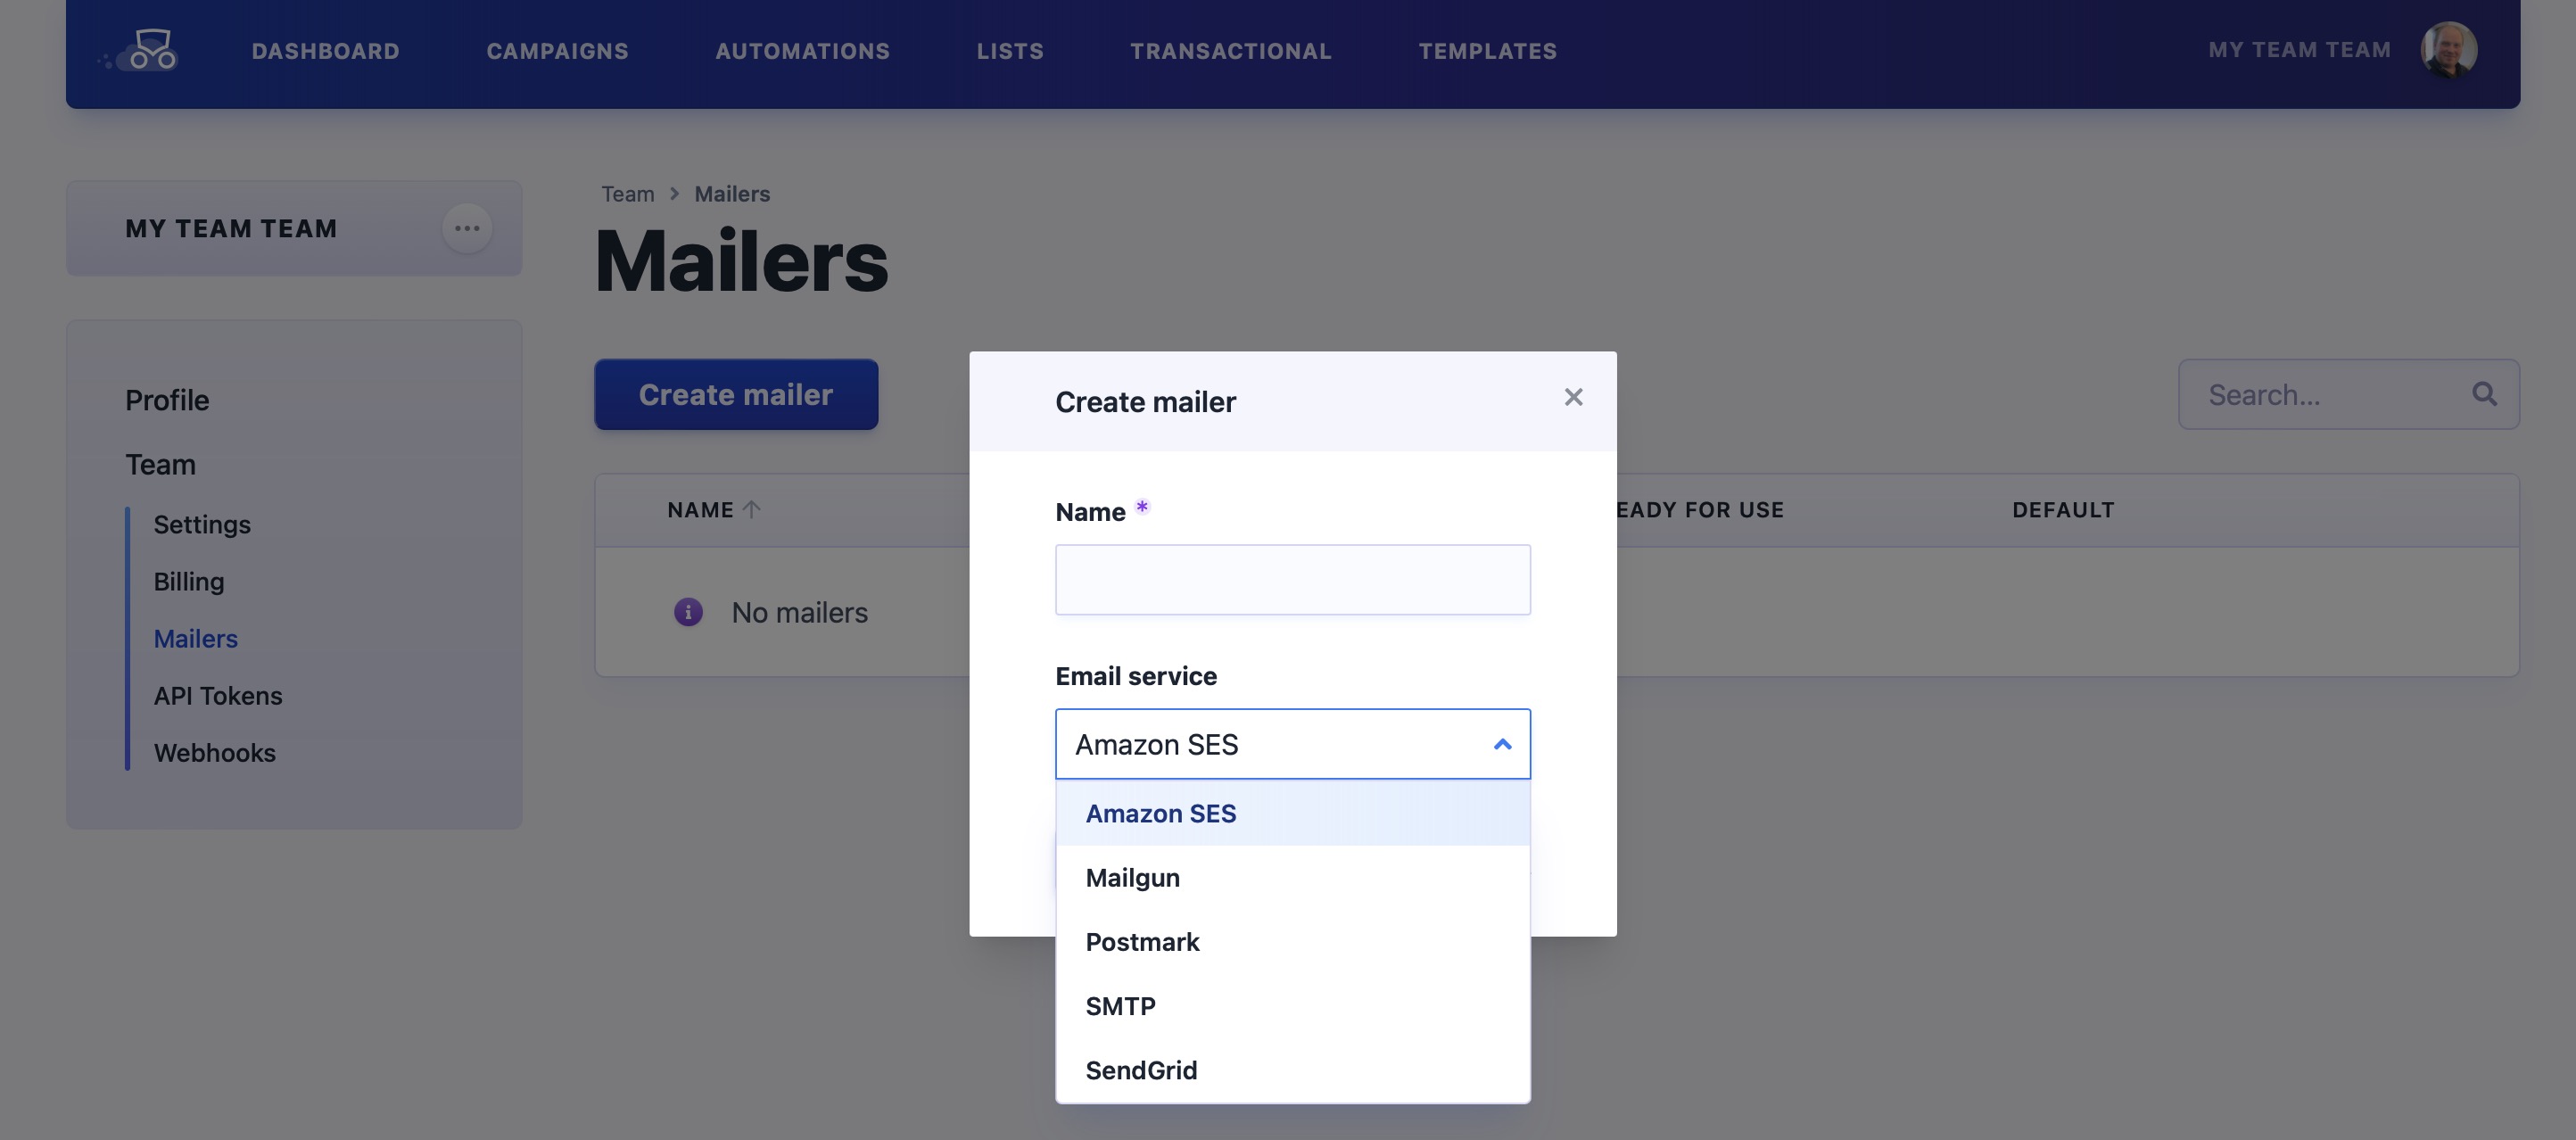
Mailcoach sends all emails through your account of an email sending service such as Amazon SES, Mailgun, Postmark, ... In our UI, you can connect your email sending service account to Mailcoach by creating a mailer. When creating a Mailer, you'll have to give it a name and choose the email service you want to use.
After a mailer has been created, it should be configured. You can follow the steps of the wizard shown.
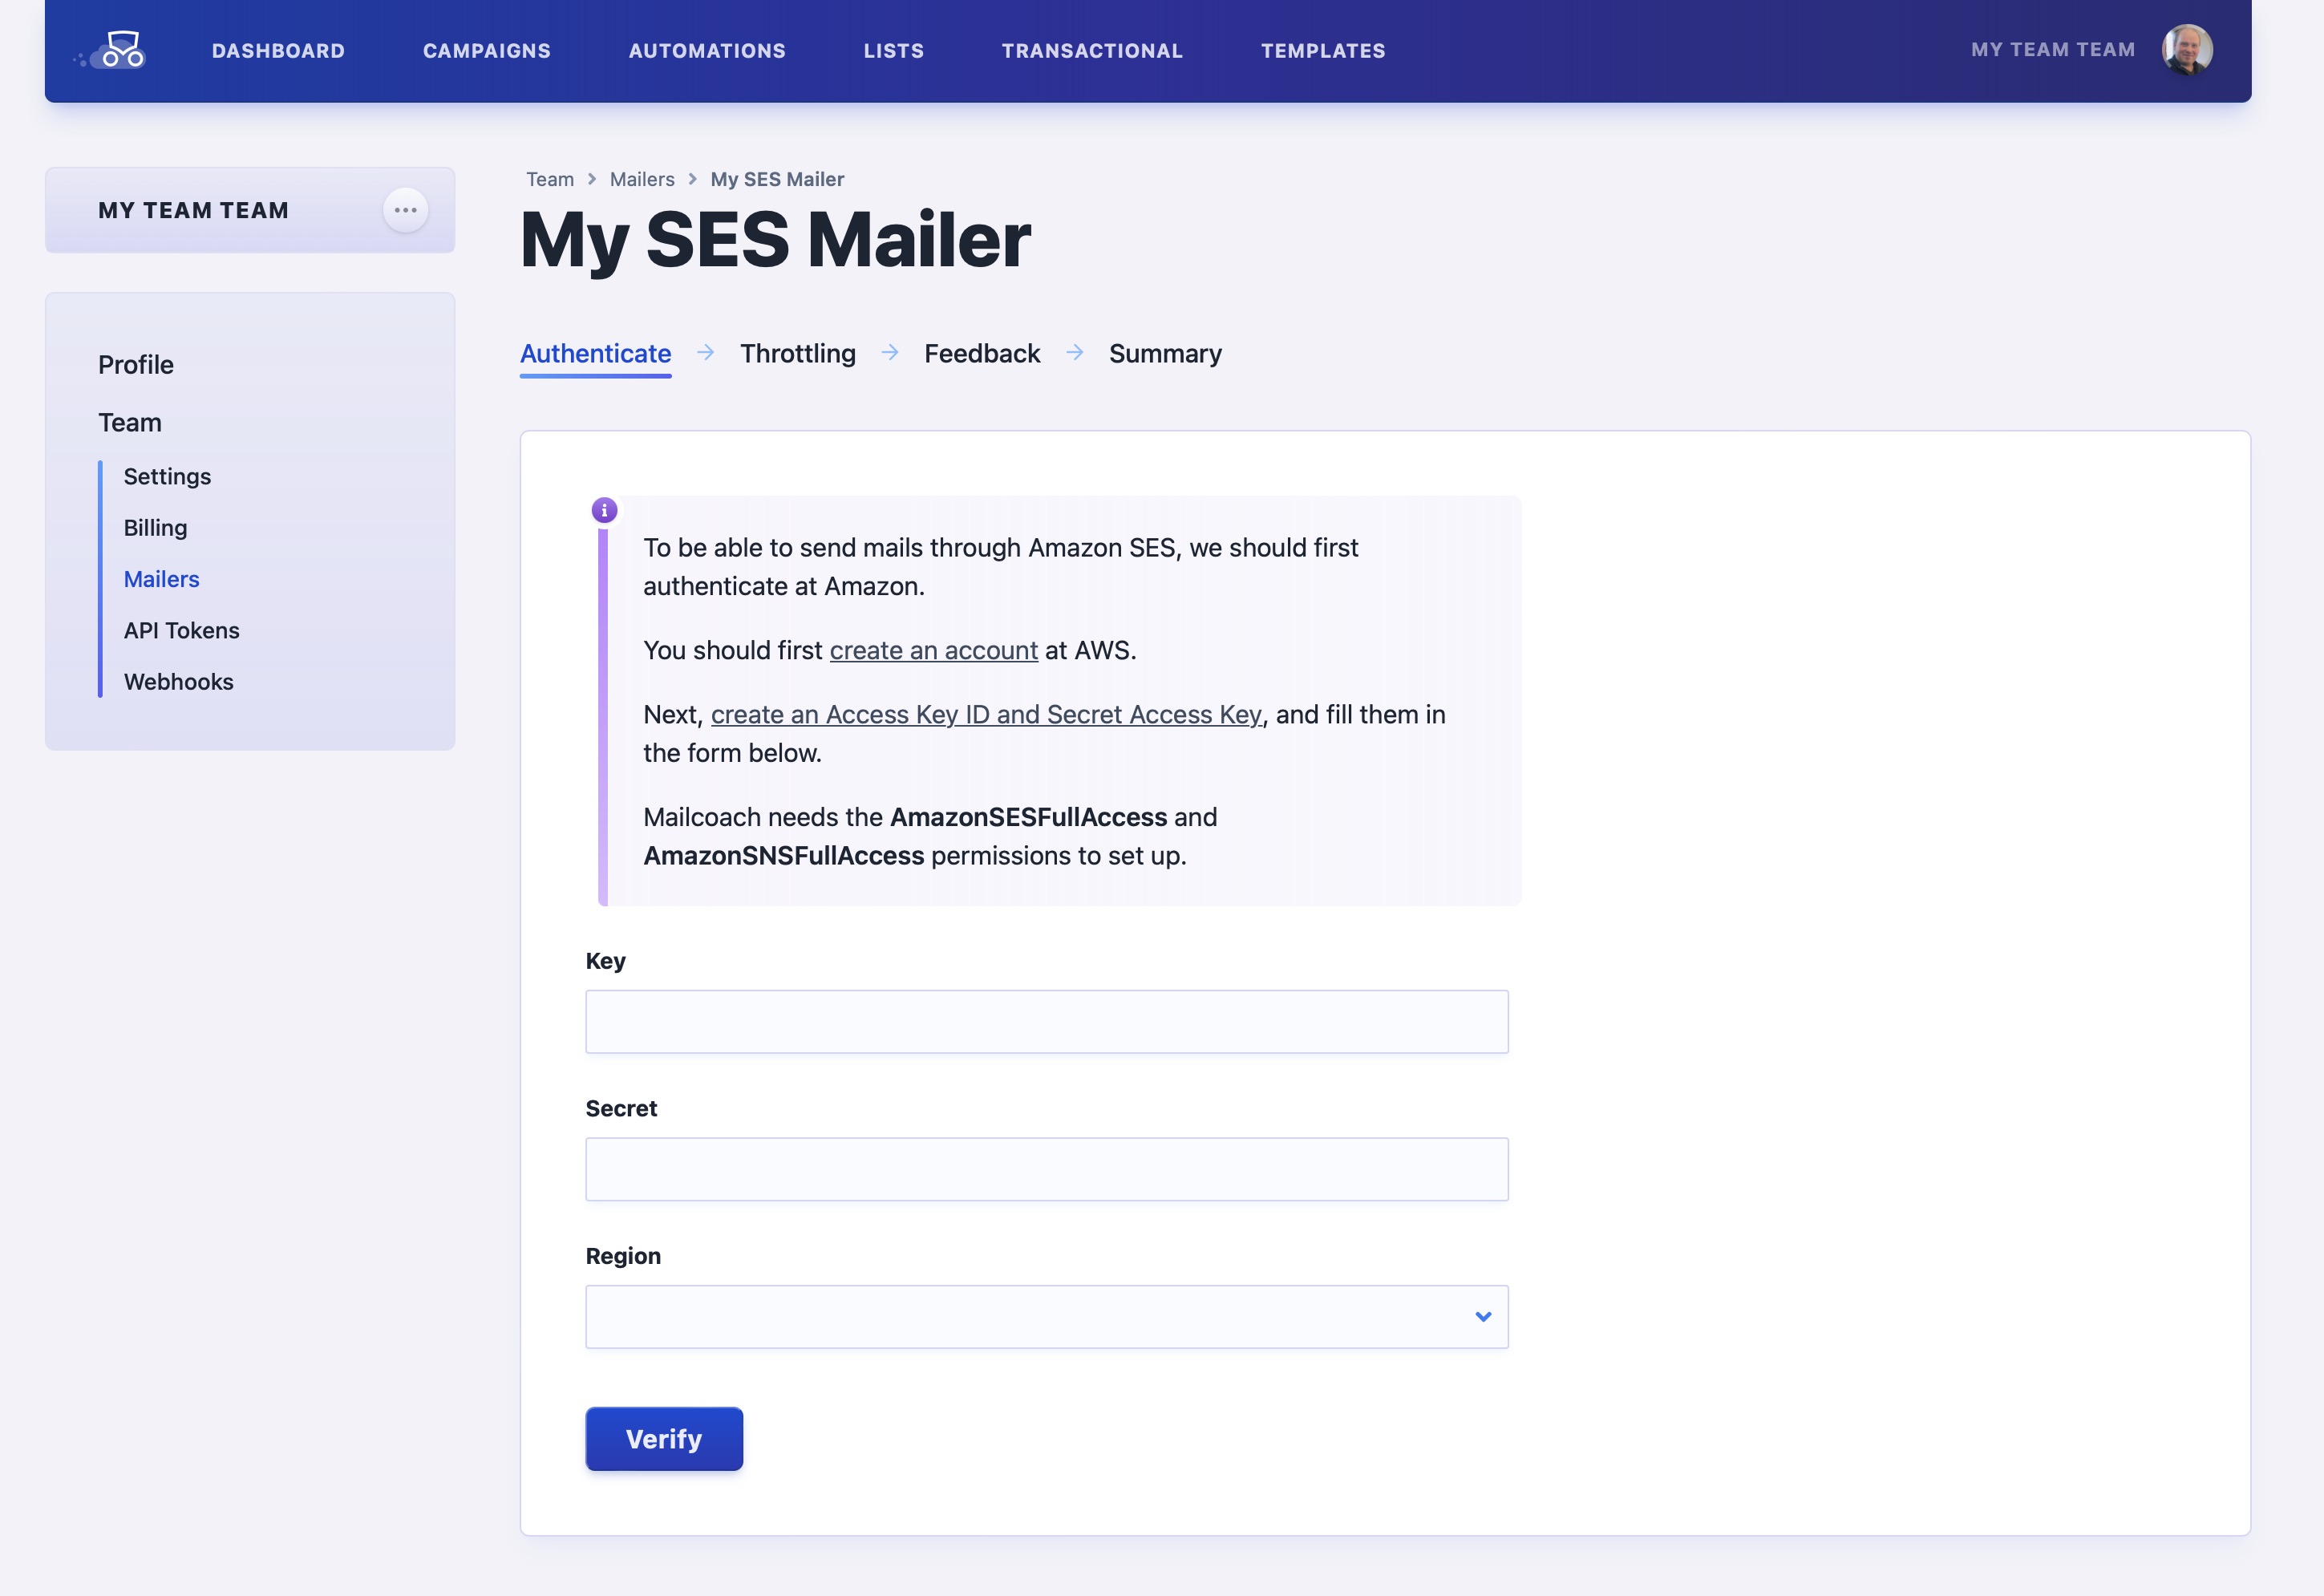
There's a dedicated wizard for each particular email service. We've made a lot of effort to make these wizards as easy as possible. All these wizards will ask to create an API key that we will use to automatically configure your external account for use with Mailcoach. We'll guide you through the process, and no deep technical knowledge is needed.
Most email services can track opens and clicks. In our wizard, you can optionally turn on this feature. When enabled, the email sending service will report open and clicks to Mailcoach. We'll present them in a nice graph.
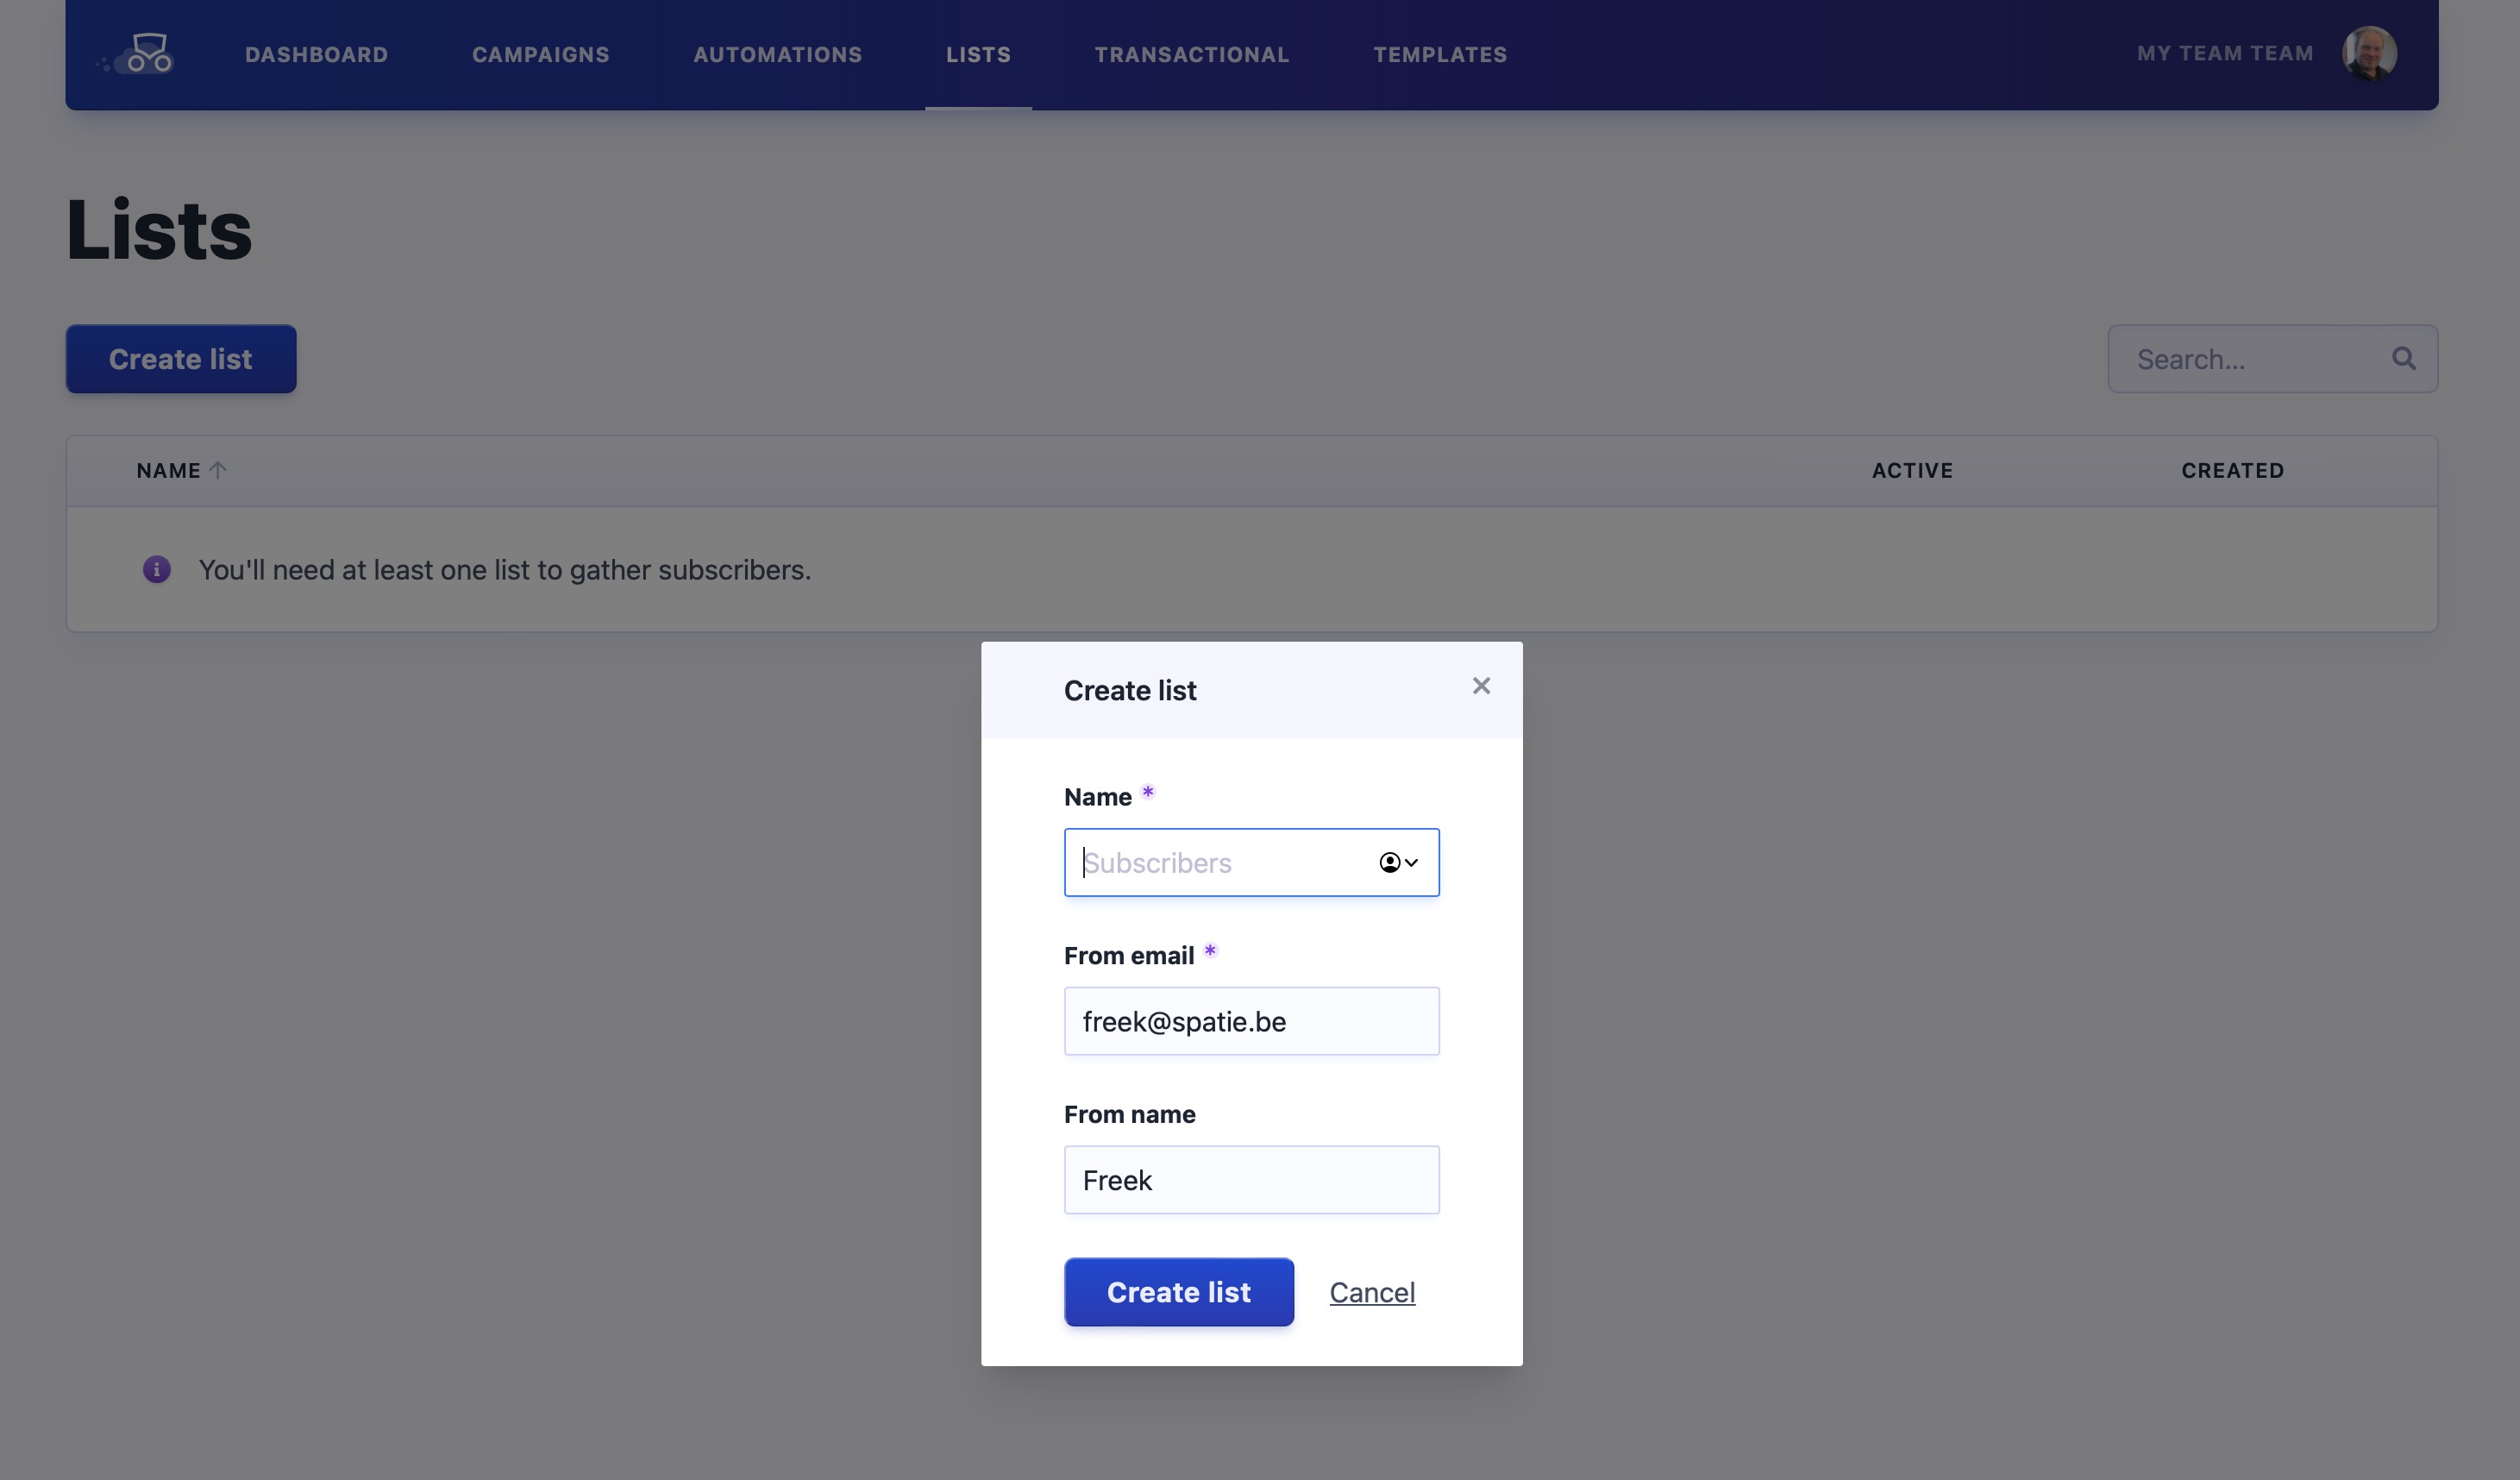
After creating a mailer, you can create an email list in the "Audience" section. An email list is a collection of email addresses you will send a campaign to. When creating a list, you must specify a name and the email address from which you will send emails. In most cases, you'll want to use the same address you used to set up the mailer.
You'll probably want to add actual subscribers to your list. You can do this in various ways using a subscription form (and yes we support double opt-in). You can also mass import subscribers via a CSV/Excel. Alternatively, you could also use the API to add subscribers.
With all that setup work done, we can start creating a campaign. When you create a campaign, you'll have to name it, specify the email list you want to send it to, and the template you want to use.
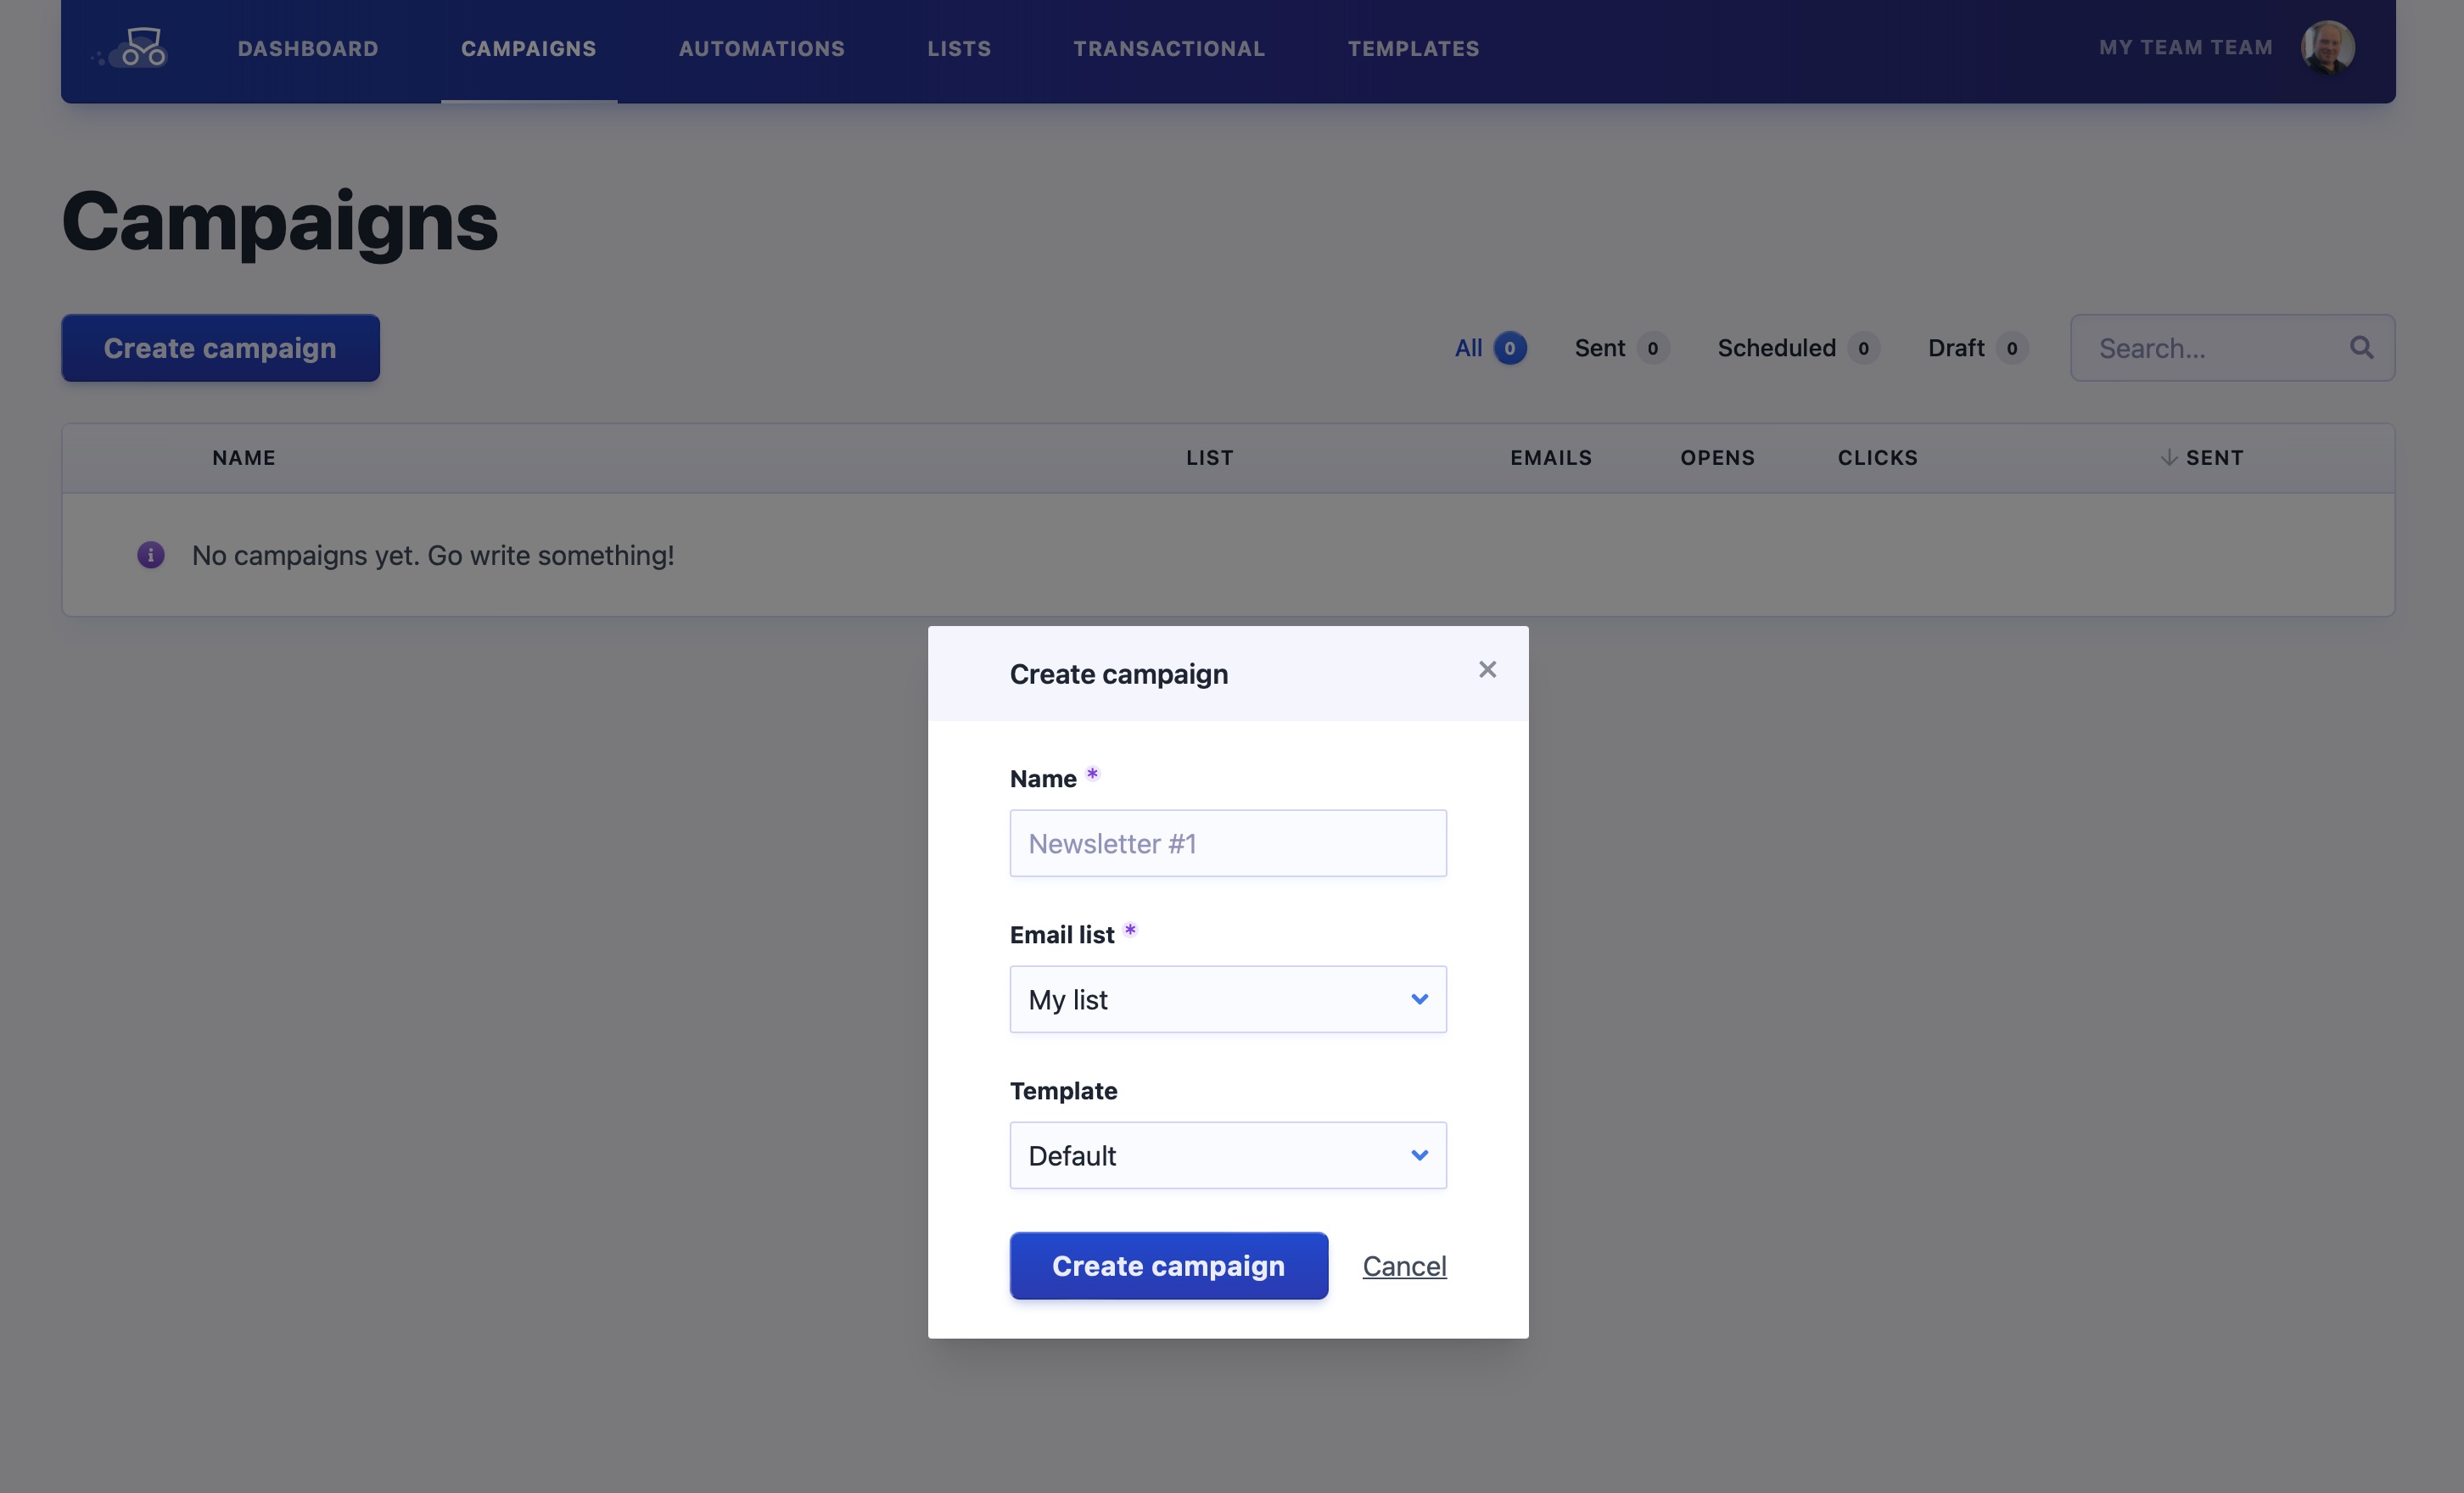
By default, you'll get our "Default" template, ensuring that all basic styling looks nice. In fact, for my own newsletter I'm using that "Default" template too.
After creating the campaign, you'll be on the settings screen. The settings have sane defaults (you can learn more about each setting in the documentation. The only thing that you might want to customize now is the "Subject" field, which will be used as the subject of your campaign.
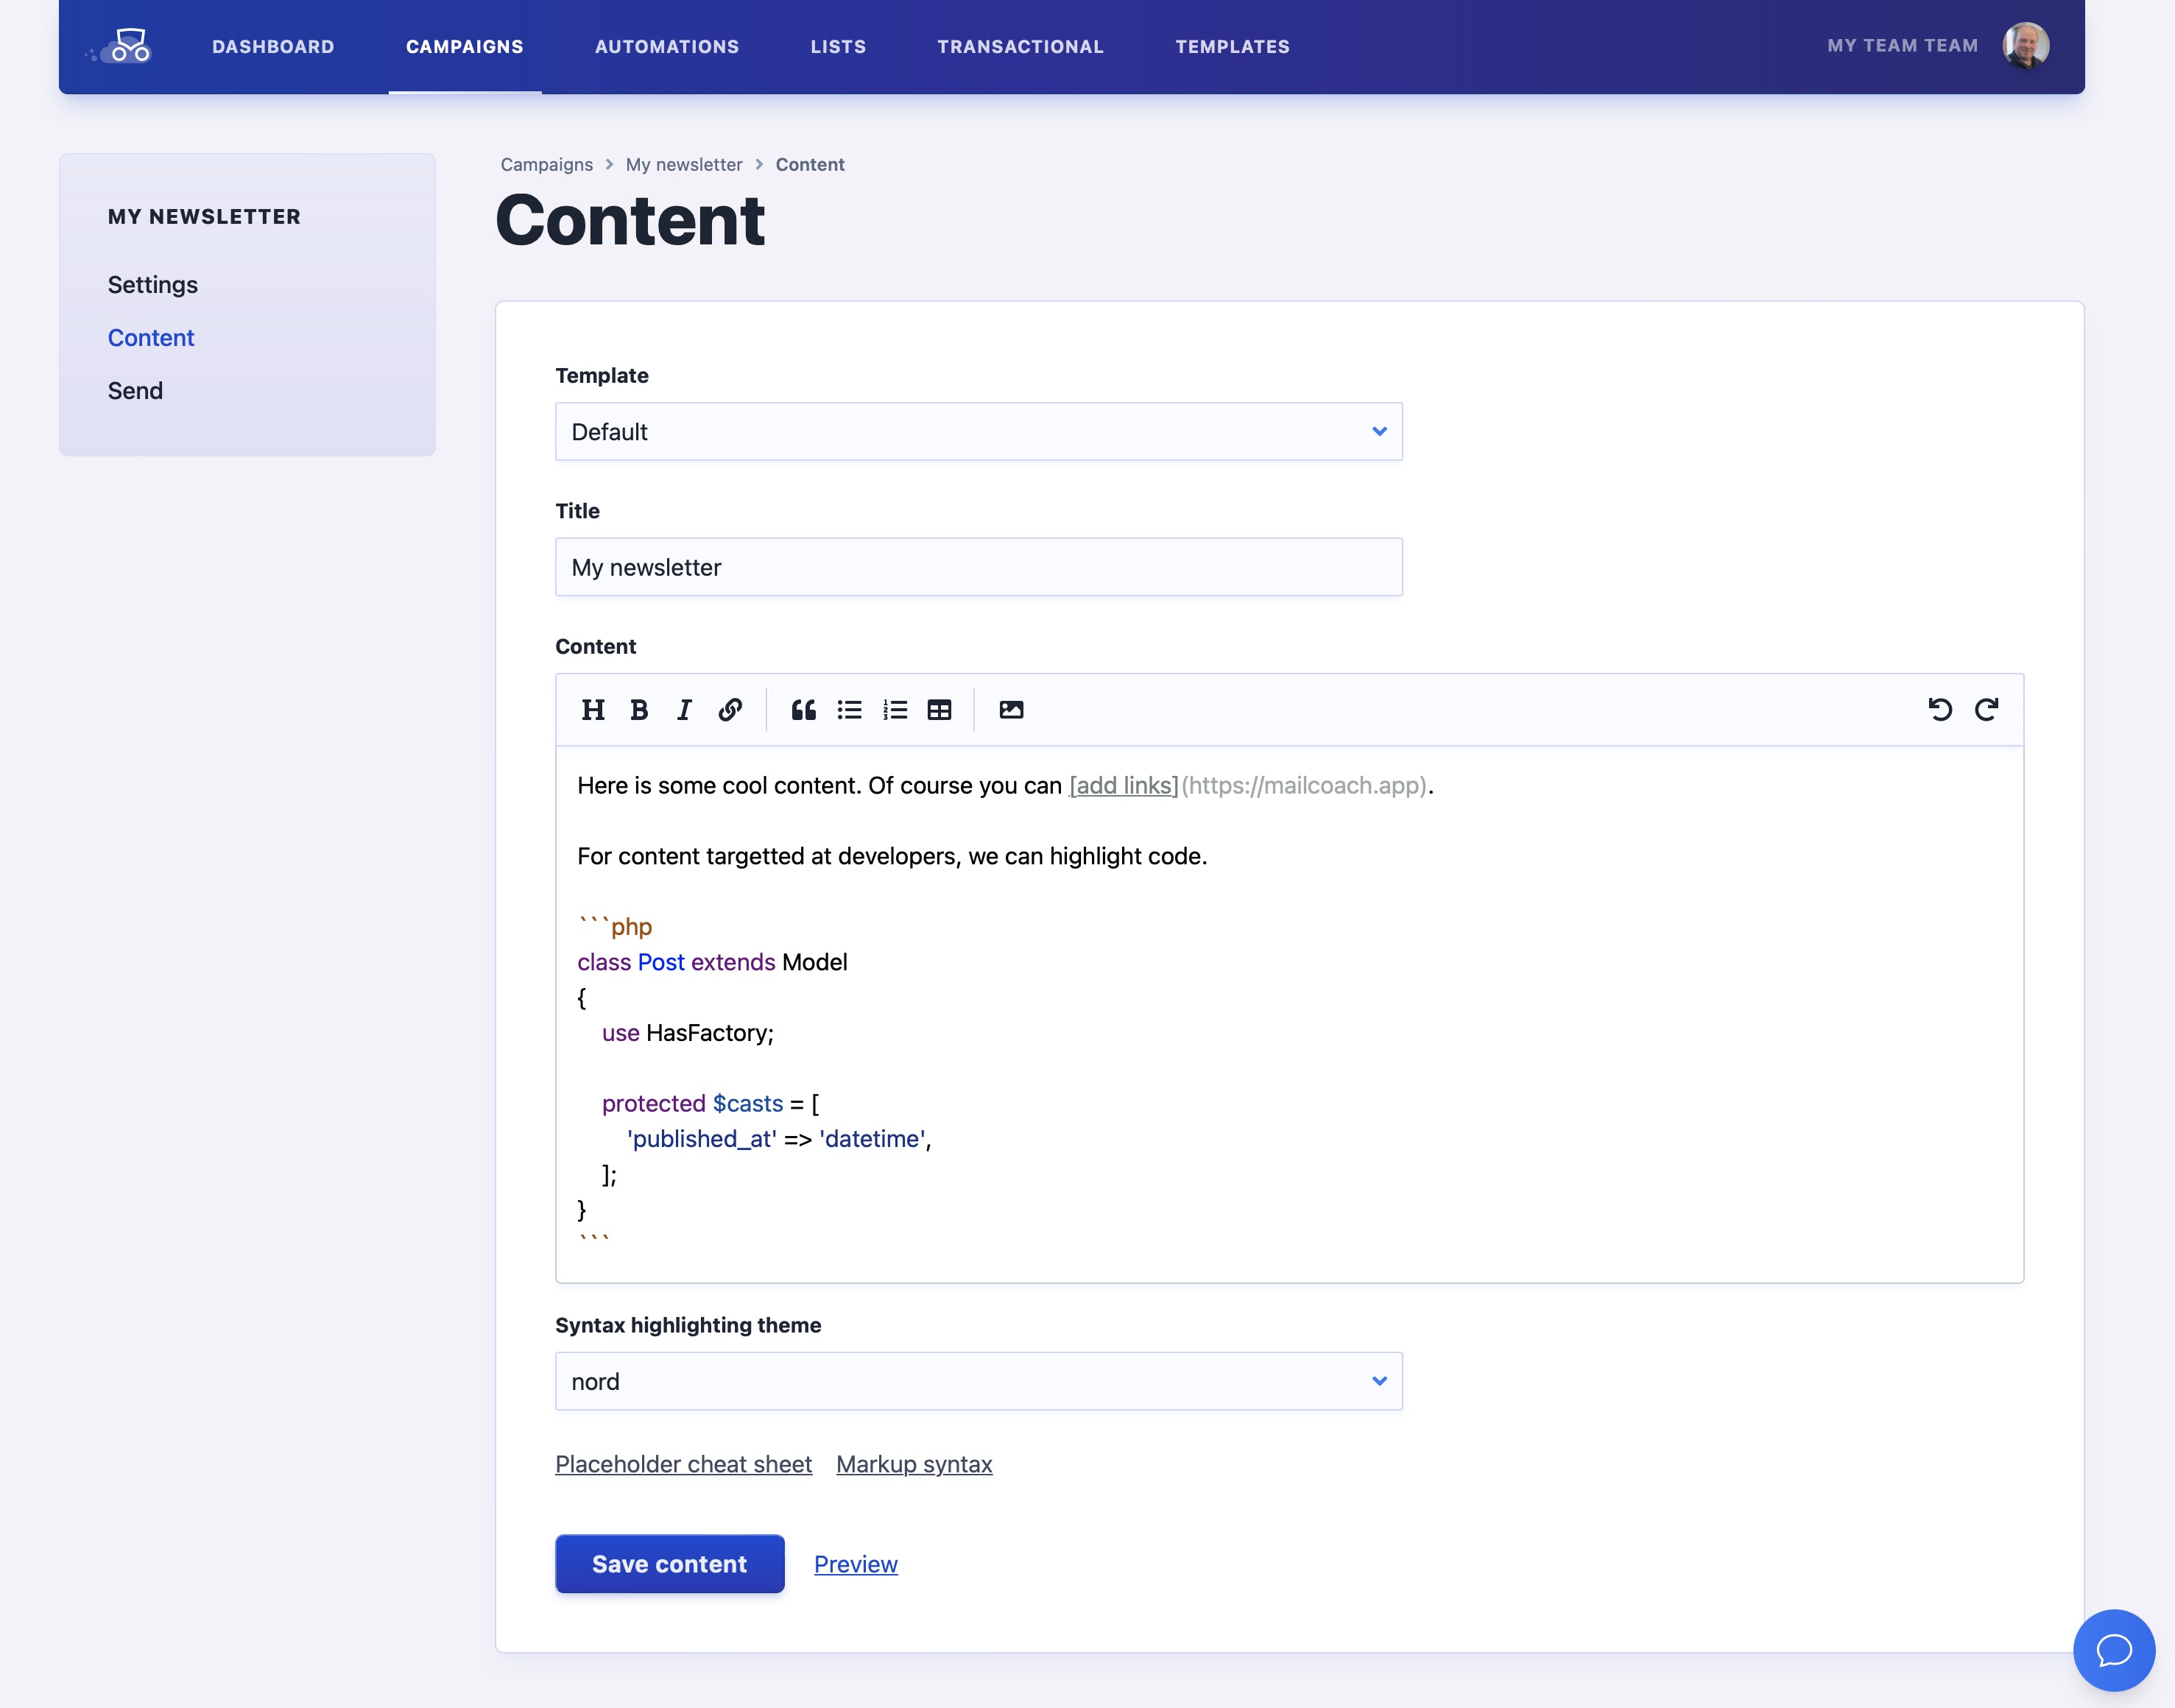
On the content screen, you can start writing the content of your campaign. In this screenshot, you'll see the Markdown editor being used.
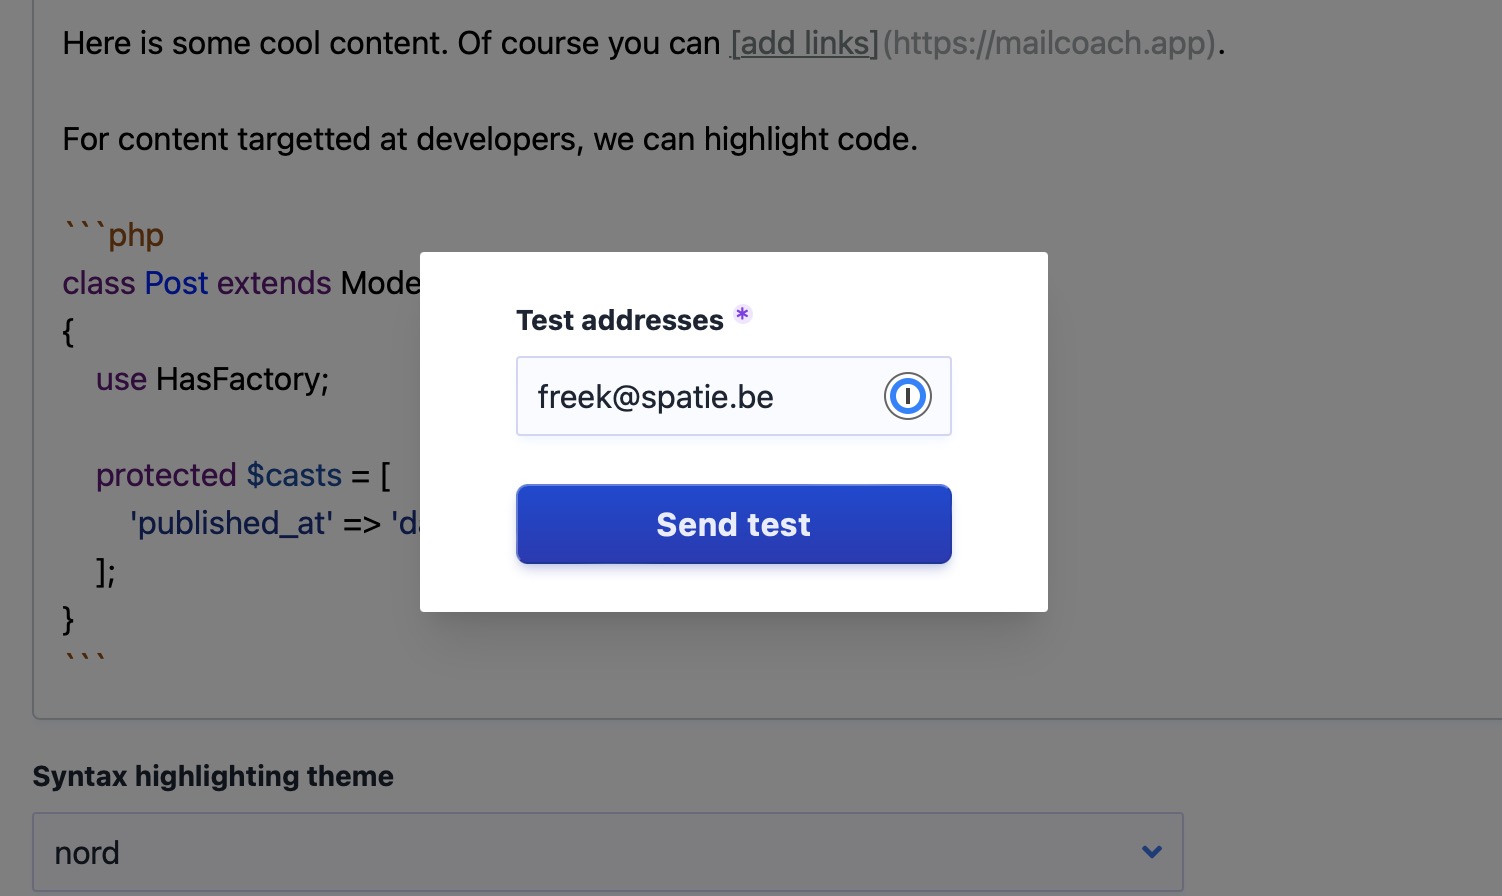
You can click "preview" to see a preview of the content in your browser. Click "Save and send test" to send a test mail to an email address so you can see what it looks like in an actual email client.
Next, we come to the show's highlight: sending a campaign. On the "Send" screen, you can get a final summary of your campaign. In the timing section, you can opt to send your campaign at a later date.
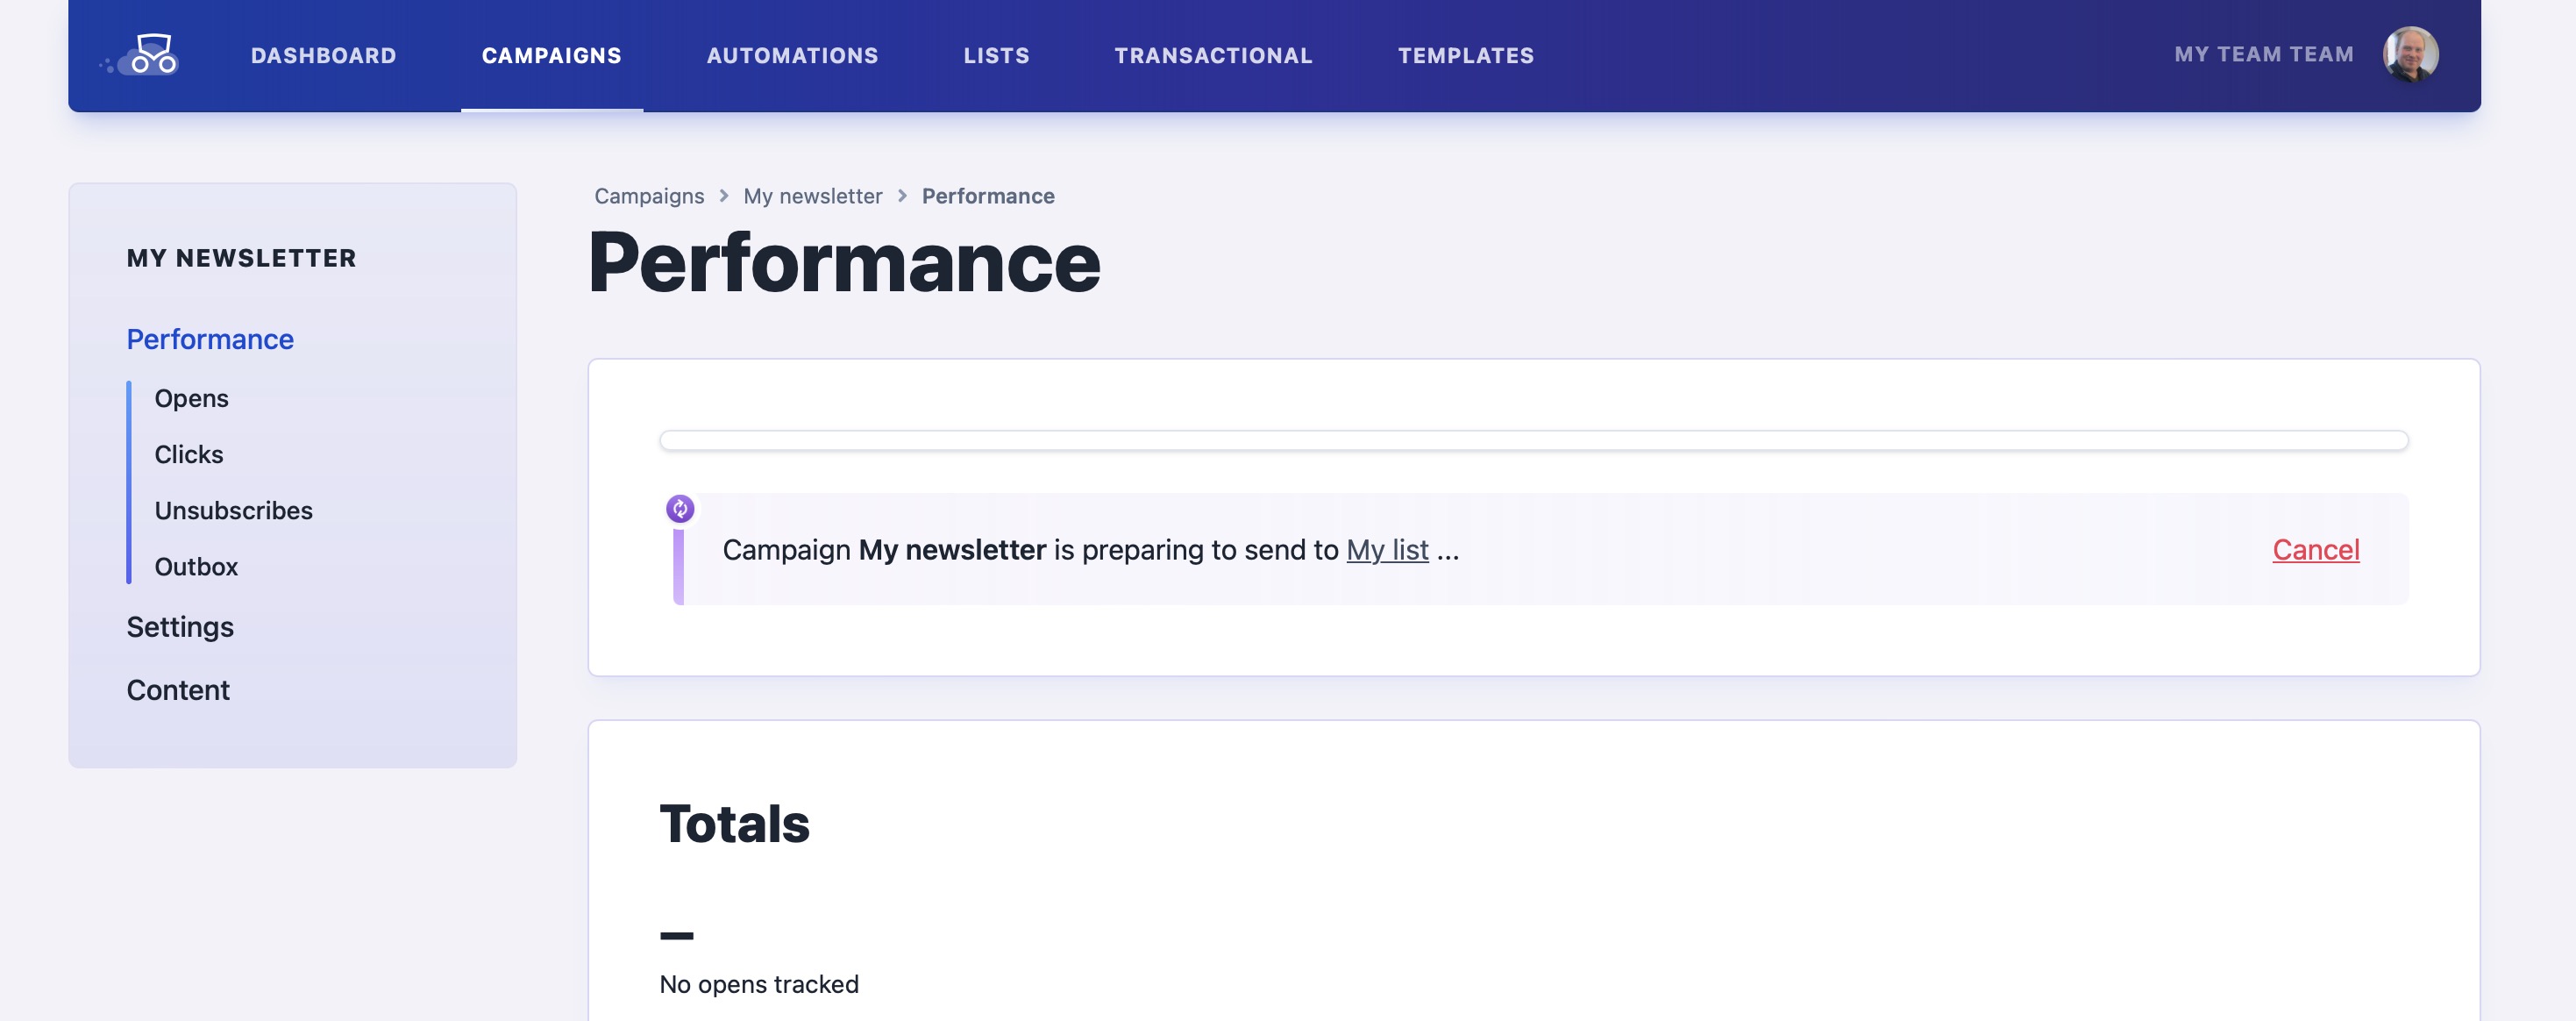
Click "Send now", and confirm, and we'll send your content to all your list subscribers.
Sending a campaign can take a couple of minutes. After that, you'll see the statistics of your campaign. Here's a screenshot from an actual campaign we sent.

Exploring automations
Another tentpole feature of Mailcoach is the ability to automate emails. You can use this feature for simple stuff, such as sending a welcome mail whenever somebody subscribes to your email list. It can also create a drip campaign that sends out daily emails to subscribers. Automation can also be used for a multi-step process that sends different emails based on previously opened emails and/or clicked links.
Let's look at the most simple scenario: sending a welcome mail to anyone subscribing to your list. First, you must create the automation.
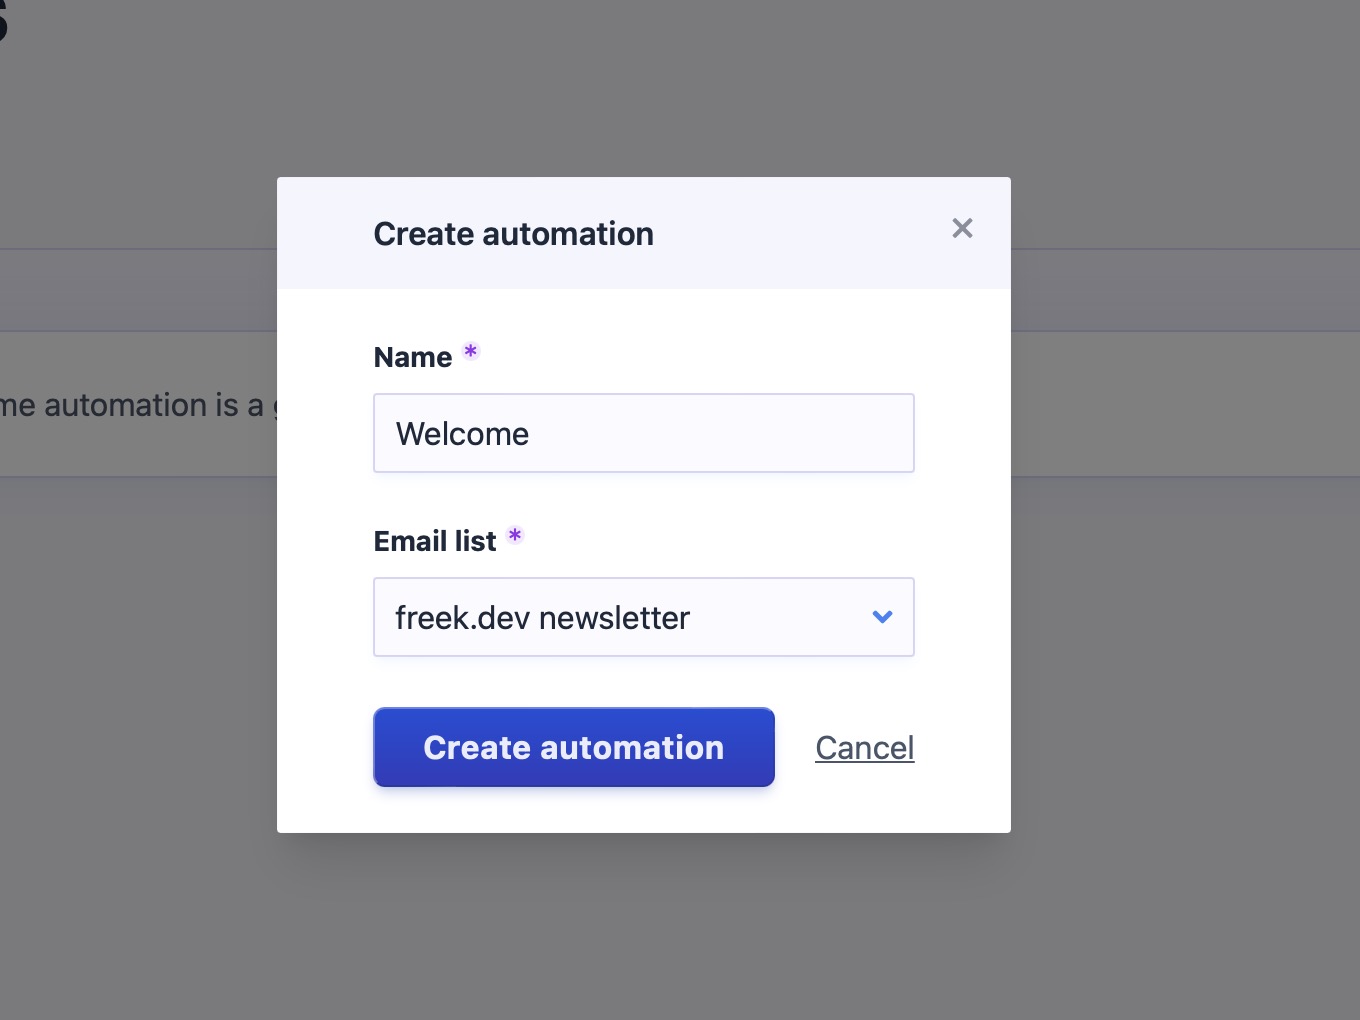
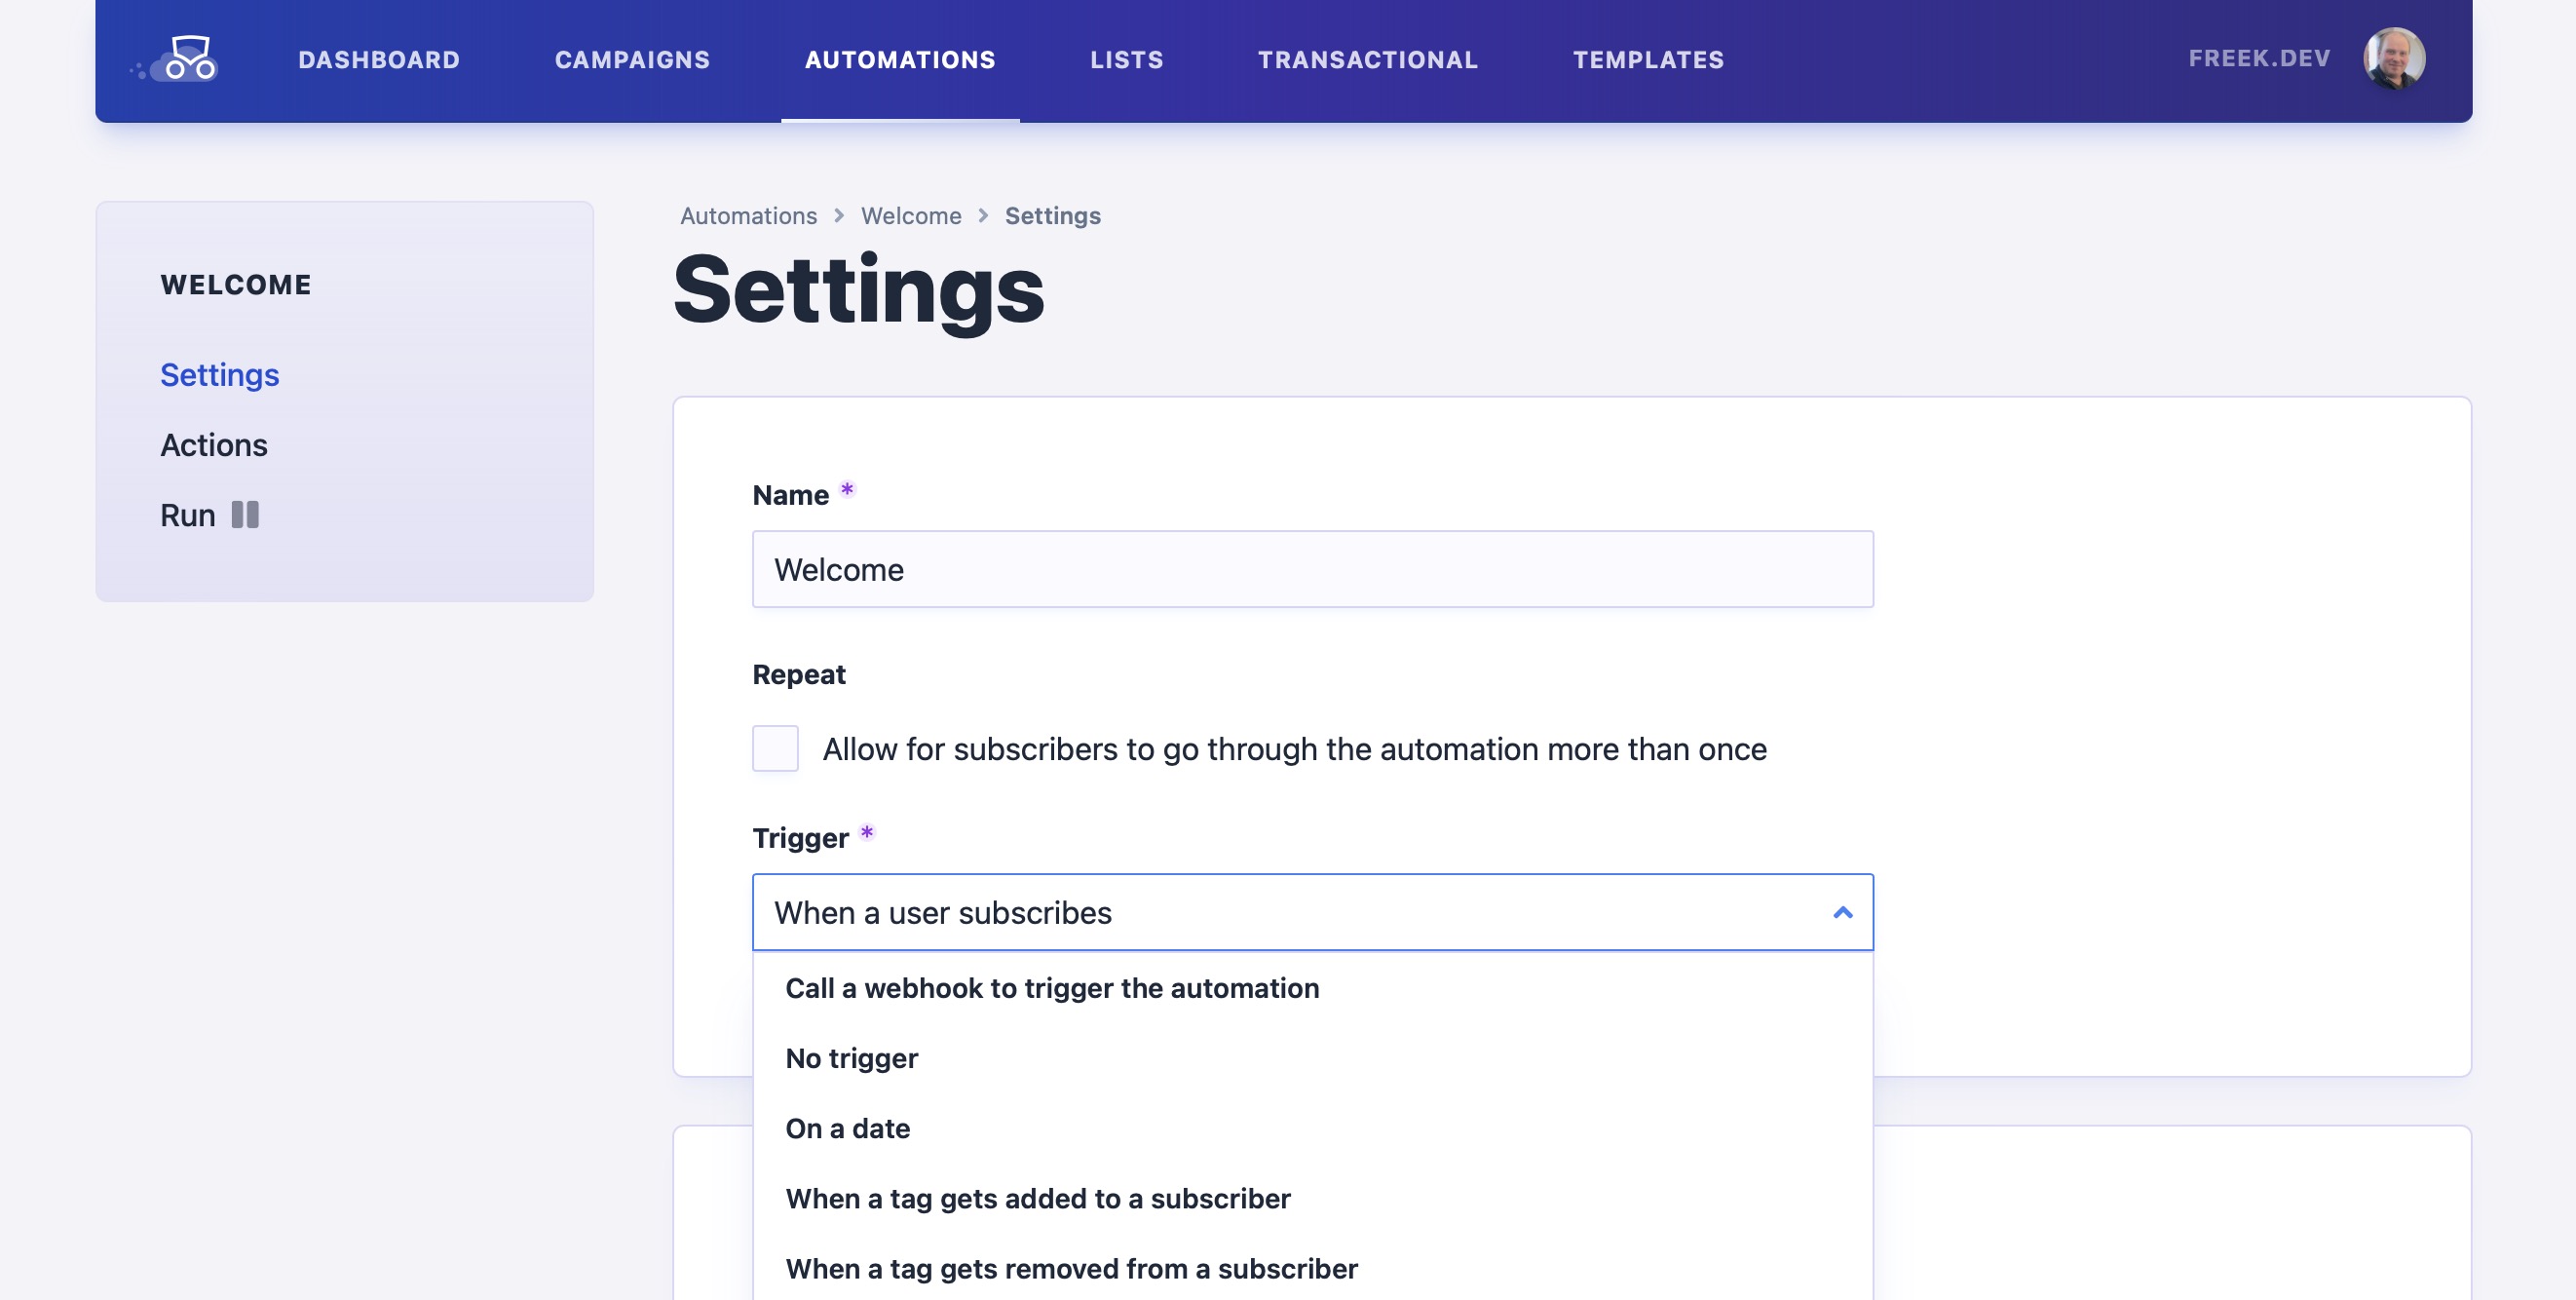
Next, you can specify when this automation should be running in the settings of the new automation. I've chosen "When a user subscribes". You can see that there are some other options as well.
After that, let's create the mail we'll use in the automation. This can be done in the Automations > Email section.

Let's now use that mail in our automation. On the "Actions" section of an automation, you can define the things that should happen.
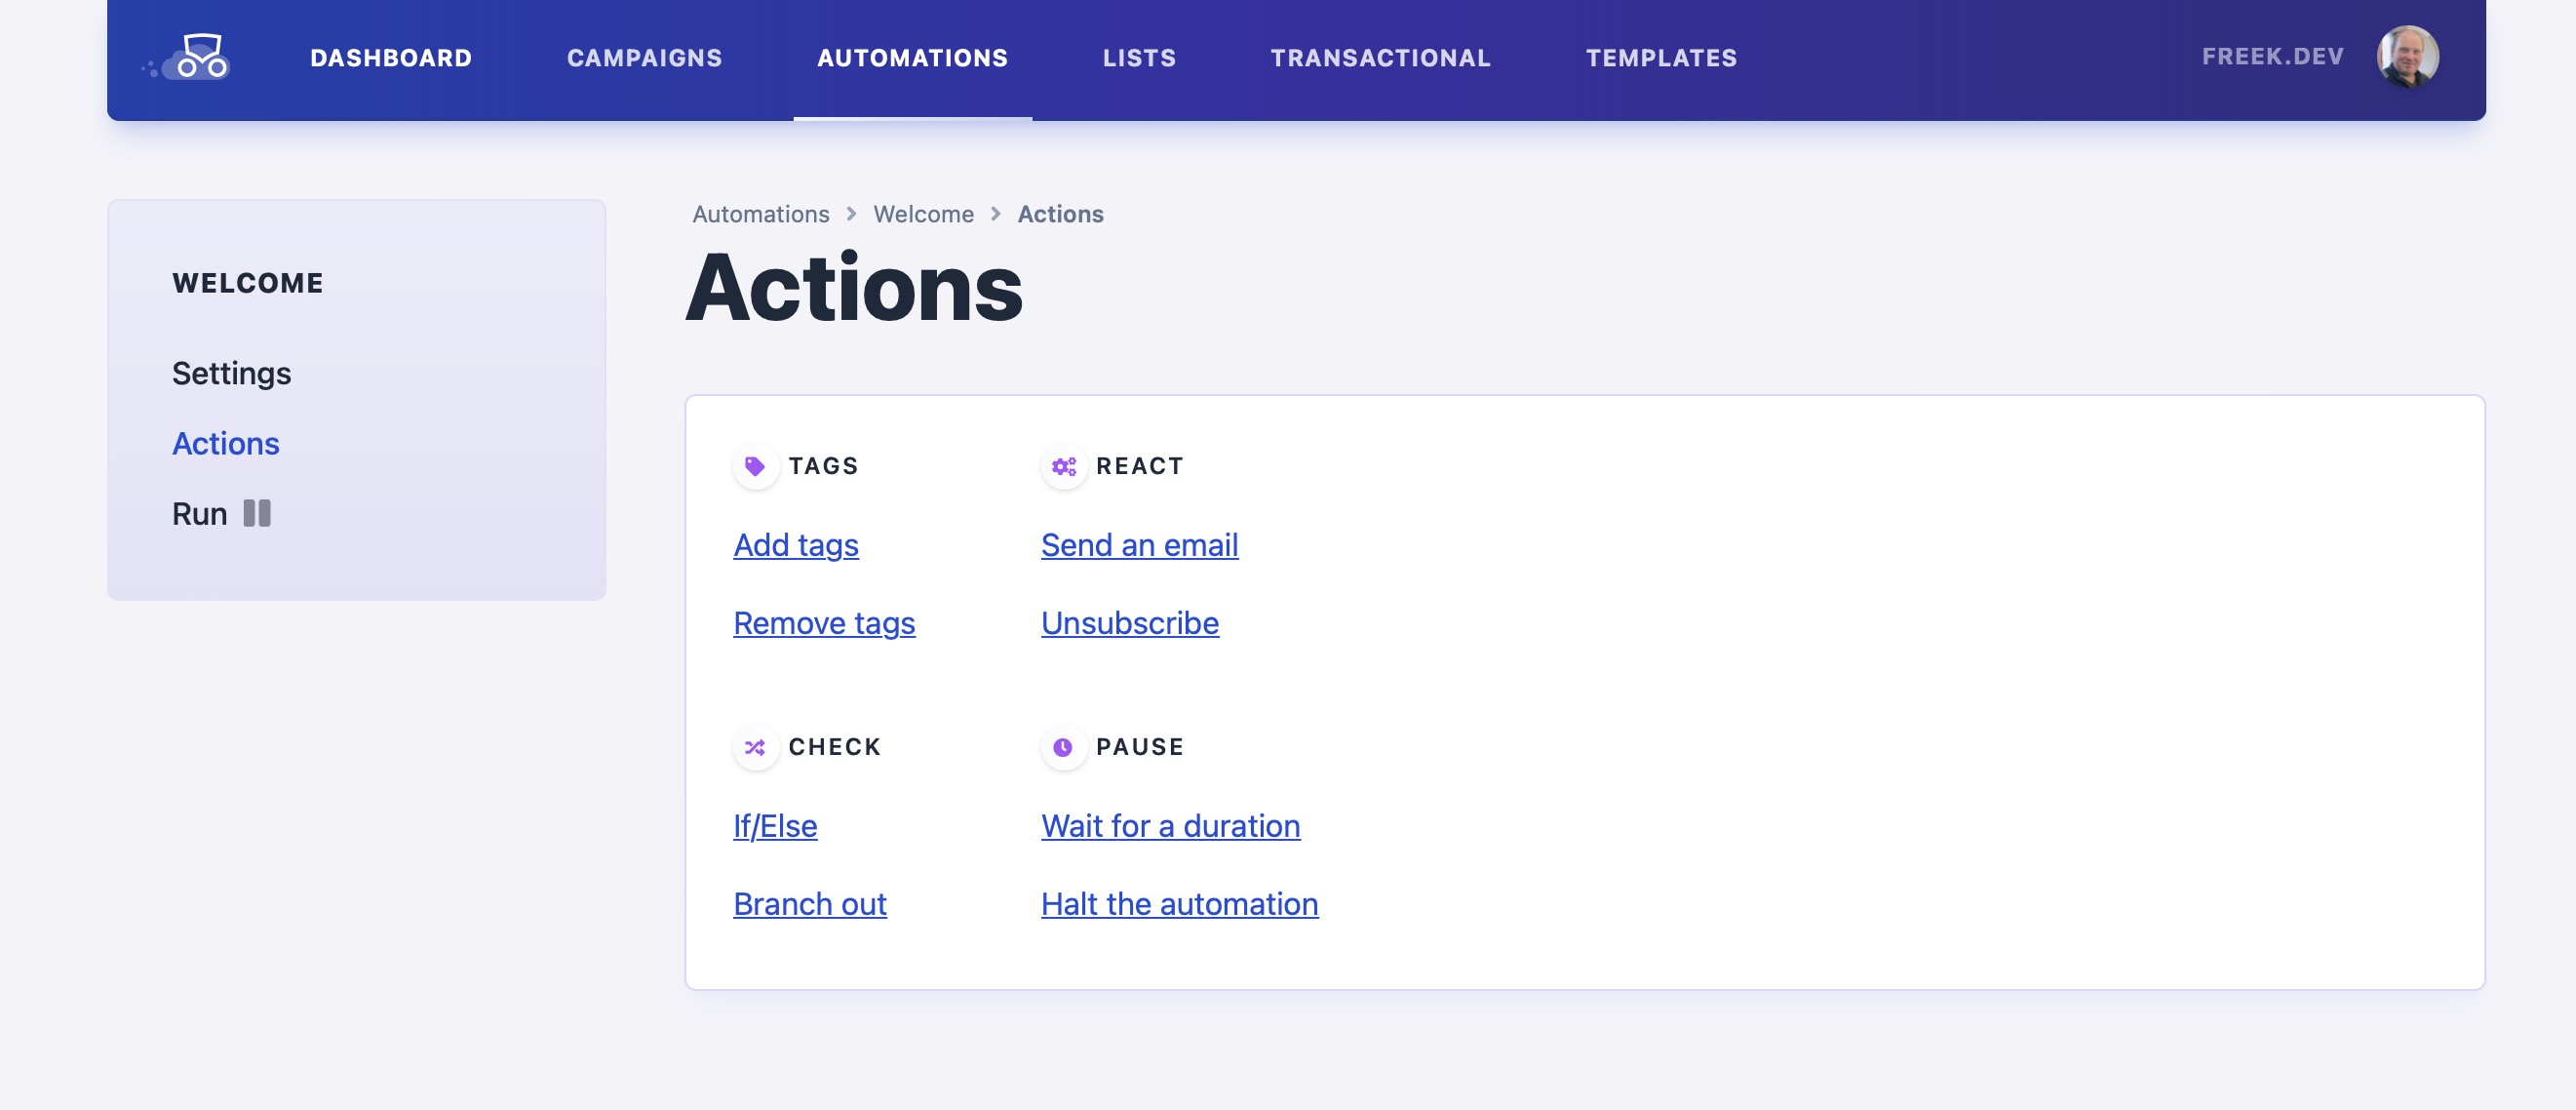
Let's not send a Welcome mail immediately, but only an hour after subscribing. We're going to pick "wait for a duration".
After we've picked an hour as the duration, we can add another action. We're going to pick "Send an email"
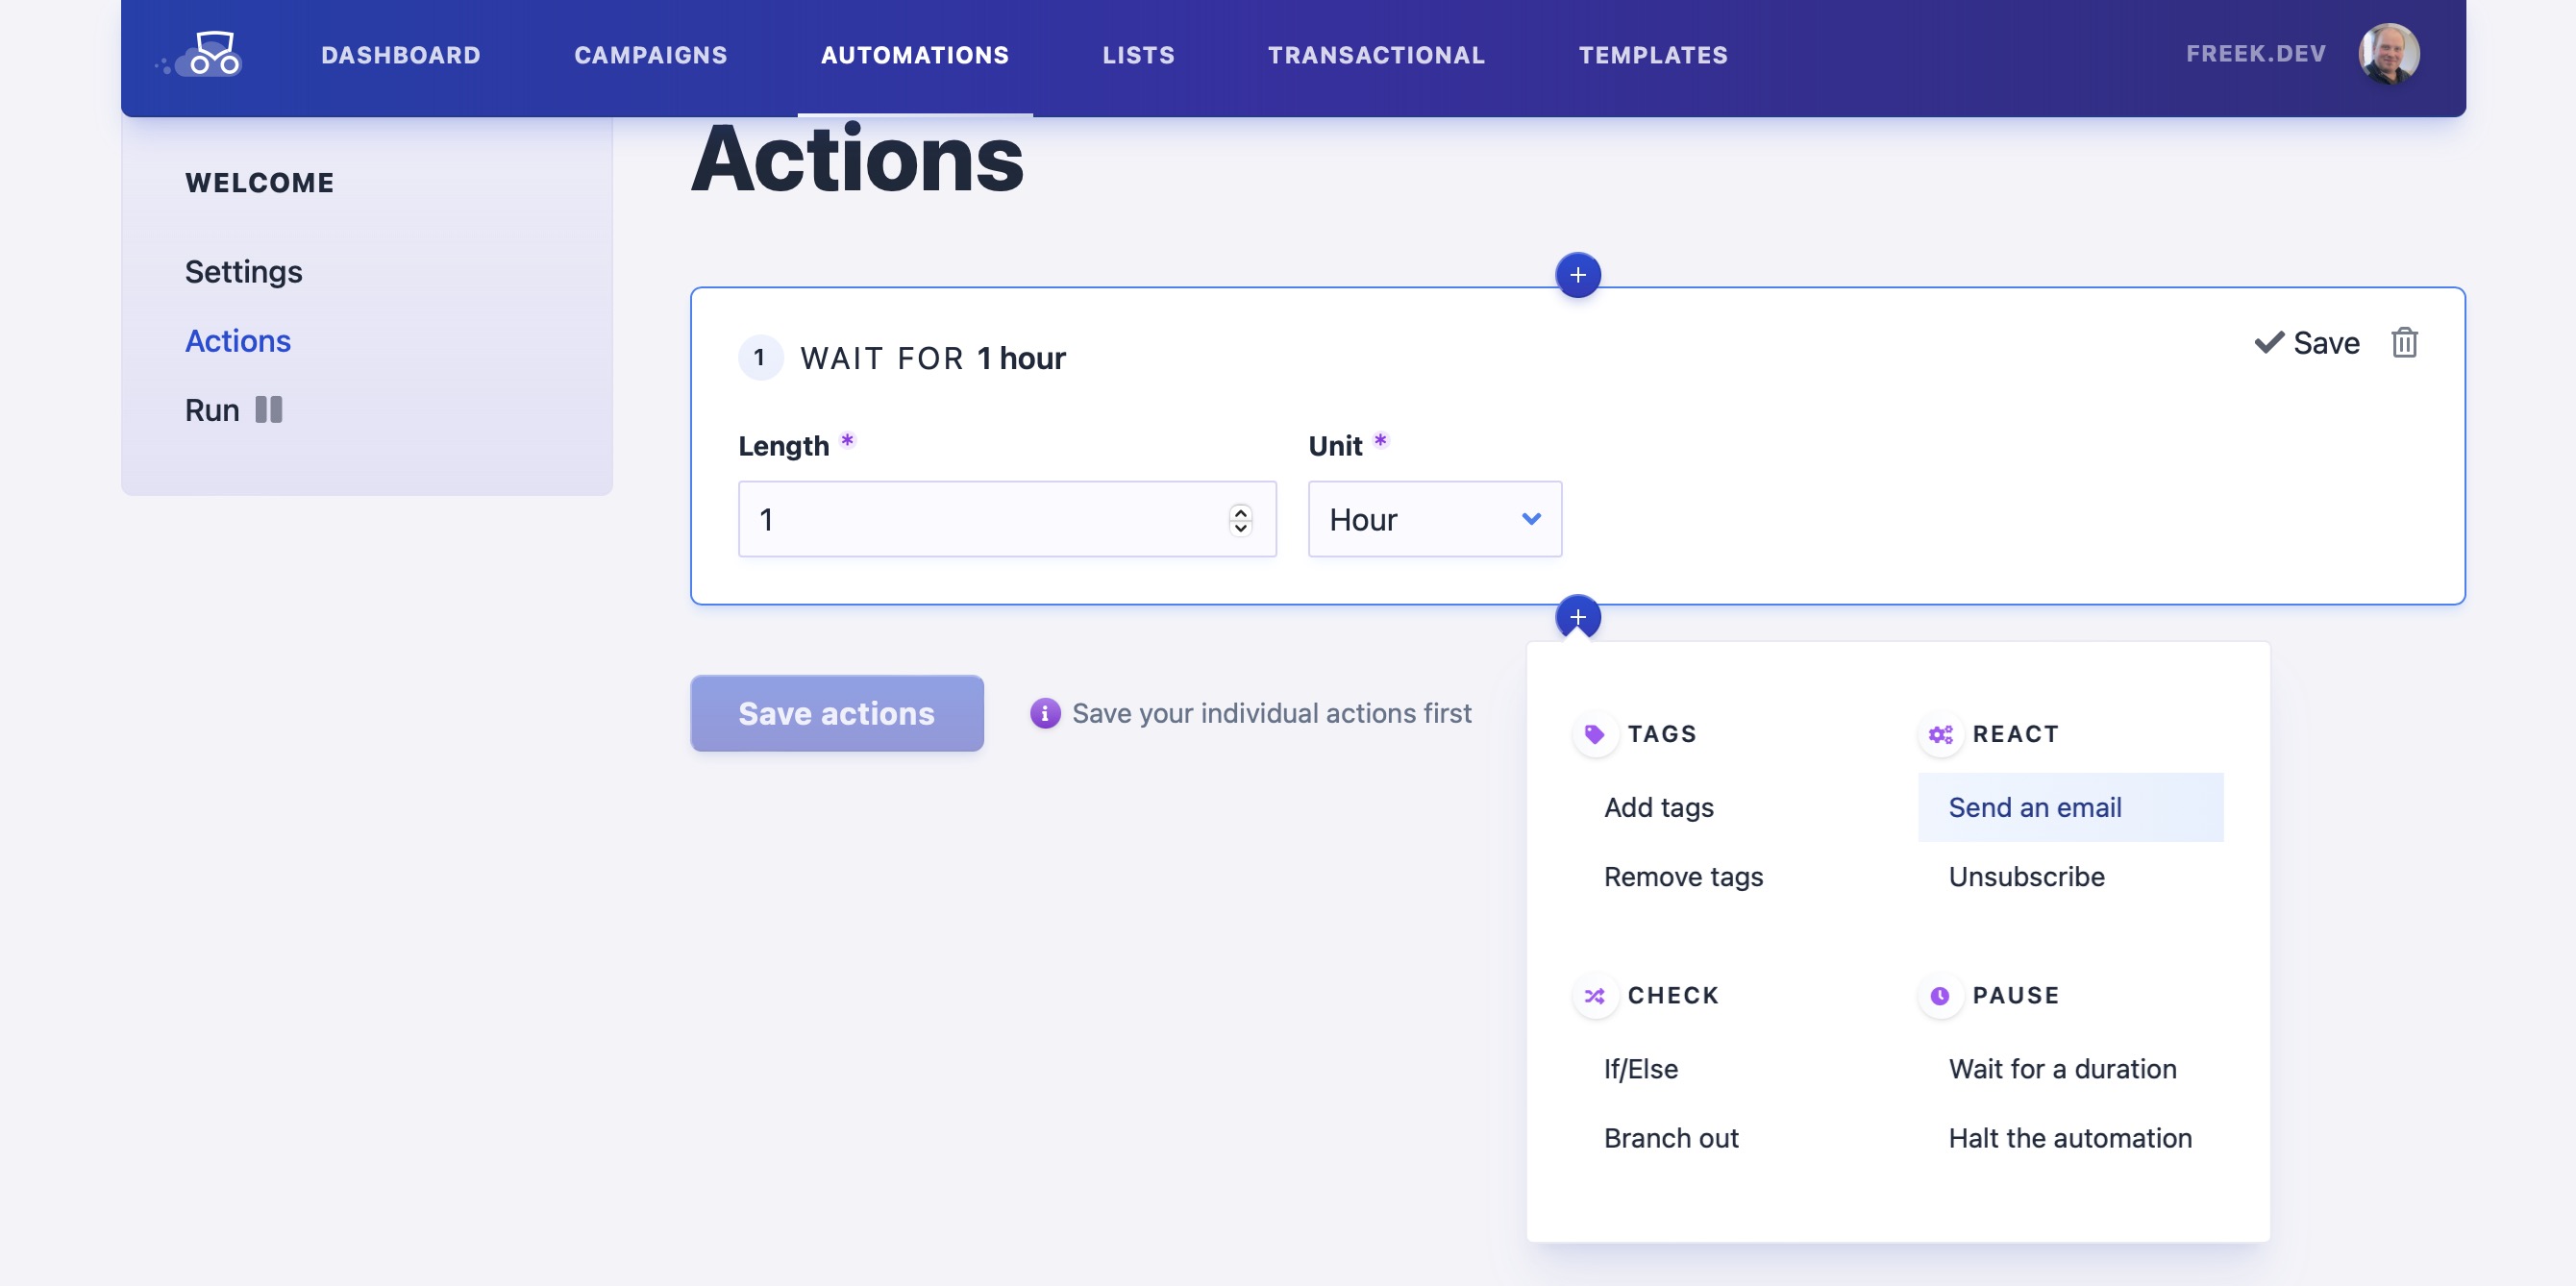
Here we are going to pick the mail that we've just created.
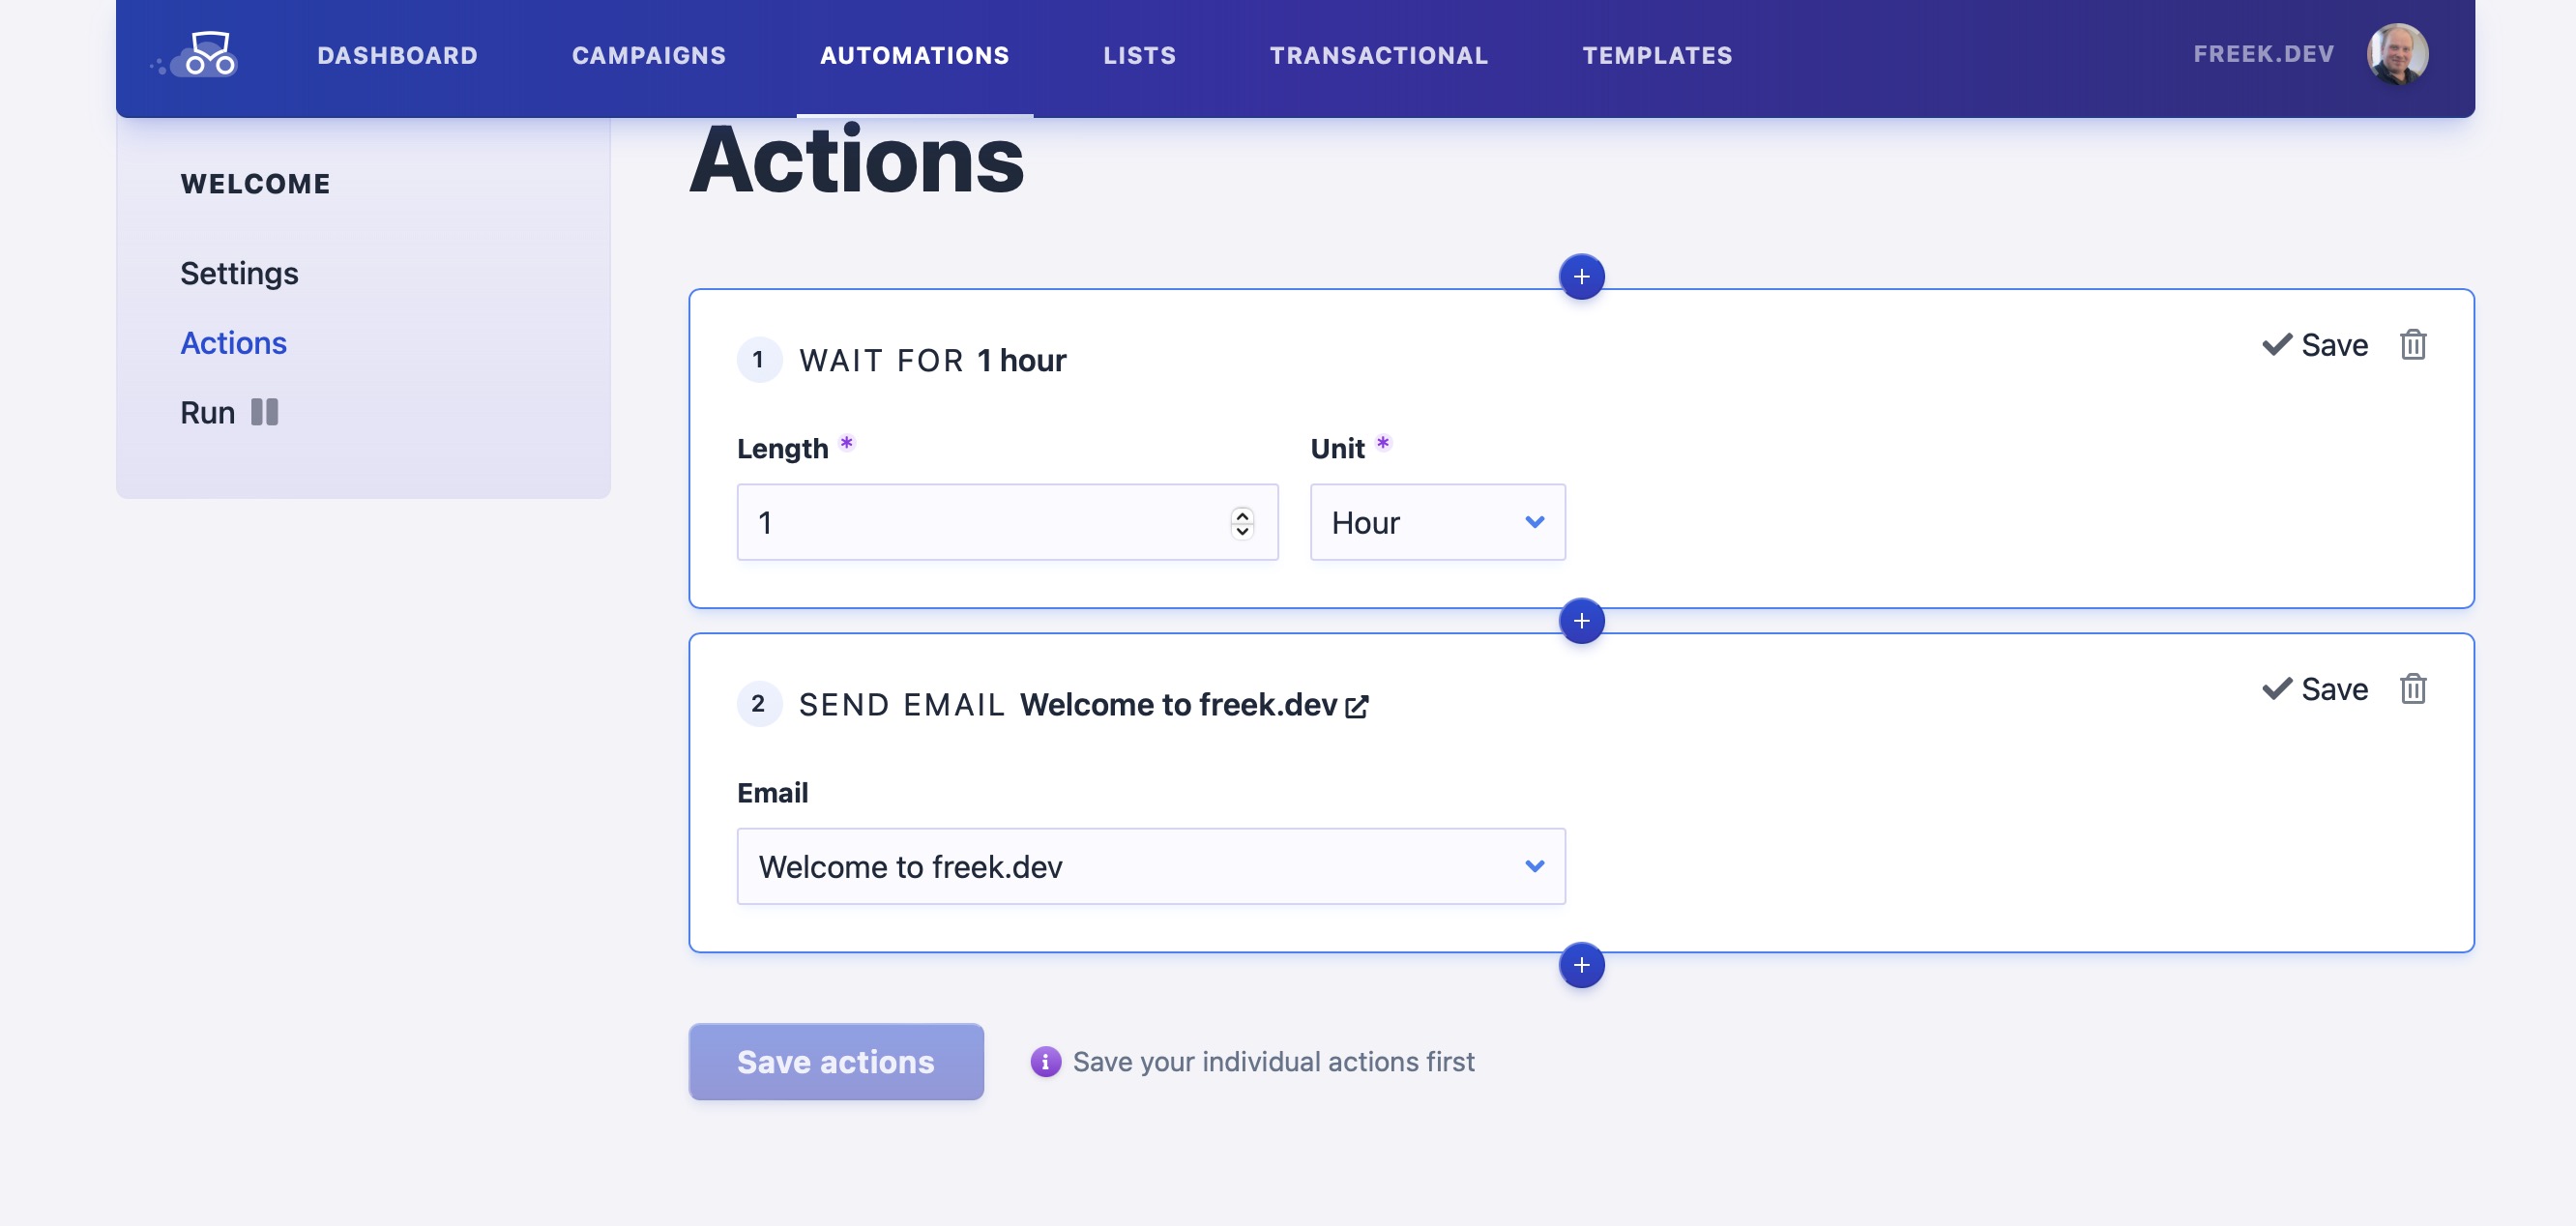
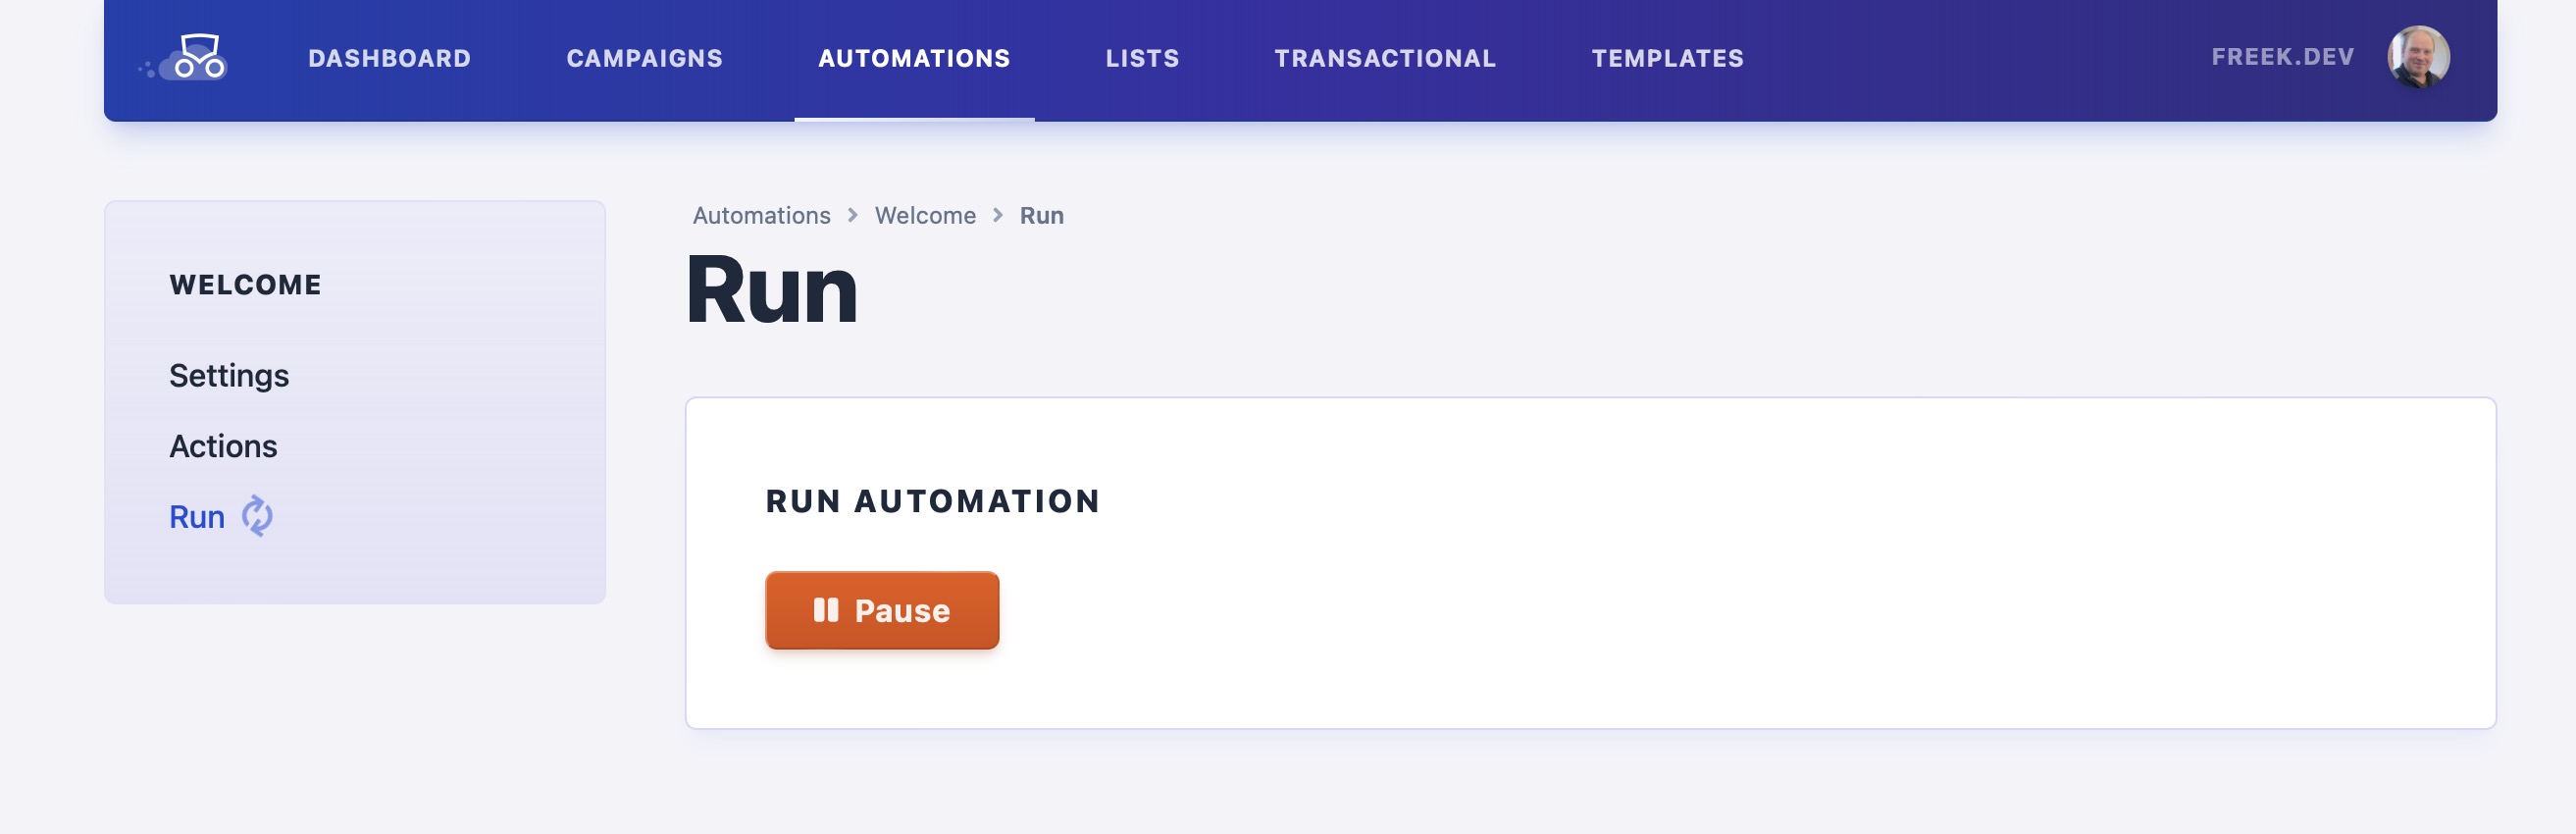
After saving all the actions, we can now run the automation.
With this set up, each new subscriber will get the welcome mail after an hour.
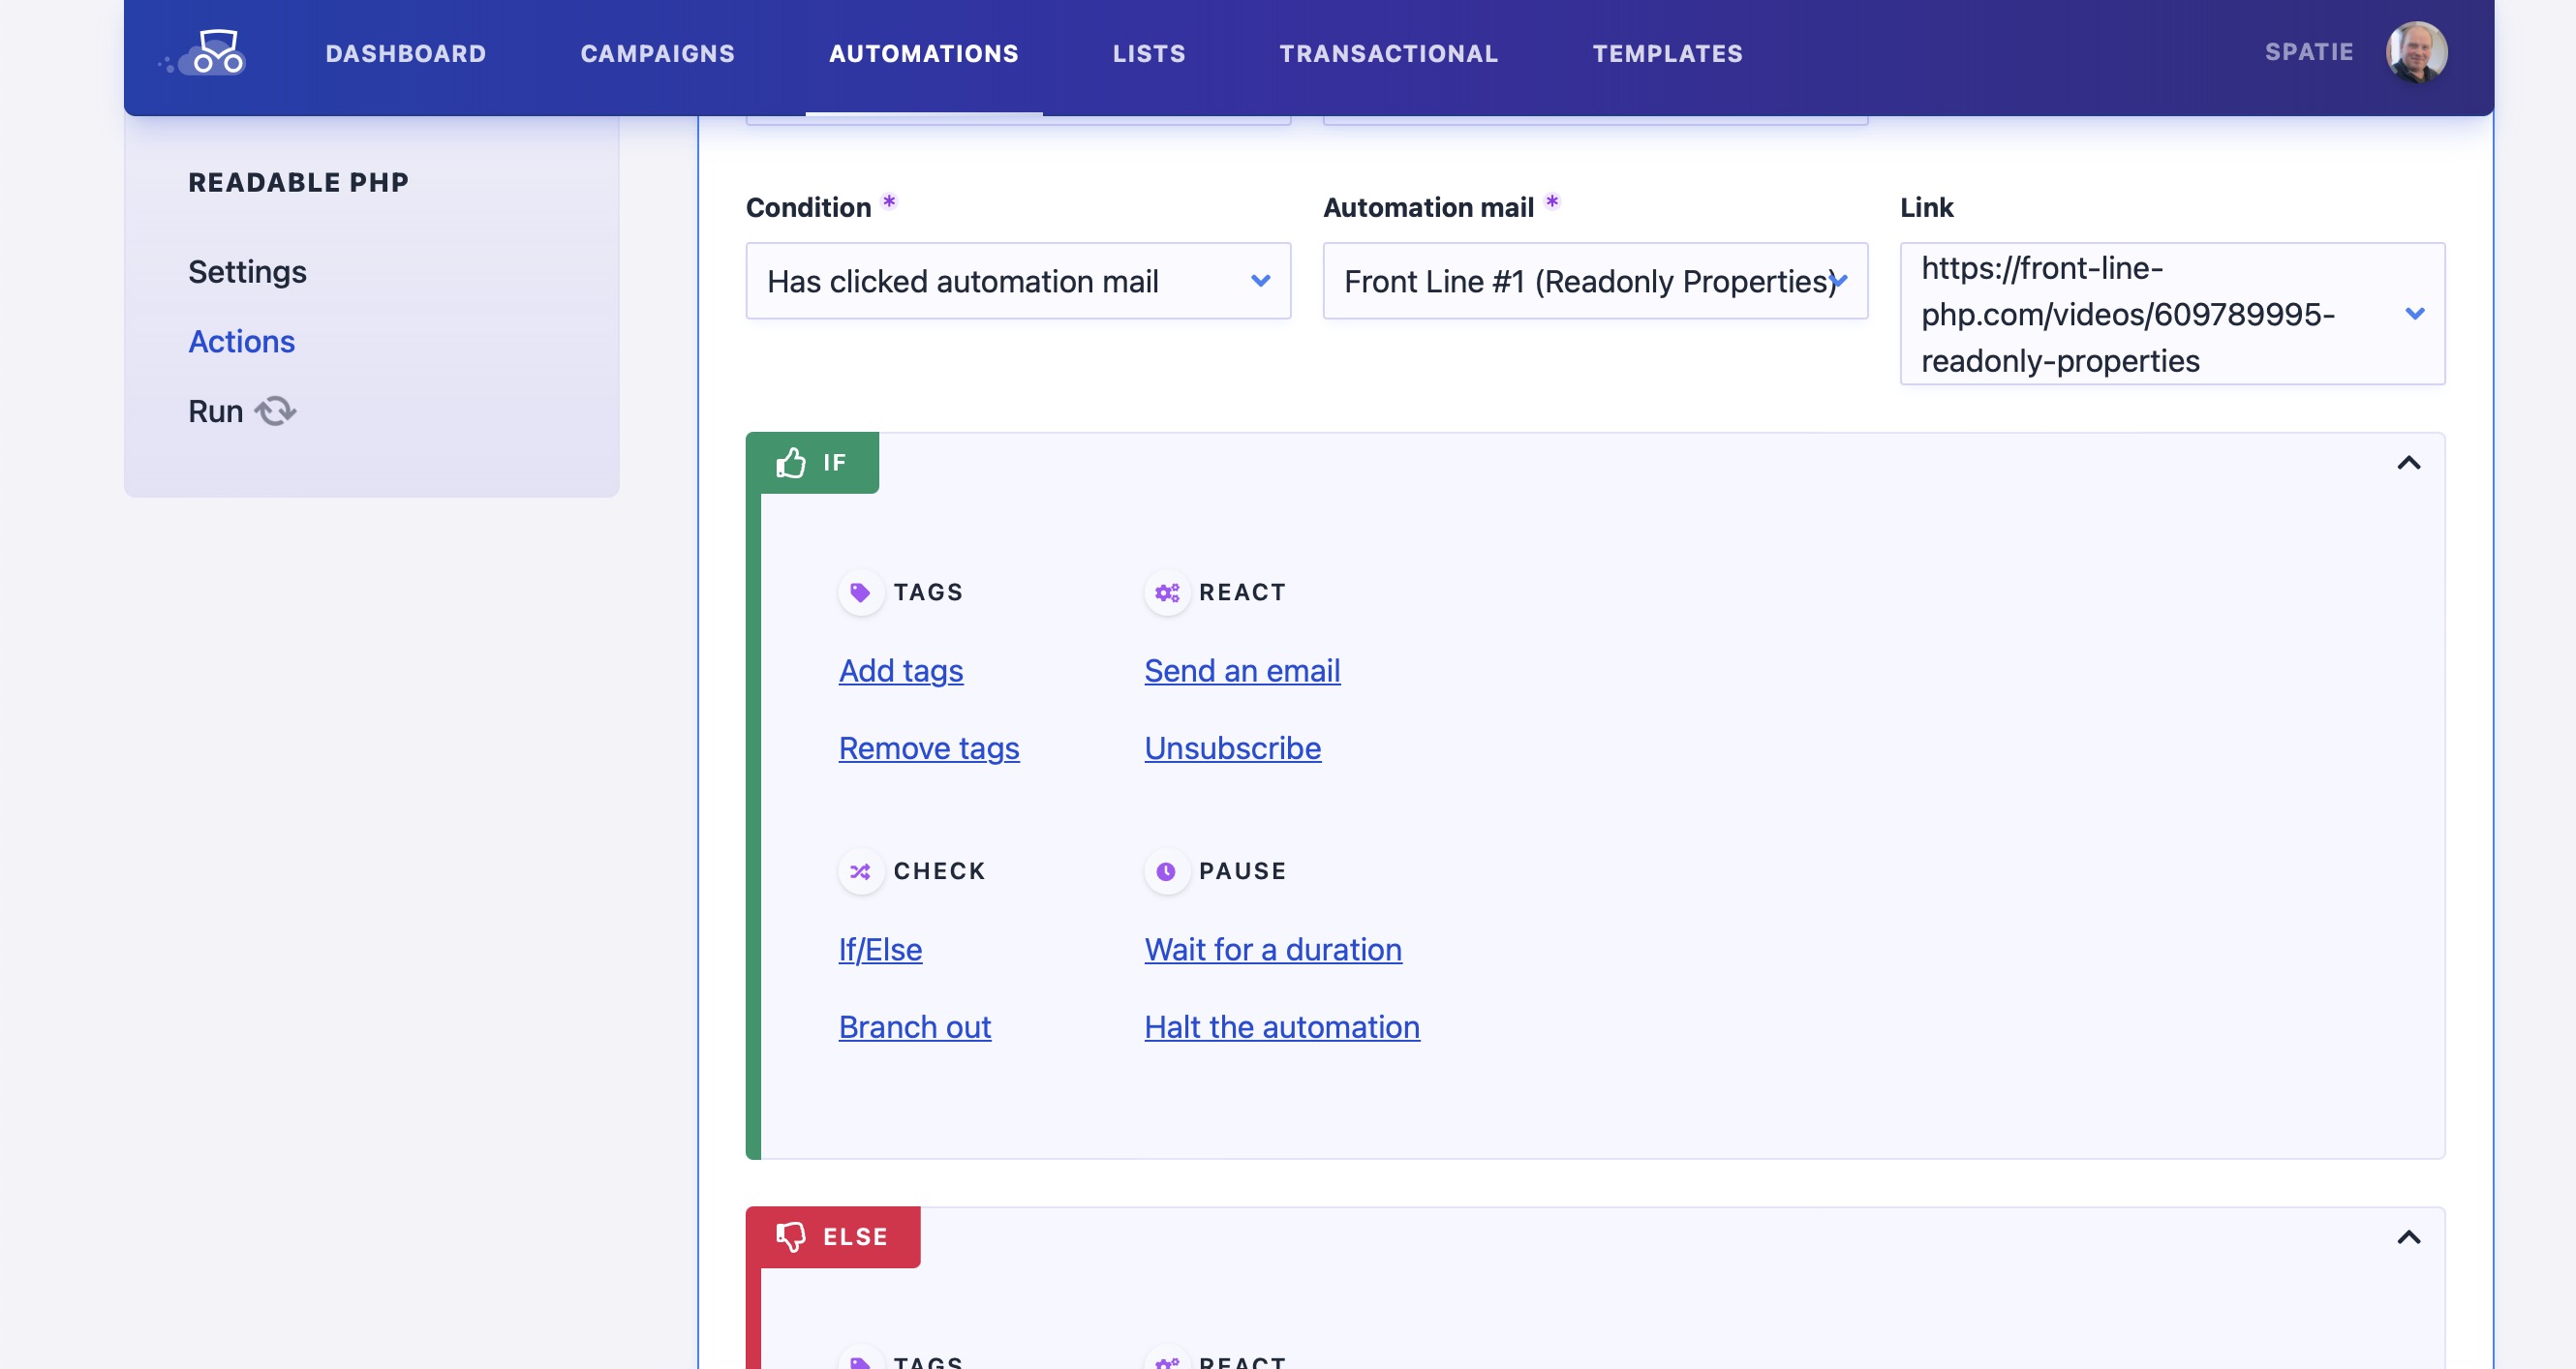
Let's take a look at another automation. As a promo for our Writing Readable PHP course, developers can subscribe to a mini email course with free coding tips. This free mini-course is essentially a drip campaign created in Mailcoach Cloud. Everyone that subscribes gets one tip a week per mail. Here's what that drip campaign looks like in Mailcoach.
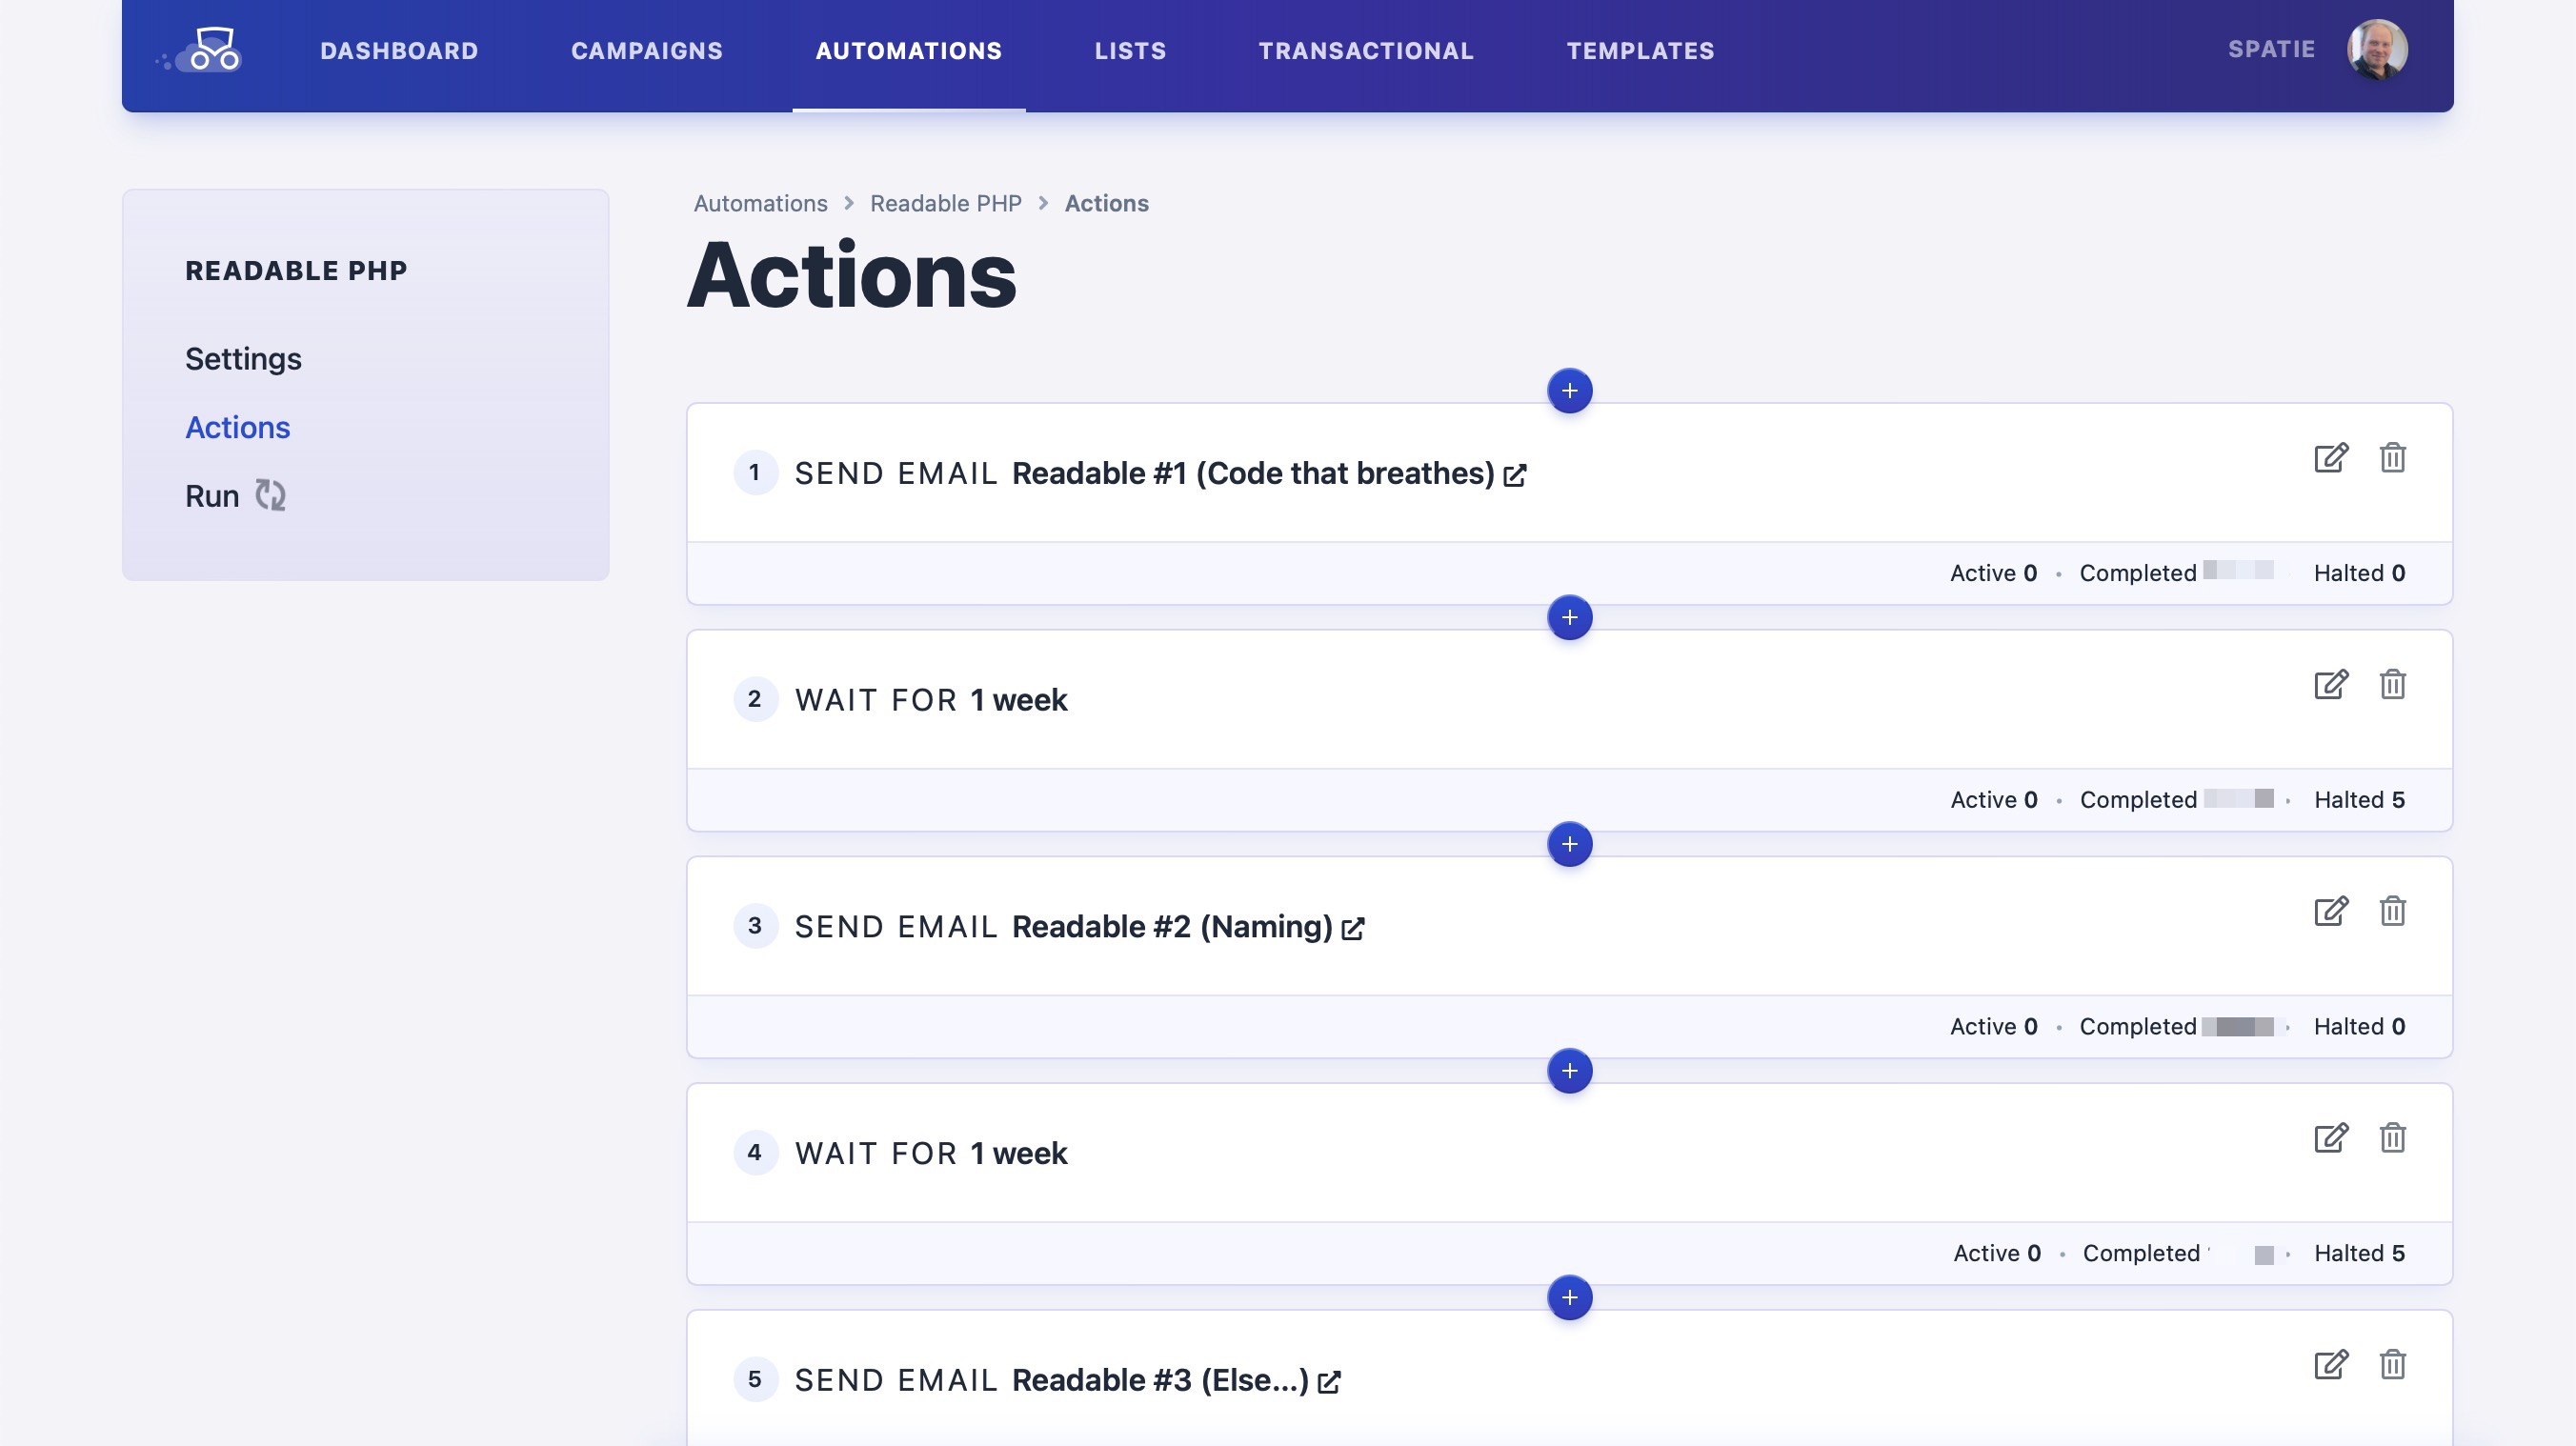
Pretty simple to set up, right? You can also create a more advanced automation. When you pick the "If/else" action, you can set up a condition, like whether a person clicked a specific link in a mail. You can choose actions, for both the if and else cases. This "If/else" block makes our email automation very flexible.
Self hosting Mailcoach
Now that we have launched Mailcoach Cloud, you might think that we'll abandon the self-hosted version, but that is not the case.
The success of the self-hosted version of Mailcoach has proven a big need for a self-hosted marketing solution. We think users of self-hosted have good reasons to do so:
- some will send so many emails that going self-hosted is much cheaper than using a service
- some will use self-hosted for security. Their email lists are so sensitive that they are not allowed to be stored on an external server
- some people might need customization that a hosted service cannot provide. When self-hosting Mailcoach by installing it as a package into an existing Laravel app, you can go very far in configuring everything to your own needs
We're going to continue improving the self-hosted version of Mailcoach. In fact, we will maintain feature parity between Mailcoach Cloud and Mailcoach.
As said early in this post, at the heart of Mailcoach Cloud, we use the spatie/laravel-mailcoach package, which is the self-hosted version. Any improvement we make there benefits both the self-hosted and cloud version.
With Mailcoach Cloud now launched, we're going to focus on getting Mailcoach (self-hosted) v6 out of the door. Compared to v5, we have a whole bunch of excellent new features:
- a totally rebuilt UI (the one you also see in Mailcoach Cloud)
- a fantastic Markdown editor that sports uploads and code highlighting
- a new templating system
- Mailcoach will provide a public mini website listing all your previously sent newsletters
- a new "Manage preferences" screen where subscribers can manage the (public) tags attached to them
- a vastly improved onboarding experience, we'll automatically configure your favorite mail sending service (SES, Postmark, ...) for you
- support for Sendinblue, a EU based mail provider
- the ability to override, replace and extend every page of Mailcoach
Under the hood, we've also made stability improvements to send massive campaigns reliably.
Mailcoach v6 will be our best release yet, and we expect it to be available in the first half of November.
Under the hood
I've already mentioned a couple of times that, at the heart of Mailcoach Cloud, we use our own spatie/laravel-mailcoach package (which is, in fact, the self-hosted version of Mailcoach). Let's look at how we made it behave in a multi-tenant environment.
The spatie/laravel-mailcoach package contains a couple of Artisan commands which should be scheduled as explained in our installation docs.
/*
 * in app/Console/Kernel.php of an app
 * where you use spatie/laravel-mailcoach
 */
protected function schedule(Schedule $schedule)
{
    // ...
    $schedule->command('mailcoach:send-automation-mails')->everyMinute()->withoutOverlapping()->runInBackground();
    $schedule->command('mailcoach:send-scheduled-campaigns')->everyMinute()->withoutOverlapping()->runInBackground();

    $schedule->command('mailcoach:run-automation-triggers')->everyMinute()->runInBackground();
    $schedule->command('mailcoach:run-automation-actions')->everyMinute()->runInBackground();

    $schedule->command('mailcoach:calculate-statistics')->everyMinute();
    $schedule->command('mailcoach:calculate-automation-mail-statistics')->everyMinute();
    $schedule->command('mailcoach:rescue-sending-campaigns')->hourly();
    $schedule->command('mailcoach:send-campaign-summary-mail')->hourly();
    $schedule->command('mailcoach:cleanup-processed-feedback')->hourly();
    $schedule->command('mailcoach:send-email-list-summary-mail')->mondays()->at('9:00');
    $schedule->command('mailcoach:delete-old-unconfirmed-subscribers')->daily();
}
The Mailcoach Cloud application is multi-tenant using a single DB. Each team that registers at Mailcoach Cloud is seen as a tenant. Behind the scenes, we use our own spatie/laravel-multitenancy package to make Mailcoach Cloud tenant-aware.
In Mailcoach Cloud, all Artisan commands above should be run for every tenant. We could have gone ahead and created a special version of each command that is tenant aware. But we'd rather not do that and execute the exact same commands as in spatie/laravel-mailcoach.
The solution we used here is to loop over each tenant and wrap each command in a job. Let's take a look at the simplified code:
/*
 * in app/Console/Kernel.php of mailcoach.app
 */
protected function schedule(Schedule $schedule)
{
   Team::with(['subscriptions'])
      ->select(['id', 'name', 'trial_ends_at'])
      ->each(function (Team $team) use ($schedule): void {
         $schedule
            ->job(new TeamArtisanJob($team, 'mailcoach:send-automation-mails'))
            ->name("{$team->name} - mailcoach:send-automation-mails")
            ->everyMinute();

         $schedule
            ->job(new TeamArtisanJob($team, 'mailcoach:run-automation-triggers'))
            ->name("{$team->name} - mailcoach:run-automation-triggers")
            ->everyMinute();

         $schedule
            ->job(new TeamArtisanJob($team, 'mailcoach:run-automation-actions'))
            ->name("{$team->name} - mailcoach:run-automation-actions")
            ->everyMinute();

         // all other mailcoach commands.

    });
}
Each command is wrapped in a TeamArtisanJob We use queued jobs instead of commands because if there are a lot of tenants, executing all commands for all tenants sequentially might take too much time. By using queued jobs, we can perform the necessary concurrently by using multiple queue workers.
Let's look at the simplified code of TeamArtisanJob and discover what happens there. I've left some details out to make a good example.
namespace App\Domain\Team\Jobs;

// imports left out for brevity...

class TeamArtisanJob implements ShouldQueue, ShouldBeUnique
{
    use Dispatchable;
    use InteractsWithQueue;
    use Queueable;
    use SerializesModels;

    public function __construct(
	    private Team $team,
	    private string $command,
    )
    {
    }

    public function handle()
    {
        $this->team->execute(fn () => Artisan::call($this->command));

        Team::current()?->forget();
    }

    public function uniqueId()
    {
        return $this->team->id.$this->command;
    }

    public function uniqueFor()
    {
        return 60 * 15; // 15 minutes
    }
}
You can see that the artisan command itself is passed to a closure given to the execute method on $this->team. This method is available because the Team model extends from the Tenant base class provided by spatie/laravel-multitenancy.
The execute method will first perform all tasks to make a tenant the current one. The most important task for this example is setting global scopes. After that task each, query gets an extra where clause that looks like this (pseudo code) where team->id = <team-id-where-execute-is-being called-on>.
After that global scope is set, the closure passed to execute will be executed. In our case, Artisan::call($this->command) will be called (and remember, $this->command contains a command signature from the spatie/laravel-mailcoach package, eg. 'mailcoach:send-automation-mails'. Each query inside the command will be scoped to the right team. After that closure is executed, the global scope will automatically be removed by the spatie/laravel-multitenancy package.
So with this setup, we've made all of the commands of the spatie/laravel-mailcoach package tenant-aware without changing the source code of those commands.
In the code of TeamArtisanJob, you also see that we're using the ShouldBeUnique trait. This will ensure that only one job for this command and team will be on the queue. Should our queue be so slow, the TeamArtisanJob is not executed on time, then running the scheduler again won't result in a duplicate job on the queue.
Hosting Mailcoach
Using Mailcoach, you can send email campaigns of all sizes. Some of our users have large subscriber lists and send hundreds of thousands of emails in a short time. We also see that multiple users send such large campaigns simultaneously.
If you need automatic scaling, you might use a serverless solution like AWS Lambda (optionally in combination with Laravel Vapor). For most use cases, they can handle immense workloads.
However, for Mailcoach, using AWS Lambda was not an option. We focus on privacy: all tracking options are optional and turned off by default. Another aspect of the focus on privacy is our desire to adhere to GDPR rules as much as possible.
Some of the GDPR rules are open for interpretation. Ask a bunch of legal experts about how things should be implemented, and you'll get a bunch of different opinions. We wanted to be on the safe side, and chose a very strict interpretation. Our application only uses servers that are located in the EU and that are owned by EU companies. That's why using AWS is not an option for us.
Mailcoach is hosted on UpCloud servers. A server hosts the main application, and servers handling all work in the background using queued jobs. The queue itself is handled via Laravel Horizon. Preparing an email and sending it is also a queued job. So, when we have a large volume of mail that needs to be sent out, we need extra servers to handle queued jobs.
Using UpCloud's API we can create and destroy servers programmatically. All queued jobs are stored in Redis running on a central server. We have created a server image on UpCloud that contains the Mailcoach application and will connect to that Redis server to pick up jobs.
In an early version of Mailcoach, all code to start and stop servers was tailor-made for Mailcoach and UpCloud. Because we think others might also like our approach, we extracted our code to a package called spatie/laravel-dynamic-servers. In Mailcoach, we now use this package.
You can think of laravel-dynamic-servers as a sort of PHP-based version of Kubernetes that has 5% of its features but covers that 80% use case. For most PHP and Laravel developers, this package will also be easier to learn and use.
The package is driver based. It ships with support for UpCloud (because we needed that ourselves), but the community already created a DigitalOcean driver, and creating a driver of your own is easy.
Typically, on your hosting provider, you would prepare a server snapshot that will be used as a template when starting new servers.
After the package is installed and configured, you can use PHP to start and stop servers.
Here's the most straightforward way to start a server via PHP code:
use Spatie\DynamicServers\Facades\DynamicServers;

DynamicServers::increase();
To start a server, the package will start a queued job that makes an API call to your server provider to spin up a server. It will also dispatch subsequent jobs to monitor the entire starting process of a server.
Stopping one server is equally simple:
DynamicServers::decrease();
In most cases, you would use these methods directly, though. The package also offers a method called ensure. You can pass it the number of servers you want to have available in total.
DynamicServers::ensure(5);
If fewer servers are currently active than the number given, more servers will spin up. The package will destroy a few if there are more servers than that number.
Usually, you would have code that calculates the number of servers you need and pass that number to ensure.
Here's a simplified version of the calculation logic we used at Mailcoach. We use Horizon's WaitTimeCalulator class to get the waiting time of the queue.
use Laravel\Horizon\WaitTimeCalculator;
use Spatie\DynamicServers\Facades\DynamicServers;

$waitTimesOfAllQueues = (WaitTimeCalculator::class)->calculate();

$maxWaitTime = max($waitTimesOfAllQueues);

// 1 server for every 5 minutes of wait time
$amountOfServersNeeded = floor($waitTimesOfAllQueues / 60 / 5);

DynamicServers::ensure($amountOfServersNeeded);
So, when the wait times are long, the number of needed servers will be passed to ensure. When the queues are empty, $amountOfServersNeeded will be zero. When zero is passed, all dynamic servers will be destroyed.
Of course, this logic should be executed frequently. The package has a method determineServerCount which will be executed every minute through a scheduled command. You would typically use it in a service provider:
use Laravel\Horizon\WaitTimeCalculator;
use Spatie\DynamicServers\Facades\DynamicServers;
use Spatie\DynamicServers\Support\DynamicServersManager;

// in some service provider

DynamicServers::determineServerCount(function (DynamicServersManager $servers) {
	$waitTimesOfAllQueues = (WaitTimeCalculator::class)->calculate();

	$maxWaitTime = max($waitTimesOfAllQueues);

	// 1 server for every 5 minutes of wait time
	$amountOfServersNeeded = floor($waitTimesOfAllQueues / 60 / 5);

	DynamicServers::ensure($amountOfServersNeeded);
});
Using the spatie/laravel-dynamic-servers package, we can automatically scale the capacity for sending emails. Whenever large campaigns are sent out, we see in our Slack channel that servers are being created and deleted.
In closing
Phew, you've made it to the end! Congrats!
Developing Mailcoach Cloud was a fun experience, and I'm very proud of what our team has achieved. I hope you will like using it. You can try it out using our free trial period.
I'd like to specially thank my colleague Rias for spearheading development on Mailcoach Cloud. Many ideas that power Mailcoach Cloud behind the scenes came from him. Like always, my colleague Willem created an absolutely gorgeous design.
In true Spatie fashion, we saw a couple of functionalities during development that we could extract into packages.
- when you register a new Mailcoach account and log in, you'll get a pleasant onboarding experience that is powered by spatie/laravel-onboard
- A handy wizard will guide you to connect your favorite email sending service to Mailcoach. This wizard is built using our spatie/laravel-livewire-Wizard package
- mentioned early in this post is the fact that we automatically spin up servers using spatie/laravel-dynamic-servers when large campaigns are being sent simultaneously
- you can use the Mailcoach Markdown editor, which features automatic code highlighting, in a Filament powered admin panel, by installing spatie/filament-markdown-editor
- during development, we sent some one-off mails to beta users. We ensured that our beta users were only mailed once using our spatie/laravel-model-flags package.
Of course, you should also check out all other Laravel and PHP packages my team and I have published previously.