A package to create Livewire powered wizards in no time original
I'm proud to announce that our team has released a new package called laravel-livewire-wizard. Using this package, you can set up multi-step wizards quickly using Livewire.
The package is headless, which means that it provides no UI itself, but it makes it easy to build any UI you desire.
You can easily control which step is displayed, access state of other steps, and build any navigation you desire.
I'd like to introduce the package to you in this blog post.
What is a wizard?
First, let's clarify what we mean by a "wizard". With "wizard", we mean a multi-step process in which each step has its own screen.
Wizards are often used to break up long forms or processes. By letting a user concentrate on one aspect of a process, the user will have a more pleasant experience.
In the remainder of this blog post, we will use a simplified sales process and present it to the user as a wizard.
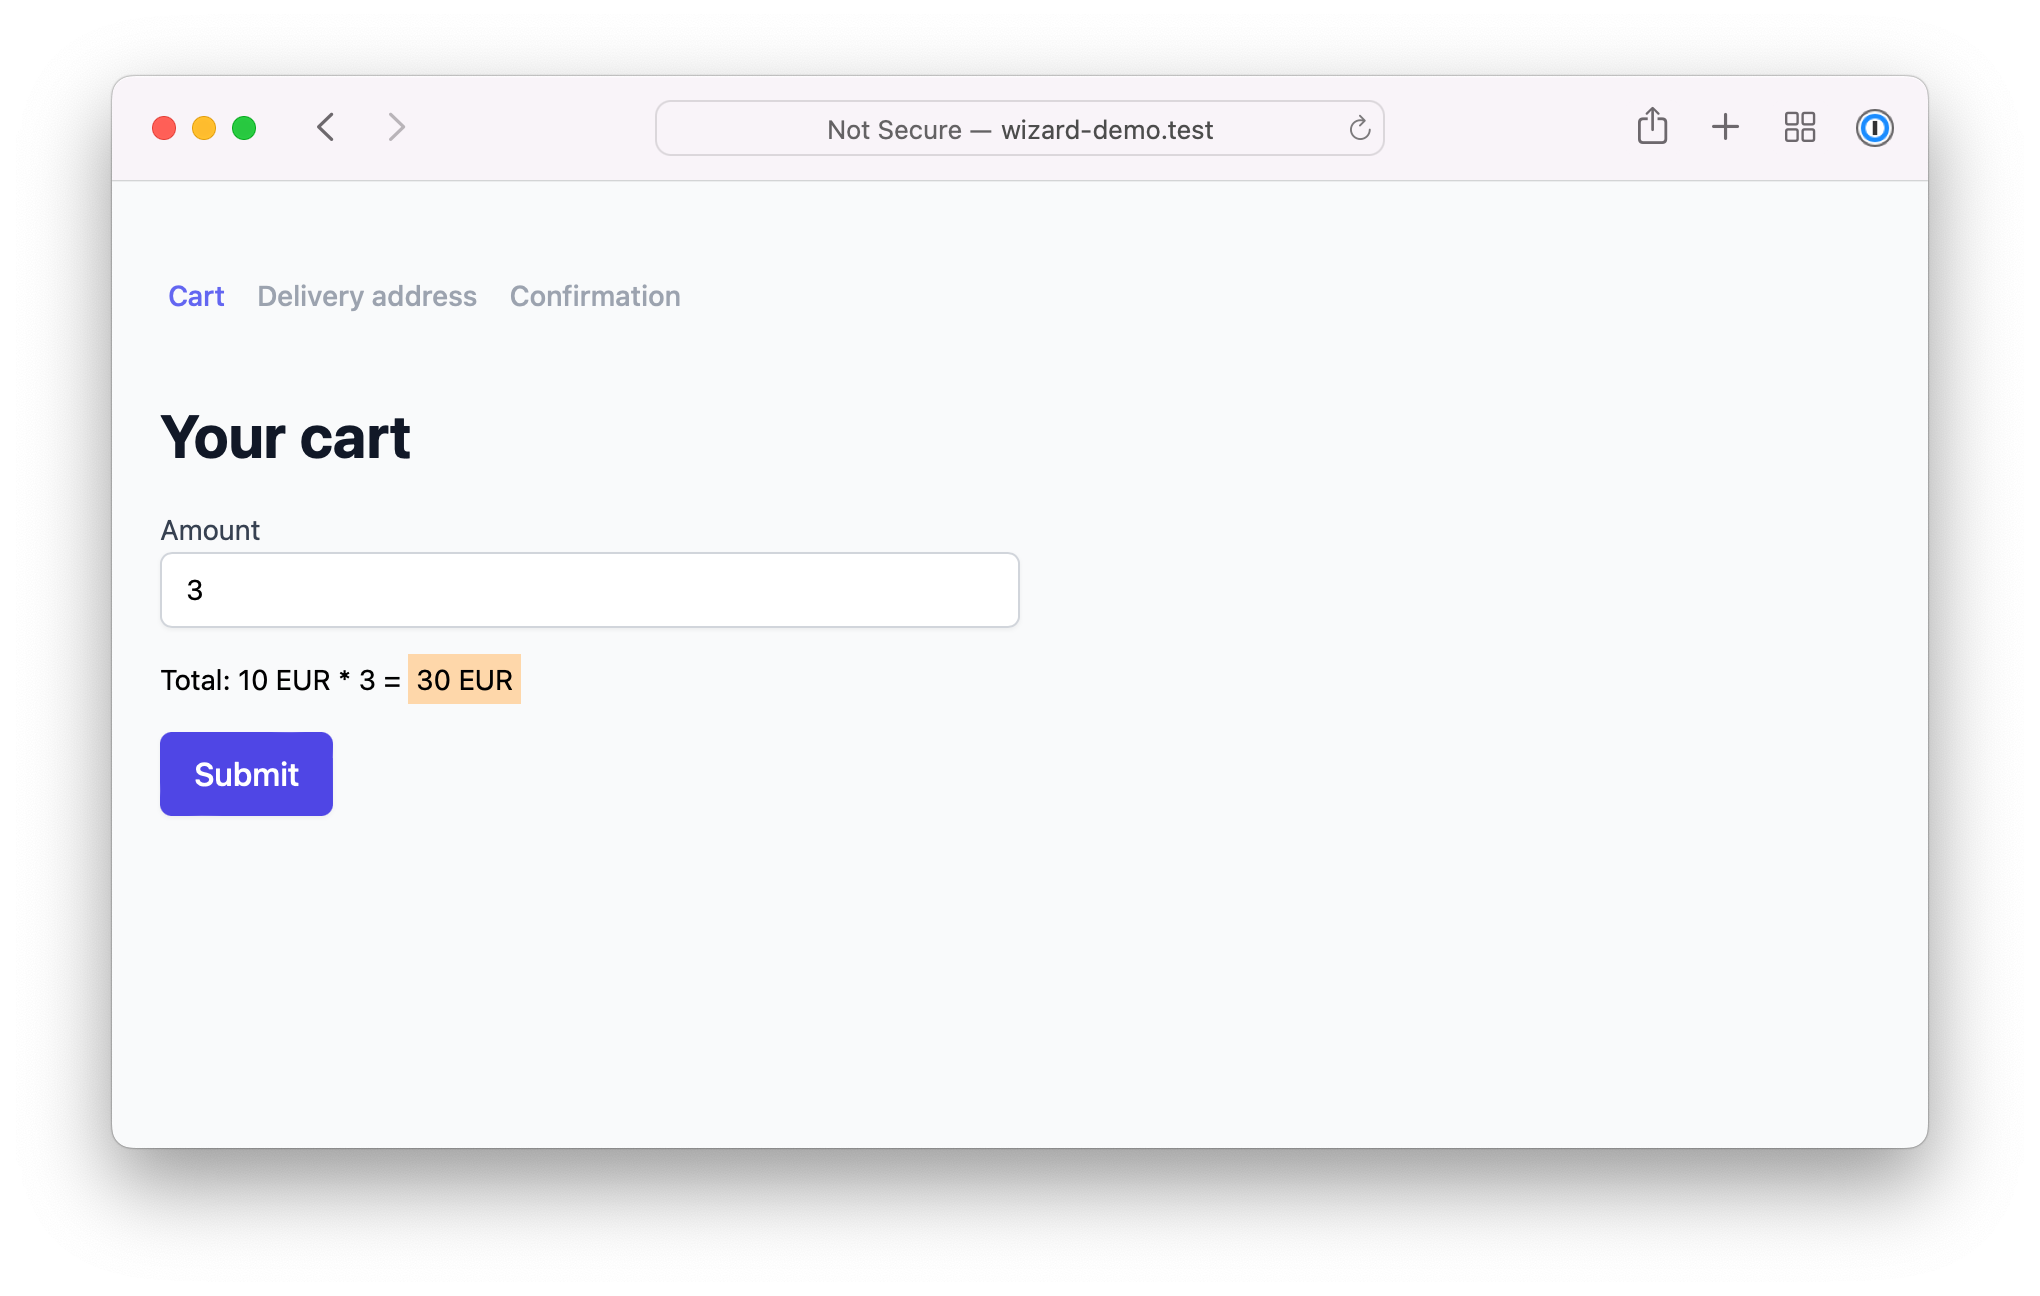
First, we will ask the user to specify how many items should be ordered.
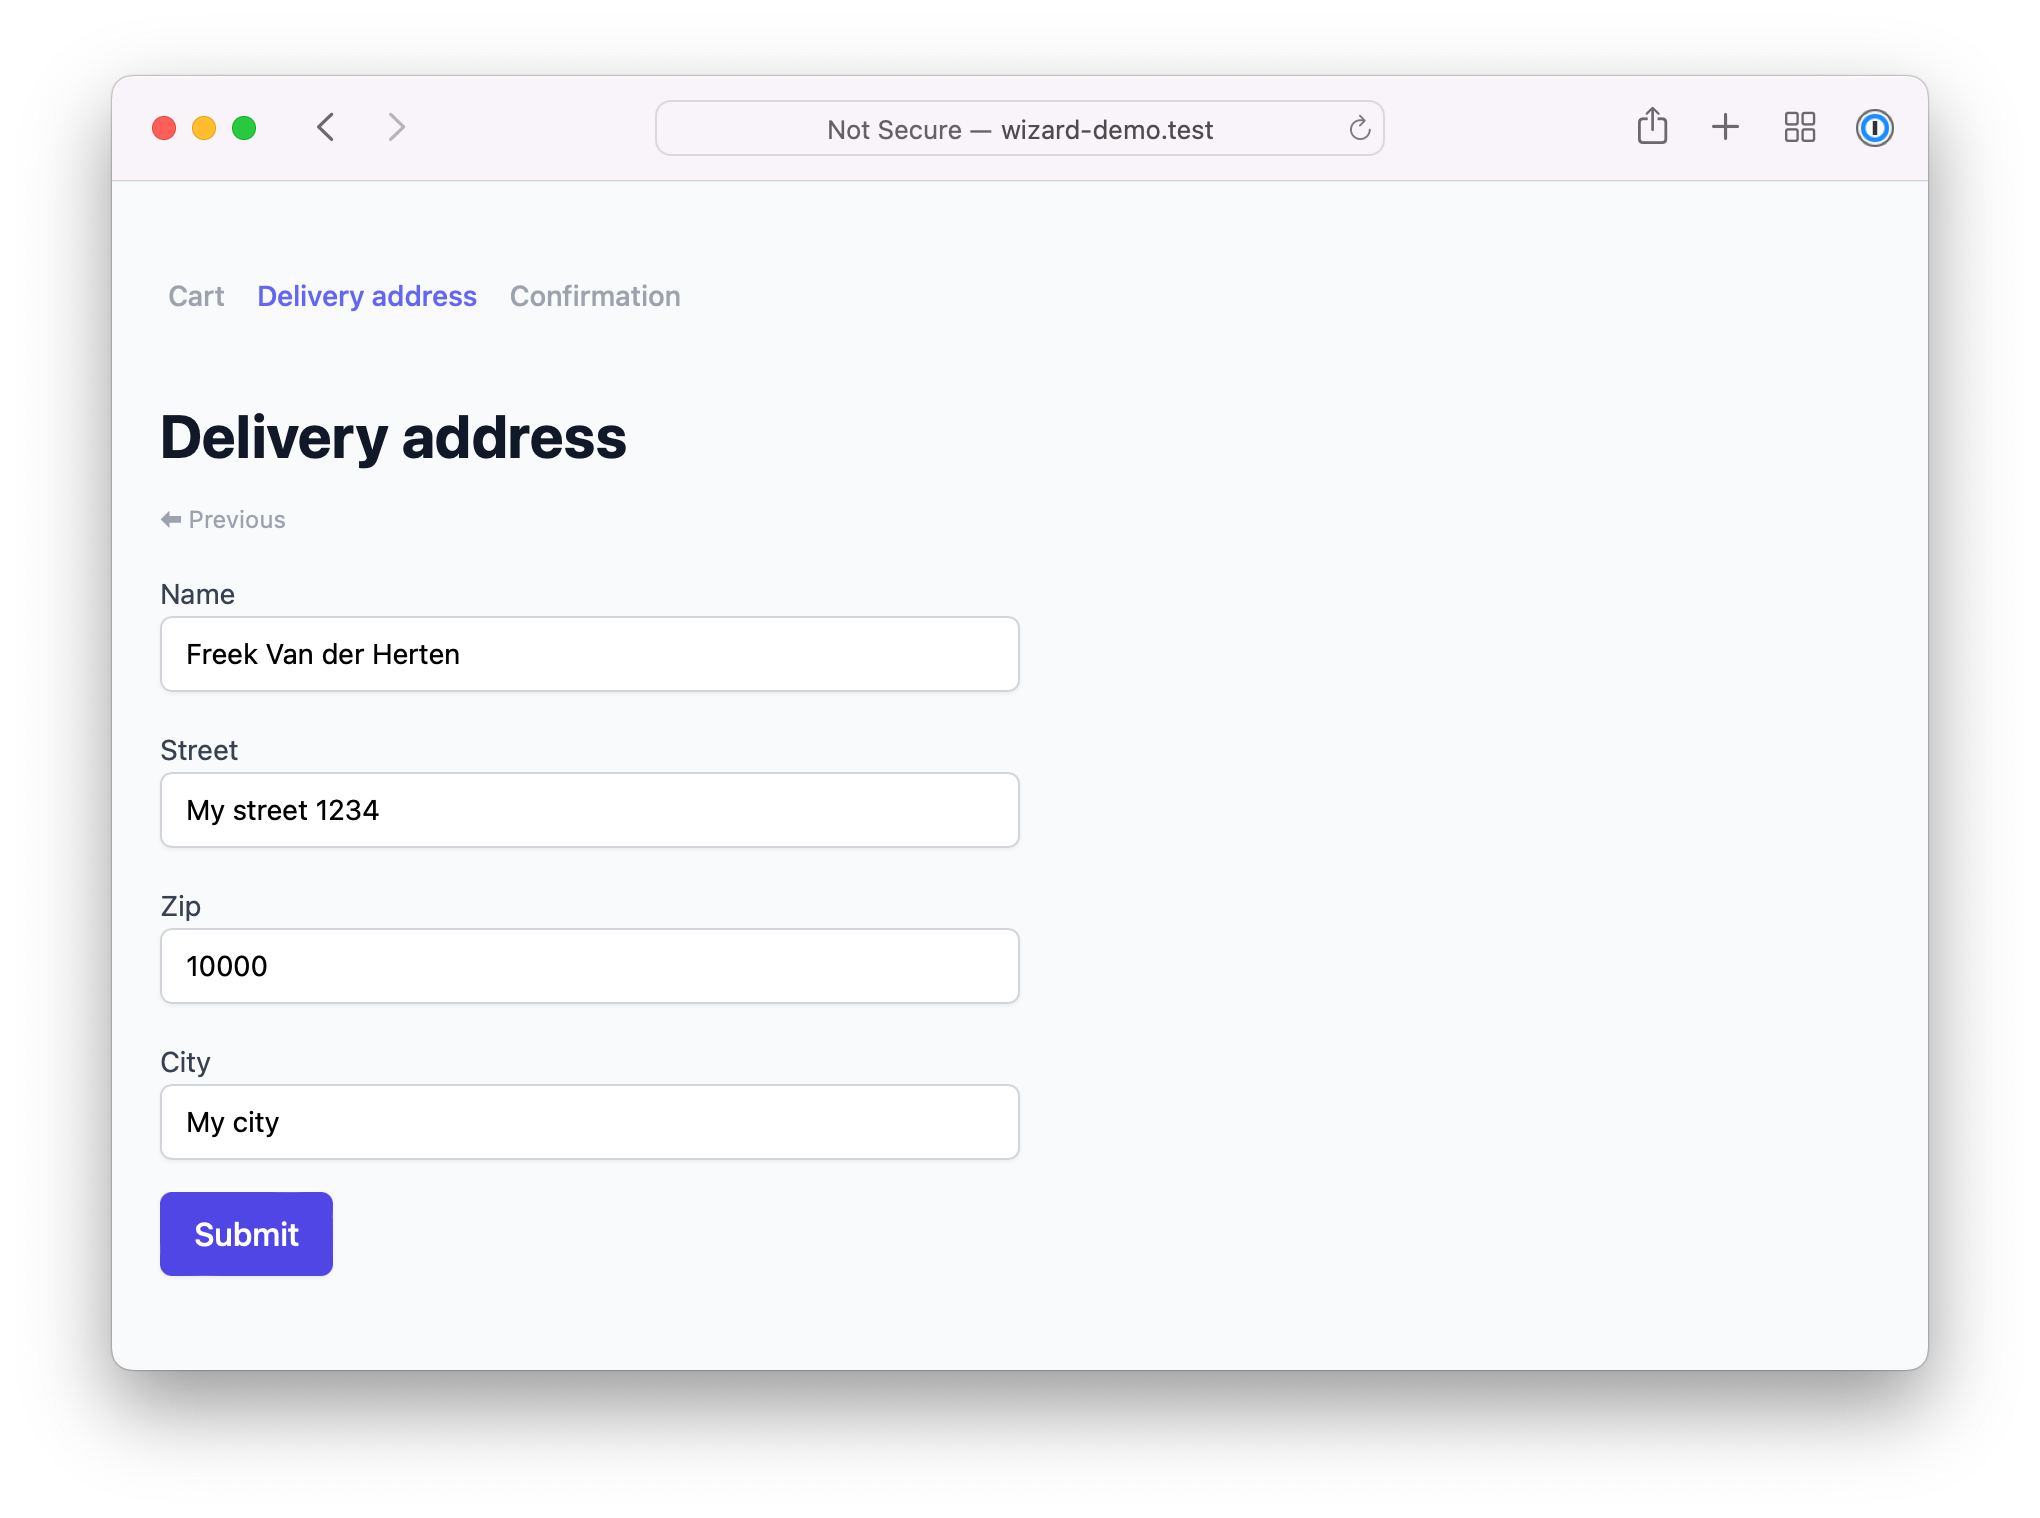
Onwards to the second step: here, the user can specify a delivery address.
In that last step, the user can see a summary of all entered data and confirm everything.
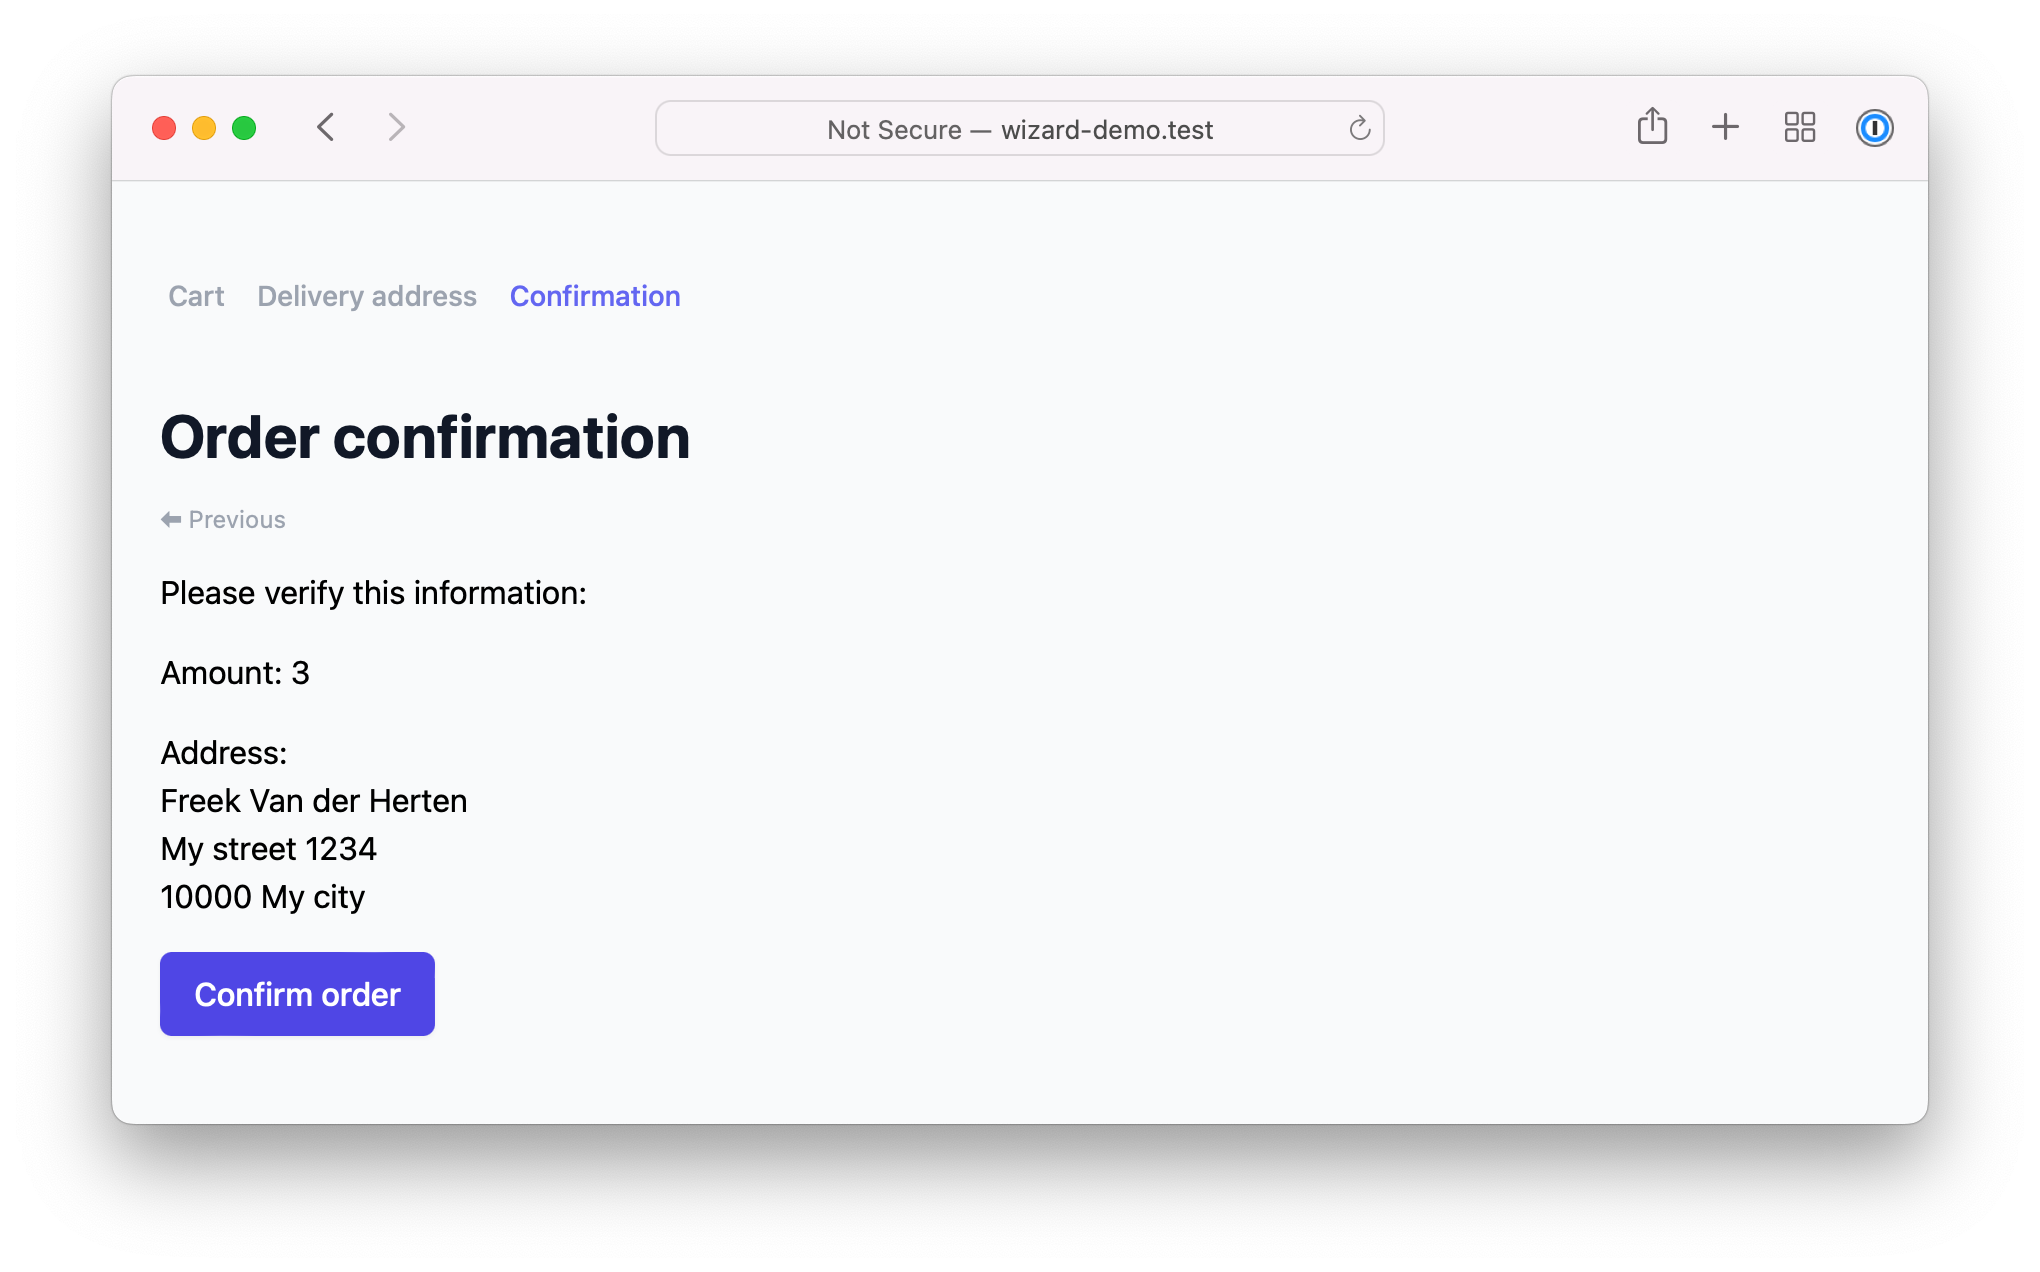
Notice that on this confirmation screen, we use data from the first and second steps.
I want to emphasize again that it's a very simple example. In a real-world scenario, each step would probably have many fields that need to be filled in, more steps, or many actions that can be executed. We keep it simple, so the basic concepts of the wizard can be more easily explained.
Creating a Livewire powered wizard
Ok, let's start implementing the wizard described above. If you, instead or reading further, want to view the example in your IDE, then clone this repo. It contains a small Laravel application in which a wizard has been set up.
Creating the wizard component
First, create a component that extends the provided WizardComponent.
namespace App\Components;

use Spatie\LivewireWizard\Components\WizardComponent;

class CheckoutWizardComponent extends WizardComponent
{

}
The WizardComponent class extends Livewire's component class, so you need the register CheckoutWizardComponent with Livewire.
// typically, in a service provider

use Livewire\Livewire;
use App\Components\App\Components;

Livewire::component('checkout-wizard', CheckoutWizardComponent::class);
Creating steps
Next, let's add steps to the wizard. In our example, our vastly simplified checkout process has three steps:
- A step to specify to display the contents of a cart
- A step to specify delivery address details
- A step that shows all order details and the ability to confirm the order
You need to create a class that extends StepComponent for each step. Here's what it may look like for the first step of our example.
namespace App\Http\Livewire\Steps;

use Spatie\LivewireWizard\Components\StepComponent;

class CartStepComponent extends StepComponent
{
    public $amount = 1;

    public array $rules = [
        'amount'=> ['numeric', 'min:1', 'max:5'],
    ];

    public function submit()
    {
        $this->validate();

        $this->nextStep();
    }

		/* This will be used to render the navigation. More
		 * on that later in this blog post.
		 */
    public function stepInfo(): array
    {
        return [
            'label' => 'Cart',
        ];
    }

    public function render()
    {
        return view('livewire.orderWizard.steps.cart');
    }
}
This CartComponent is a regular Livewire component, so you can add any Livewire functionality. You could display some info, add actions, handle a form, anything goes!
Let's look at how that cart view might look.
<div>
    <h1>Your cart</h1>

    <div class="space-y-4">
        <x-input type="number" name="amount"/>

        <x-button label="Submit" wire:click="submit"/>
    </div>
</div>
Super simple stuff! Notice that when we press that submit button, the Submit function of the component will be executed. In that method, you can do anything that you want. In this case, we will call Livewire's native validate method. If the validation passes, we call nextStep(), which will let the wizard display the next step of the process. The package also offers previousStep and showStep functions to go to other steps.
Since steps are Livewire components, don't forget to register all steps to Livewire.
// typically, in a service provider

use Livewire\Livewire;
use App\Components\CartComponent;
use App\Components\DeliveryAddressComponent;
use App\Components\ConfirmOrderComponent;

// ... other registrations

Livewire::component('cart-step', CartStepComponent::class);
Livewire::component('delivery-address-step', DeliveryAddressStepComponent::class);
Livewire::component('confirm-order-step', ConfirmOrderStepComponent::class);
Adding steps to the wizard
Now that you've created the step classes, let's add them to the wizard.
In CheckoutWizardComponent add a function named steps that returns an array with all your steps.
namespace App\Components;

use App\Components\CartComponent;
use App\Components\DeliveryAddressComponent;
use App\Components\ConfirmOrderComponent;
use Spatie\LivewireWizard\Components\WizardComponent;

class CheckoutWizardComponent extends WizardComponent
{
    public function steps() : array
    {
        return [
            CartStepComponent::class,
            DeliveryAddressStepComponent::class,
            ConfirmOrderStepComponent::class,
        ];
    }
}
Rendering the wizard component
Now that everything is set up, you can render the wizard component in any view you desire.
<div>
    <livewire:checkout-wizard />
</div>
Rendering the navigation
In the screenshots above, you've probably noticed that we have a little navigation section that displays all the step names of our wizard.

The package doesn't provide a pre-built navigation component but instead gives you functions that help you build any navigation you want.
A view of any step component has a $steps property that contains an array containing information on all steps in the wizard. You can use $steps to build any navigation you want. Here's an example:
{{-- somewhere in a Blade view--}}
<ul>
    @foreach($steps as $step)
        <li
            class="{{ $step->isCurrent() ? 'text-bold' : '' }}"
            @if ($step->isPrevious())
                wire:click="{{ $step->show() }}"
            @endif
        >{{ $step->label }}</li>
    @endforeach
</ul>
In the example above, we've used $step->label to render the content of the <li>.
That label property isn't available by default.
You can add any property on a step by adding a stepInfo method to your Step component. That method should contain an array of properties regarding your step.
// in your step component

public function stepInfo(): array
{
    return [
        'label' => 'Your cart',
        'icon' => 'fa-shopping-cart',
    ];
}
Any key you return will be available as a property on $step.
$step->label; // returns 'Your cart'
$step->icon; // returns 'fa-shopping-cart'
Accessing the state of all steps
In our example wizard, the last step is the confirmation step. This is what it looks like:
As you can see, this step displays information that was entered in the previous steps. The package makes it easy to get to the state of other steps in the wizard.
In any of StepComponent you can access the state of all other steps in the wizard. You can call the state() function in a step component, to get back and instance of Spatie\LivewireWizard\Support\State.
// in a step component

$this->state(); // returns instance of `Spatie\LivewireWizard\Support\State`
On that state object, you can call these methods:
-
all(): returns an array containing the values of all public properties of all steps in the wizard. The key of the items in the array is the name of the step. Optionally, you can pass a key name to let the function only return the value for that key. -
forStep($stepname): returns the values of all public properties of the given step. -
current(): returns an array containing the values of all public properties of the current step. The result is almost identical to Livewire's nativeall()method, but with some internal properties filtered out.
// in a step component

$this->state()->all(); // returns all state from all steps in the wizard
$this->state()->forStep('delivery-address-step'); // returns all state of the given step
$this->state()->current(); // returns all state of the current step
By default, calling $this->state() returns instance of Spatie\LivewireWizard\Support\State. But you can customize the class the package should use. You can add little helper methods to your state class in your custom class. You can think of such a custom state class as a FormRequest for wizard state.
To get started, first create a class that extends Spatie\LivewireWizard\Support\State. You can add any method that you want to that custom class.
use Spatie\LivewireWizard\Support\State;

class MyCustomState extends State
{
    public function deliveryAddress(): array
    {
        $deliverStepState = $this->state()->forStep('delivery-address-step');

        return [
            'name' => $deliverStepState['name'],
            'address' => $deliverStepState['address'],
            'zip' => $deliverStepState['zip'],
            'city' => $deliverStepState['city'],
        ];
    }
}
Next, in your wizard class, you should add a method name stateClass and let it return the class name of your custom state.
use Spatie\LivewireWizard\Components\WizardComponent;

class CheckoutWizardComponent extends WizardComponent
{
    public function stateClass(): string
    {
        return MyCustomState::class;
    }
}
With this in place, the state() function of step components will return an instance of MyCustomState. You can use any custom method you added to your state class.
namespace App\Components;

use Spatie\LivewireWizard\Components\StepComponent;

class ConfirmOrderStepComponent extends StepComponent
{
    public function render()
    {
        return view('checkout-wizard.steps.confirm', [
            'address' => $this->state()->deliveryAddress(),
        ]);
    }
}
And in a view, you can just make use of the passed address.
<div>
    @include('livewire.orderWizard.navigation')

    <h1>Order confirmation</h1>

    <div class="text-xs text-under text-gray-400 cursor-pointer" wire:click="previousStep">⬅ Previous</div>

    <div class="mt-4 space-y-4">
        <div>
           Please verify this information:
       </div>
       <div>
            {{ $address['name'] }}<br />
            {{ $address['street'] }}<br />
            {{ $address['zip'] }} {{ $address['city'] }}
        </div>

        <x-button label="Confirm order" wire:click="confirm"/>
    </div>

</div>
In closing
We built this package because we needed to add wizards to an upcoming project. In that project, the package works great for us, and we hope that it will work for you. We've tried to make it as flexible as possible, so you can build any wizard you want with it.
When starting with the package, I used a different way to build the package. My colleague Rias had a great idea to simplify it by using nested components vastly. I'm happy that Rias' idea worked perfectly!
To know more about the package, head over the documentation. It contains some more features not mentioned in this blog post. You might also want to take a look at the demo app, which contains the minimal checkout wizard that we used as an example.
This isn't the first package that our team has created. Check out this extensive list of packages we released previously. If you like our open source work, consider picking up one of our products, such as Flare, Ray or Mailcoach, or any of our premium courses.