
Introducing Laravel Schedule Monitor
Since version 5, Laravel has a built-in scheduler to perform tasks at regular intervals. In normal circumstances, these scheduled tasks will run just fine.
Out of the box, Laravel doesn't offer a way to see the status of the scheduled tasks. When did they run, how long did a task run, which tasks did throw an exception?
Laravel Schedule Monitor is a new Spatie package that monitors all schedule tasks in a Laravel app. In this blog post, I'd like to introduce the package to you.
Using the package
To monitor your schedule, you should first run schedule-monitor:sync. This command will take a look at your schedule and create an entry for each task in the monitored_scheduled_tasks table.
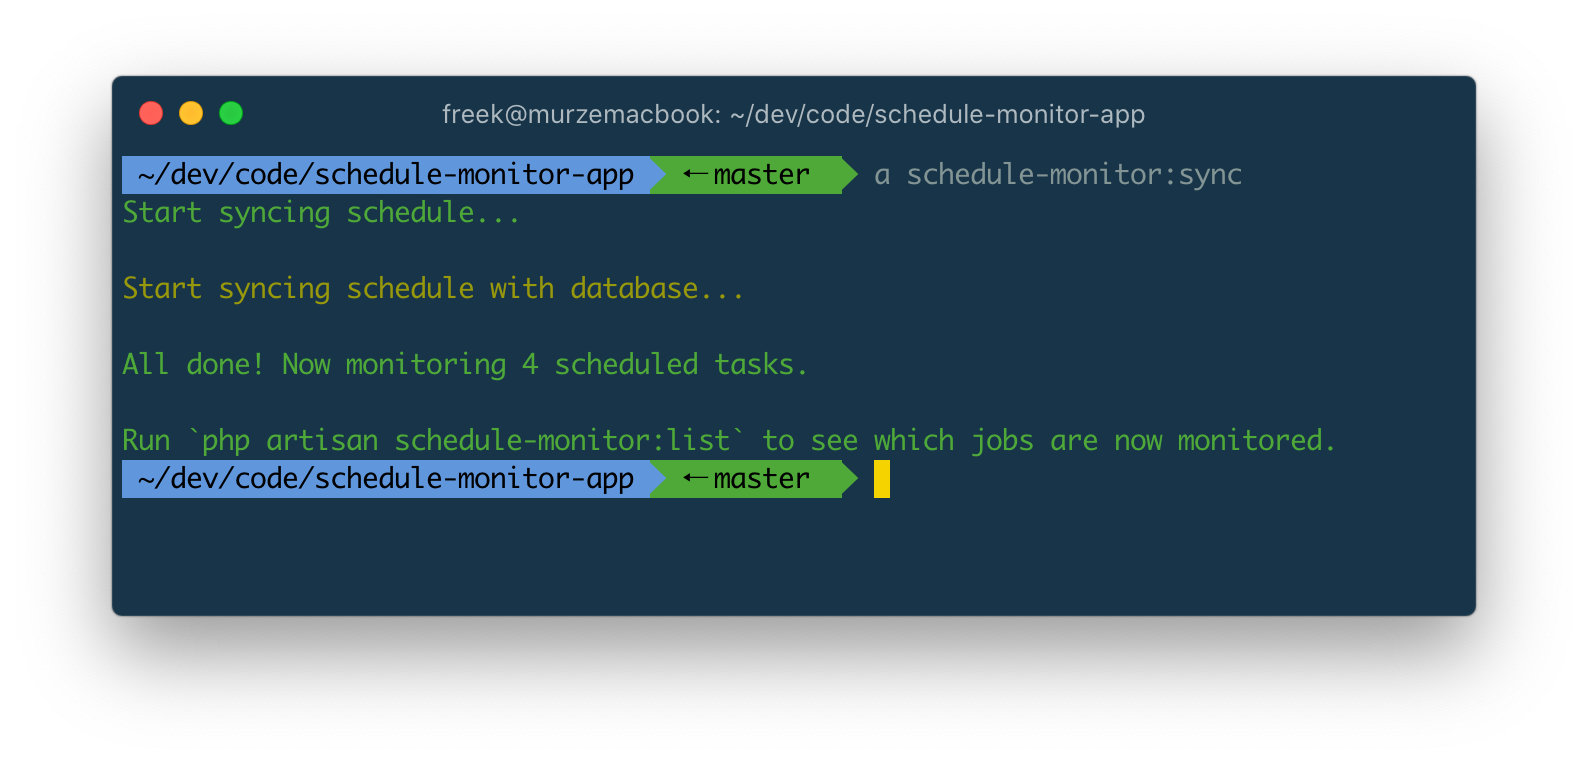
You should probably execute this command in the script that deploys your app to the production environment. This way, your scheduled tasks will always stay in sync with the schedule monitor.
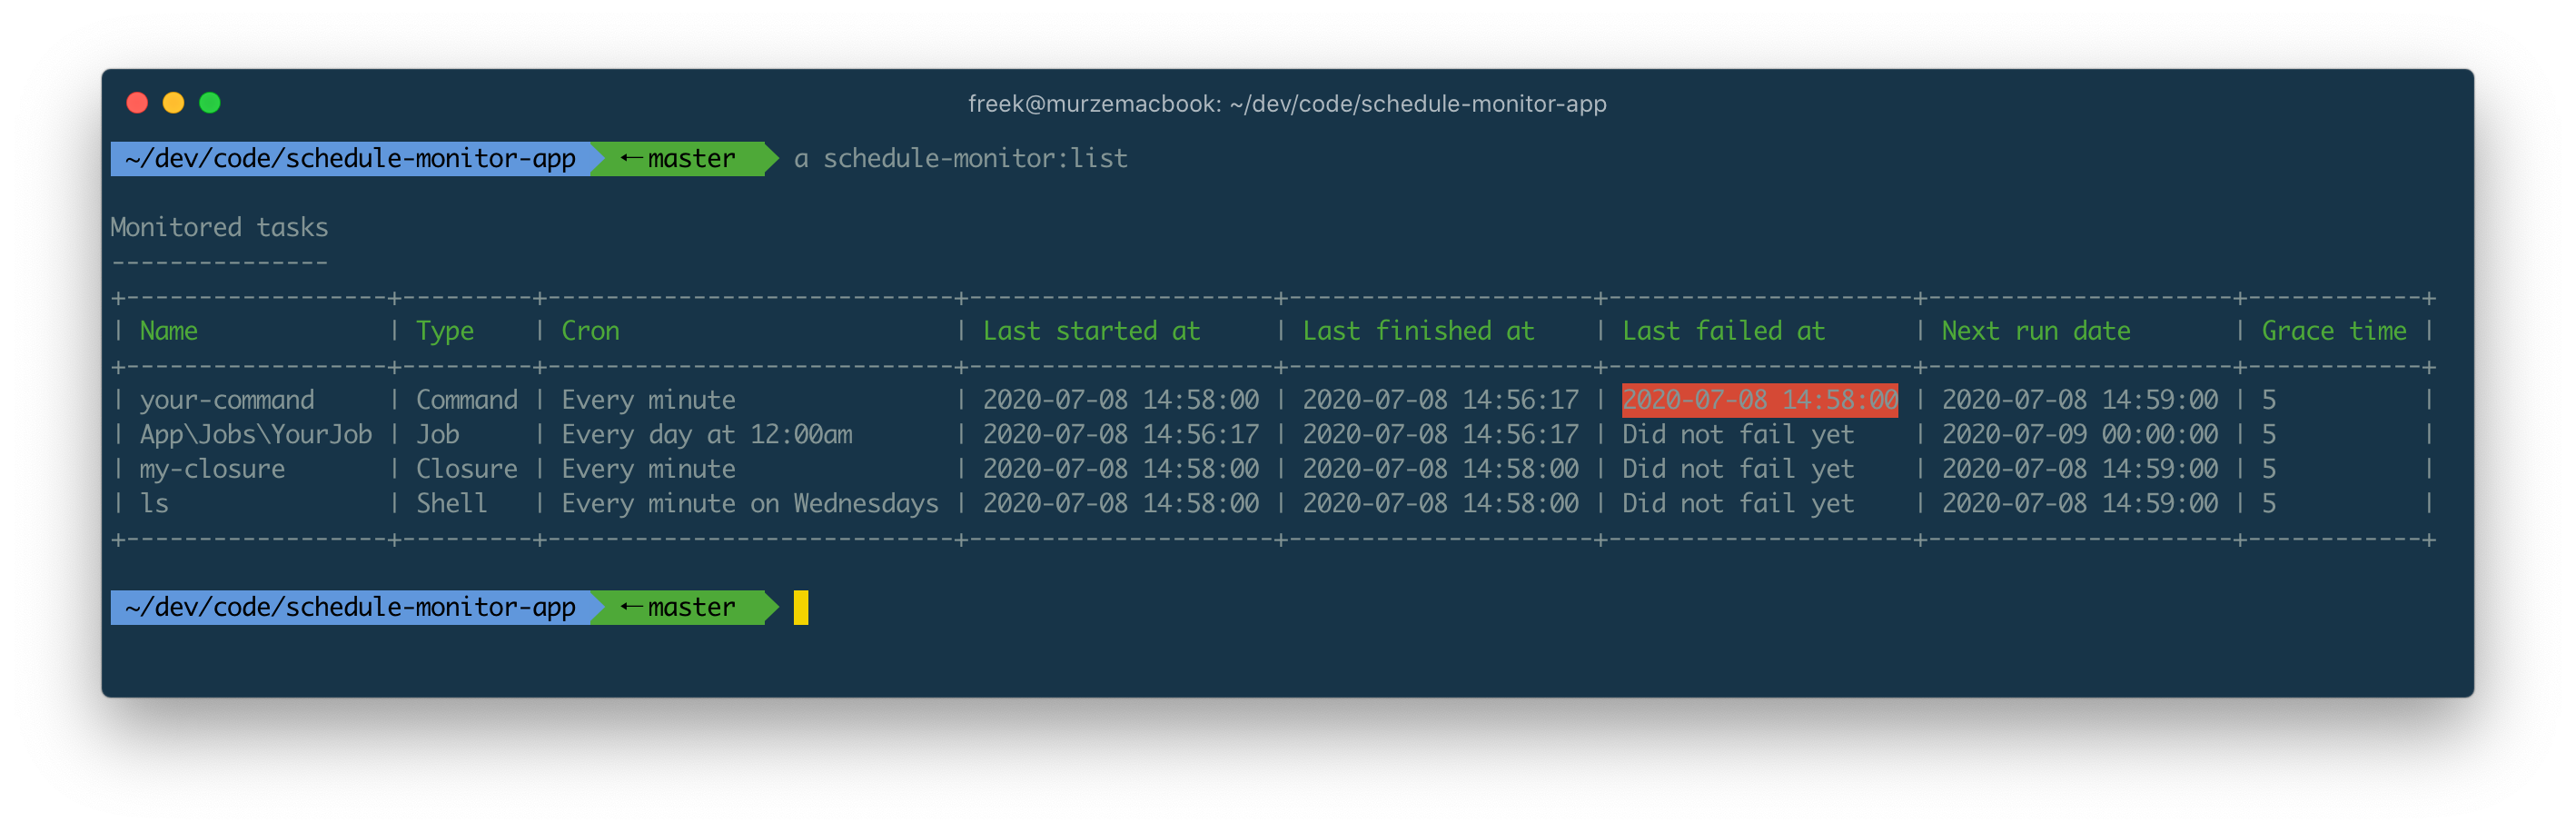
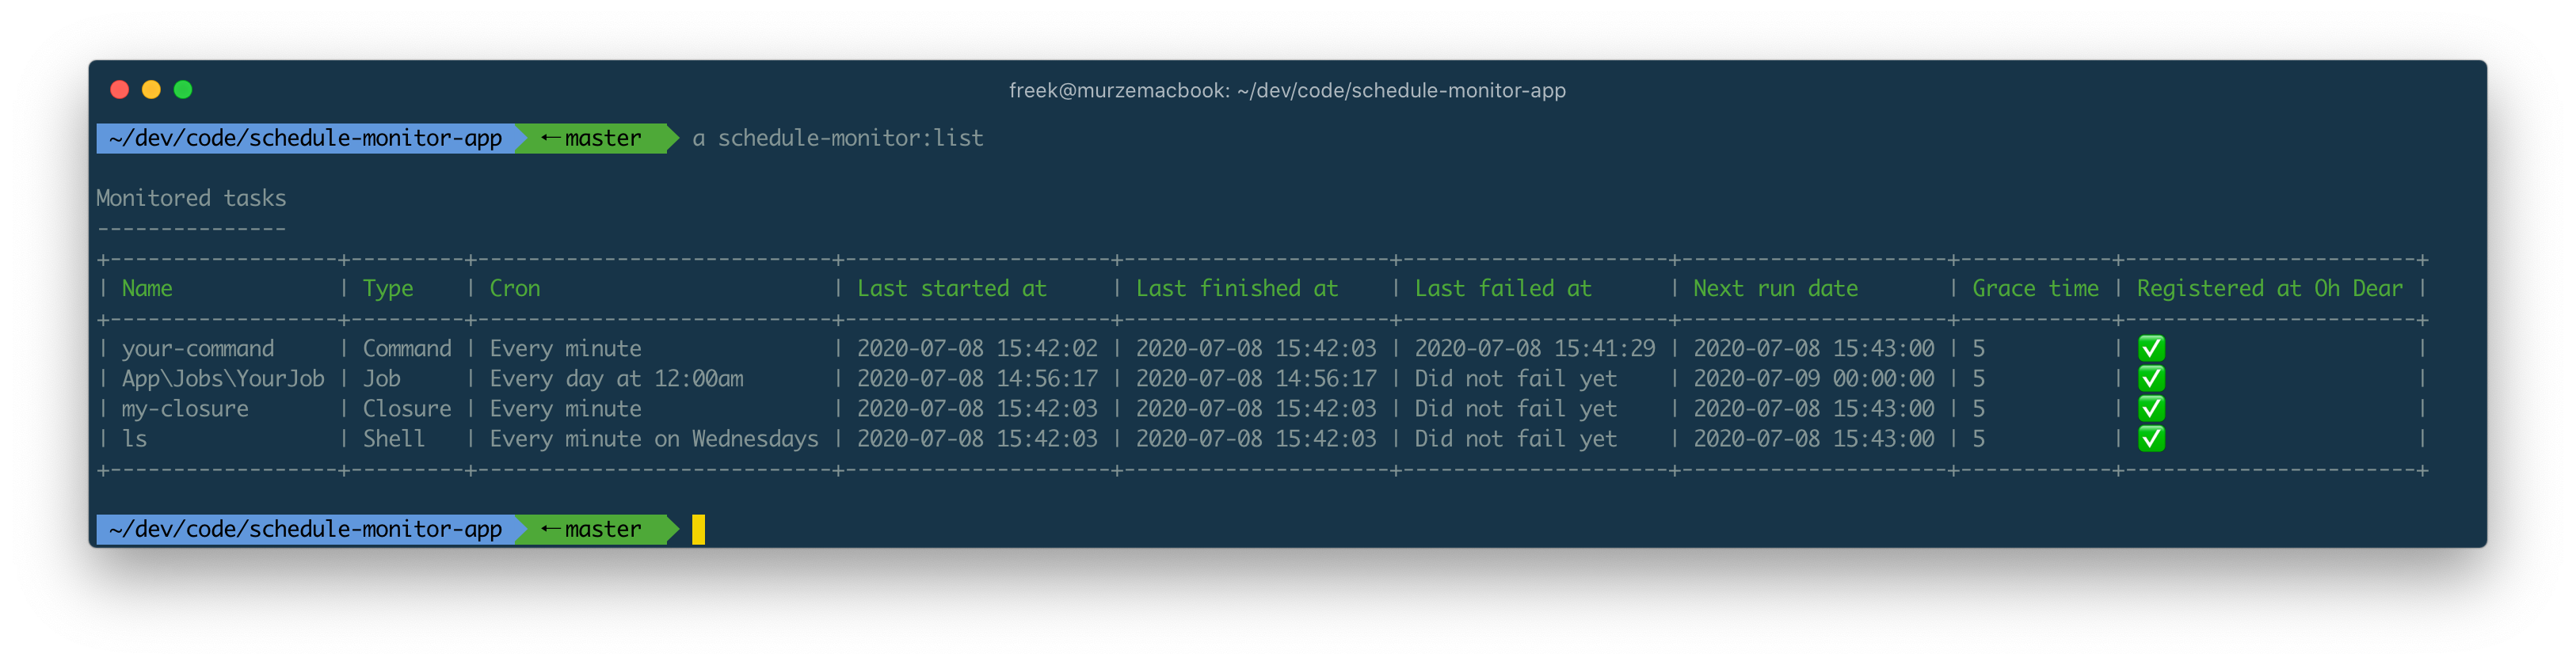
To view all monitored scheduled tasks, you can run schedule-monitor:list. This command will list all monitored scheduled tasks. It will show you when a scheduled task has last started, finished, or failed.
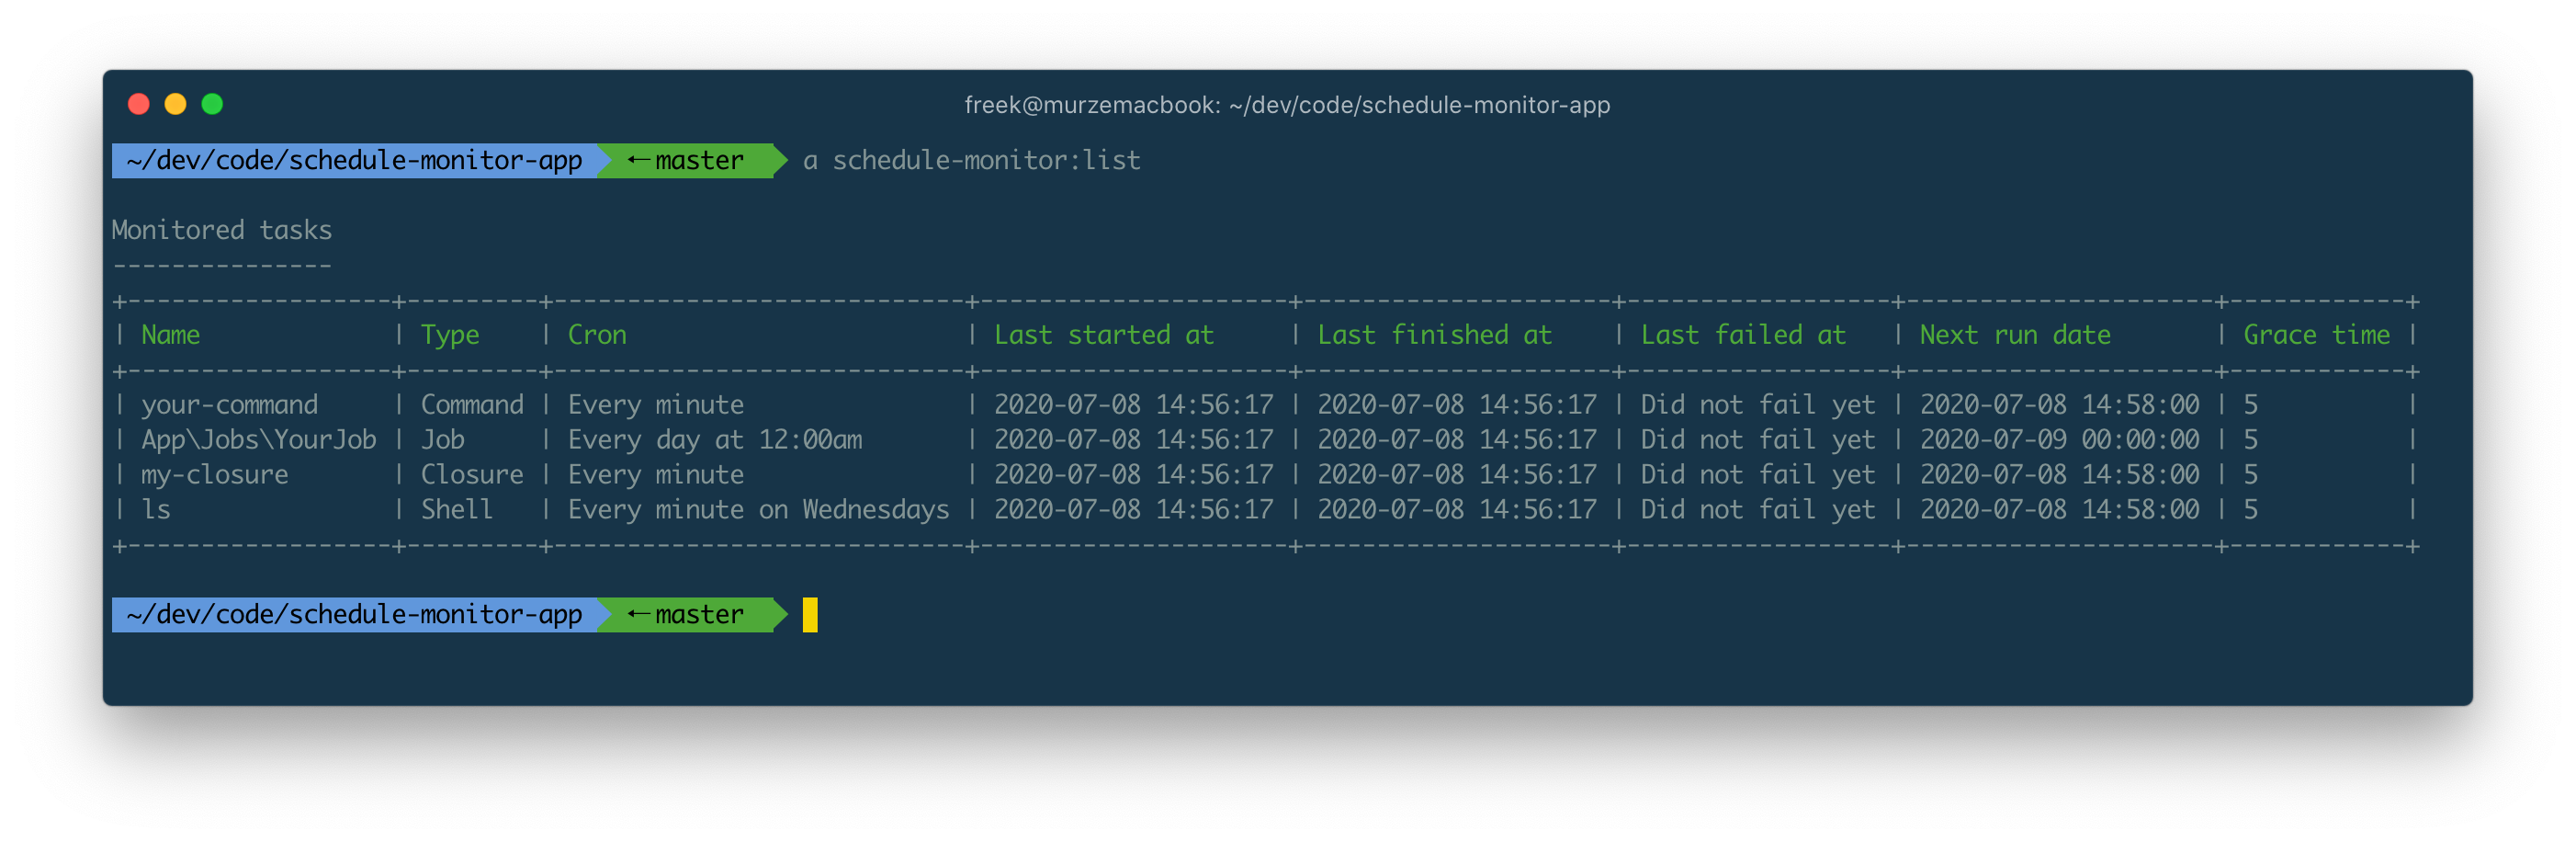
The package will write an entry to the monitored_scheduled_task_log_items table in the DB each time a scheduled task starts, end, fails, or is skipped. The log items also hold other interesting metrics like memory usage, execution time, and more.
When the package detects that the last run of a scheduled task did not run in time, the schedule-monitor list will display that task using a red background color. In this screenshot, the task named your-command ran too late.
The package will determine that a task ran too late if it was not finished at the time it was supposed to run + the grace time. You can think of the grace time as the number of minutes that a task under normal circumstances needs to finish. By default, the package grants a grace time of 5 minutes to each task.
You can customize the grace time by using the graceTimeInMinutes method on a task. In this example, a grace time of 10 minutes is used for the your-command task.
// in app/Console/Kernel.php

protected function schedule(Schedule $schedule)
{
   $schedule->command('your-command')->daily()->graceTimeInMinutes(10);
}
Getting notified
We assume that, when your scheduled tasks do not run properly, a scheduled task that sends out notifications would probably not run either. That's why this package doesn't send out notifications by itself.
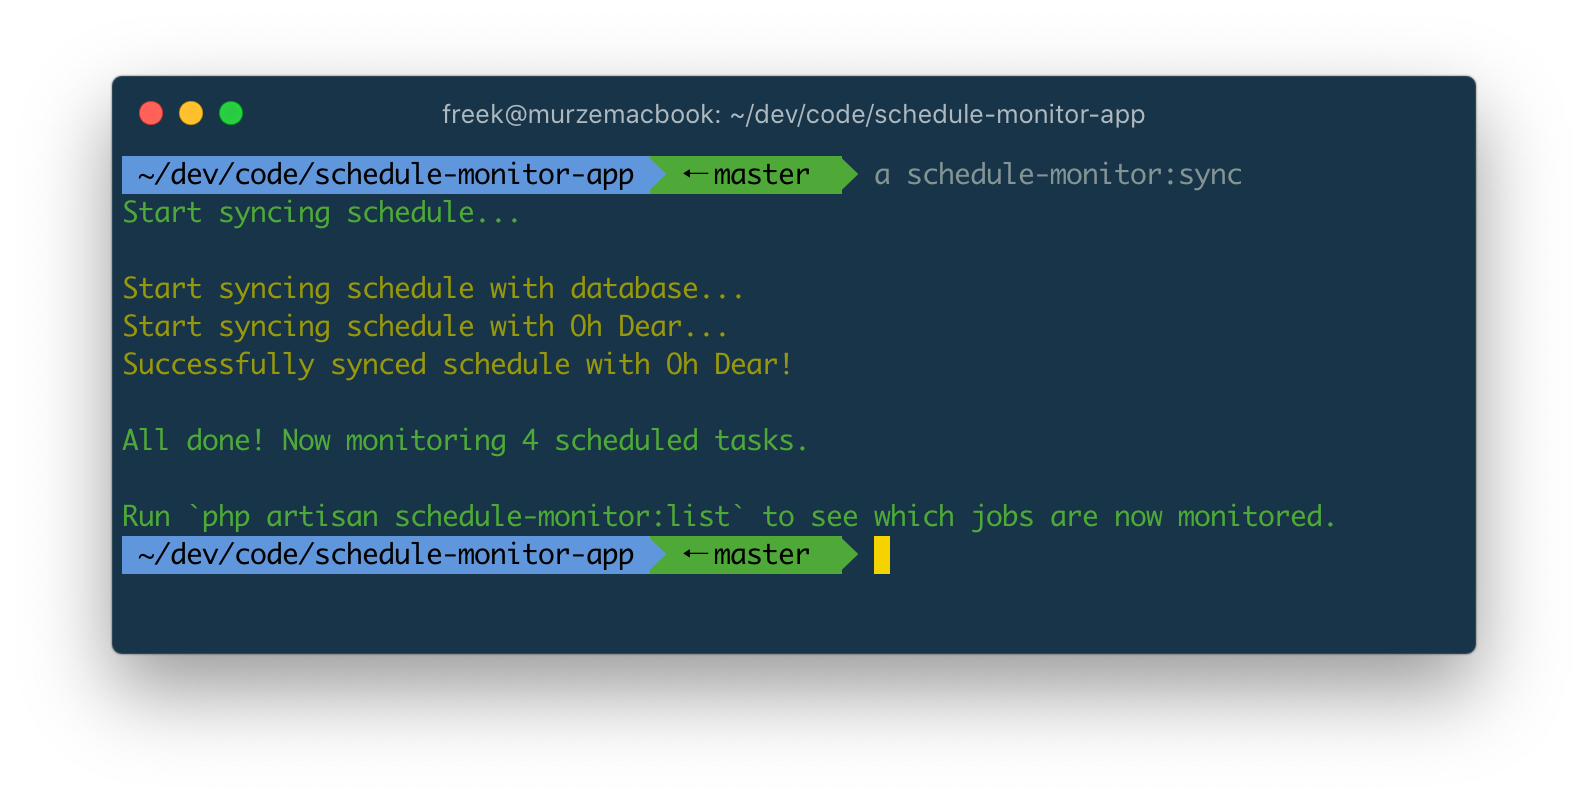
The package comes with built-in support to sync your schedule with the cron check feature of Oh Dear. Each time a scheduled task is executed, the server monitor package will send a "ping" request to Oh Dear. If pings do not arrive in time, Oh Dear will notify you.
After providing an Oh Dear API token and site ID, the sync command will sync your schedule with Oh Dear.
The list command will display whether tasks are registered at the service.
At the moment of writing, the cron check feature of Oh Dear is in closed beta, but you can request early access.
How it works under the hood
After installing the package, the first thing you need to do is run the sync command. This command will take a look at the schedule. For each task in the schedule, it will write an entry in the monitored_scheduled_tasks table.
Each time a scheduled task is executed, Laravel will fire off a couple of events. The package listens for these events and updates the relevant row in the monitored_scheduled_tasks table.
That's how it works in a nutshell. Now, let's dive into the details.
Syncing the schedule
Here's the syncScheduledTasksWithDatabase function in that sync command.
protected function syncScheduledTasksWithDatabase(ScheduledTasks $scheduledTasks): self
{
    $this->comment('Start syncing schedule with database...');

    $monitoredScheduledTasks = ScheduledTasks::createForSchedule()
        ->uniqueTasks()
        ->map(function (Task $task) {
            return MonitoredScheduledTask::updateOrCreate(
                ['name' => $task->name()],
                [
                    'type' => $task->type(),
                    'cron_expression' => $task->cronExpression(),
                    'grace_time_in_minutes' => $task->graceTimeInMinutes(),
                ]
            );
        });

    MonitoredScheduledTask::query()->whereNotIn('id', $monitoredScheduledTasks->pluck('id'))->delete();

    return $this;
}
Let's take a look at that createForSchedule function.
public static function createForSchedule()
{
    $schedule = app(Schedule::class);

    return new static($schedule);
}

public function __construct(Schedule $schedule)
{
    $this->schedule = $schedule;

    $this->tasks = collect($this->schedule->events())
        ->map(fn (Event $event): Task => ScheduledTaskFactory::createForEvent($event));
}
The code above will get all registered events for the schedule. An "event" in this context is a task that you have scheduled. We're wrapping each $event in a Task class. By wrapping these $events in a Task we can add some extra behavior on for each event on that Task class. We keep all tasks in the $tasks instance variable.
Let's take a look at that ScheduledTasksFactory. This is the entire class.
class ScheduledTaskFactory
{
    public static function createForEvent(Event $task): Task
    {
        $taskClass = collect([
            ClosureTask::class,
            JobTask::class,
            CommandTask::class,
            ShellTask::class,
        ])
            ->first(fn (string $taskClass) => $taskClass::canHandleEvent($task));

        return new $taskClass($task);
    }
}
In this factory, you see that there are four types of scheduled tasks in a Laravel app: a closure, a job, a command, and a shell command.
Here's an example of how you would schedule these types in the scheduler.
// in app/Console/Kernel.php

protected function schedule(Schedule $schedule)
{
    // a closure
    $schedule->call(fn () => 1 + 1)->everyMinute();

    // a job
    $schedule->job(new MyJob())->hourly()

    // an artisan command
    $schedule->command('an-artisan-command')->daily();

    // a shell command
    $schedule->command('ls')->weekly();
}
These types of tasks each need to be handle by the package in a slightly different way. For instance, the name we'll use to track these tasks is determined differently for each type of task.
Let's take a quick look at the ShellTask class.
namespace Spatie\ScheduleMonitor\Support\ScheduledTasks\Tasks;

use Illuminate\Console\Scheduling\CallbackEvent;
use Illuminate\Console\Scheduling\Event;
use Illuminate\Support\Str;

class ShellTask extends Task
{
    public static function canHandleEvent(Event $event): bool
    {
        if ($event instanceof CallbackEvent) {
            return true;
        }

        return true;
    }

    public function defaultName(): ?string
    {
        return Str::limit($this->event->command, 255);
    }

    public function type(): string
    {
        return 'shell';
    }
}
Here you can see that in case of shell tasks, we'll use the command property of the event as the default name.
In the abstract Task class, where ShellTask extends from, you can see that we use that defaultName function inside of the name function.
// in the Task class

public function name(): ?string
{
    return $this->event->monitorName ?? $this->defaultName();
}
You might wonder where that monitorName property is coming from. Let's sidestep and explain that too. I'm assuming that for some tasks, you might want to manually want to specify the name that should be used to track it. For a closure, you are even required to specify a name, because a closure has by its very nature no name.
The Illuminate\Console\Scheduling\Event (which is the class in Laravel that represents a scheduled task) is macroable, so we can add a function of our own to it. In the service provider, there is a macro being registered that allow that monitorName to be set.
// in ScheduledMonitorServiceProvider

Event::macro('monitorName', function (string $monitorName) {
    $this->monitorName = $monitorName;

    return $this;
});
This is how the macro can be used.
// in app/Console/Kernel.php

protected function schedule(Schedule $schedule)
{
   $schedule->call(fn () => 1 + 1)->hourly()->monitorName('addition-closure');
}
Now that you know that we wrap each scheduled task in a Task class and how they can be named, let's take another look at syncScheduledTasksWithDatabase in the sync command. Here's that code again.
protected function syncScheduledTasksWithDatabase(ScheduledTasks $scheduledTasks): self
{
    $this->comment('Start syncing schedule with database...');

    $monitoredScheduledTasks = ScheduledTasks::createForSchedule()
        ->uniqueTasks()
        ->map(function (Task $task) {
            return MonitoredScheduledTask::updateOrCreate(
                ['name' => $task->name()],
                [
                    'type' => $task->type(),
                    'cron_expression' => $task->cronExpression(),
                    'grace_time_in_minutes' => $task->graceTimeInMinutes(),
                ]
            );
        });

    MonitoredScheduledTask::query()->whereNotIn('id', $monitoredScheduledTasks->pluck('id'))->delete();

    return $this;
}
In essence, this code will create a MonitoredScheduledTask model for each Task. We can just call $task->name() because we handled each different case in the underlying specific class (ShellTask, CommandTask, ...).
Tracking scheduled tasks
Laravel will fire off an event for each scheduled task that is starting, has finished, has been skipped, or is failing.
In the ScheduleMonitorServiceProvider we set up an event subscriber that listens for these events.
protected function registerEventSubscriber(): self
{
    Event::subscribe(ScheduledTaskEventSubscriber::class);

    return $this;
}
The ScheduledTaskEventSubscriber is quite small. Here is the code of the entire class.
namespace Spatie\ScheduleMonitor;

// ...

class ScheduledTaskEventSubscriber
{
    public function subscribe(Dispatcher $events): void
    {
        $events->listen(
            ScheduledTaskStarting::class,
            fn (ScheduledTaskStarting $event) => optional(MonitoredScheduledTask::findForTask($event->task))->markAsStarting($event)
        );

        $events->listen(
            ScheduledTaskFinished::class,
            fn (ScheduledTaskFinished $event) => optional(MonitoredScheduledTask::findForTask($event->task))->markAsFinished($event)
        );

        $events->listen(
            ScheduledTaskFailed::class,
            fn (ScheduledTaskFailed $event) => optional(MonitoredScheduledTask::findForTask($event->task))->markAsFailed($event)
        );

        $events->listen(
            ScheduledTaskSkipped::class,
            fn (ScheduledTaskSkipped $event) => optional(MonitoredScheduledTask::findForTask($event->task))->markAsSkipped($event)
        );
    }
}
When we hear the ScheduledTaskFinished come in, this code is executed:
optional(MonitoredScheduledTask::findForTask($event->task))->markAsFinished($event);
That findForTask function under the hood uses the ScheduleTaskFactory shown above to wrap the event in a Task class.
public static function findForTask(Event $event): ?self
{
    $task = ScheduledTaskFactory::createForEvent($event);

    if (empty($task->name())) {
        return null;
    }

    return MonitoredScheduledTask::findByName($task->name());
}
Finally, let's take a look at the markAsFinished function on MonitoredScheduledTask model.
public function markAsFinished(ScheduledTaskFinished $event): self
{
    if ($event->task->exitCode !== 0 && ! is_null($event->task->exitCode)) {
        return $this->markAsFailed($event);
    }

    $logItem = $this->createLogItem(MonitoredScheduledTaskLogItem::TYPE_FINISHED);

    $logItem->updateMeta([
        'runtime' => $event->runtime,
        'exit_code' => $event->task->exitCode,
        'memory' => memory_get_usage(true),
    ]);

    $this->update(['last_finished_at' => now()]);

    return $this;
}
The first thing that we'll do it check the exit code. Even if a scheduled task signals an error through a non-zero exit code, Laravel will regard it as "finished" and not "failed". But in our package, we'll mark the task as failed if a non-zero exit code is used.
The rest of this function is pretty trivial. A log item model is created where we store some extra properties like how long the command ran and how much memory it did take. To mark the task as finished, we're updating that last_finished_at attribute on the monitor model.
Viewing the monitored tasks
Now that you understand how tasks are registered in the package, and how listed for events, let's take a look at how we display the schedule.
Here's the output of list command.
In the screenshot, you only see the monitored commands, but the command can also display tables of unregistered tasks, duplicate tasks, and tasks that could not be tracked because no name could be determined for them.
When you look at the code of list command you'll see that I isolated each table in its own class.
class ListCommand extends Command
{
    public $signature = 'schedule-monitor:list';

    public $description = 'Display monitored scheduled tasks';

    public function handle()
    {
        (new MonitoredTasksTable($this))->render();
        (new ReadyForMonitoringTasksTable($this))->render();
        (new UnnamedTasksTable($this))->render();
        (new DuplicateTasksTable($this))->render();

        $this->line('');
    }
}
I'm not going to dive into each class as the code is pretty straightforward. We'll just loop over the registered task and use attributes on the monitor models, like last_finished_at, to display a task's status.
In closing
I hope you enjoyed this little source dive of spatie/laravel-schedule-monitor.
If you want to source dive some more of our packages with me, consider picking up the Laravel Package Training video course. Besides teaching you how to code up quality packages, it contains videos where we'll source dive laravel-medialibrary, laravel-multitenancy, and a couple more!
Be sure also to take a look at these packages our team has created previously. I'm sure there's something there for your next project.
What are your thoughts on "Introducing Laravel Schedule Monitor"?