Mailcoach v2 has been released with support for custom HTML editors and multiple mailers original
A couple of months ago, my team released Mailcoach, a self-hosted solution to send out newsletters. It sends out mail via services like Amazon SES, Mailgun, Sendgrid, and Postmark. It can optionally track opens and clicks. When your email list grows, this is a much more cost-effective solution when compared to a service like Mailchimp.
Mailcoach can be used as a premium Laravel package or as a stand-alone app. When installed into a Laravel app, it can be greatly customized. The Mailcoach stand alone app can be used without knowing how to program.
Today we're releasing v2 of Mailcoach. It offers support for Laravel 7, html editors, and multiple mailers, together with a bunch of quality of life improvements. In this blog post, I'd like to walk you through these features and show some technical details.
If you already bought Mailcoach, you'll be happy to know that this is a free upgrade.
Introducing Mailcoach
If you're not familiar with Mailcoach yet, you can watch this video to see the core features in action.
Mailcoach intro from Spatie on Vimeo.
Support for custom HTML editors
By default, Mailcoach uses a plain text area field to edit campaigns and tables. One of the most requested features after launching Mailcoach v1, was support for an HTML editor.
Unlayer, an easy to use HTML editor
In Mailcoach v2 we've added the ability to install editors via add on packages, so you can bring any editor you like. We've created two add-on packages ourselves. The first one brings the free version of Unlayer, a powerful WYSIWYG HTML editor to Mailcoach.
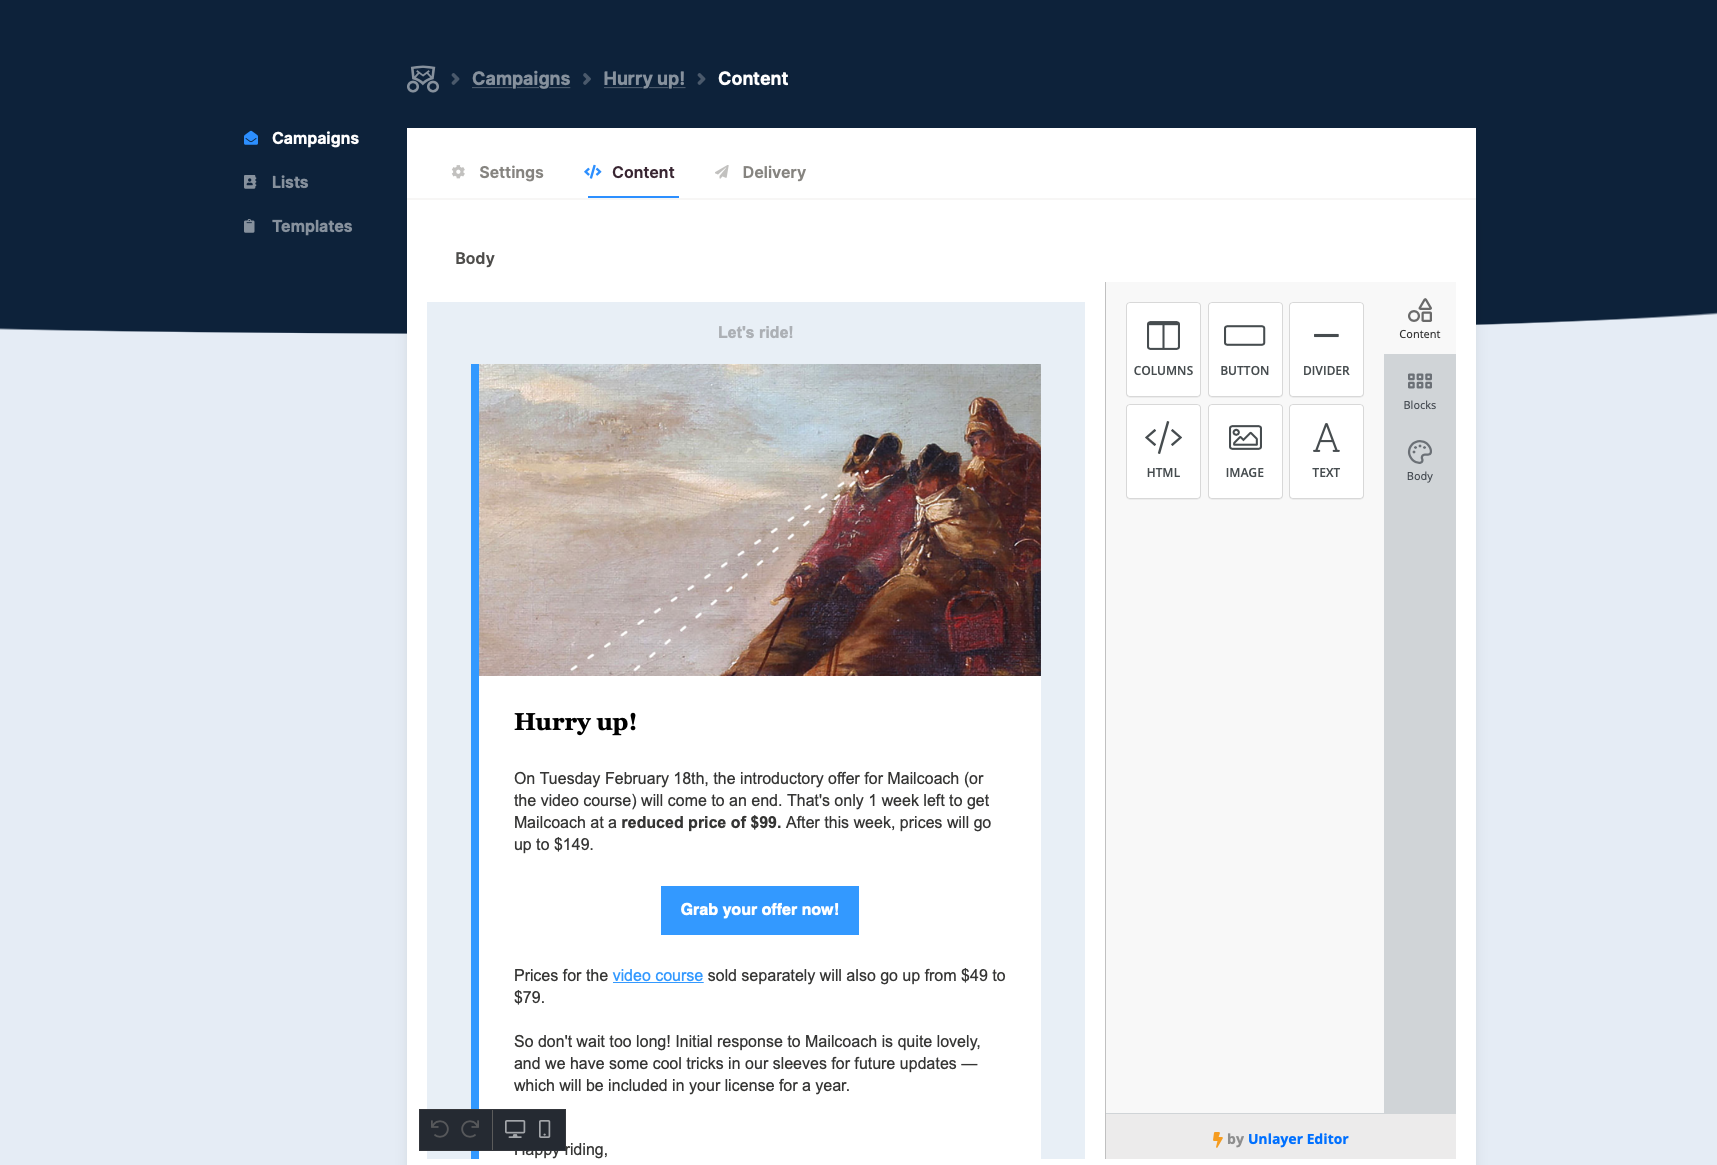
When using this editor, you don't need any knowledge of HTML to compose your campaign. It also can handle image uploads. Any uploads will be handled by our laravel-medialibrary package, but users don't need to care about that, it all happens behind the scenes.
Installing the Unlayer editor in Mailcoach is easy. You just have to require the add on package.
composer require spatie/laravel-mailcoach-unlayer
Next, you'll have to run the migration provided by the package, add the route macro, and set the editor key in the mailcoach.app config file to \Spatie\MailcoachUnlayer\UnlayerEditor::class. If you're familiar with adding packages to a Laravel app, this shouldn't take you long.
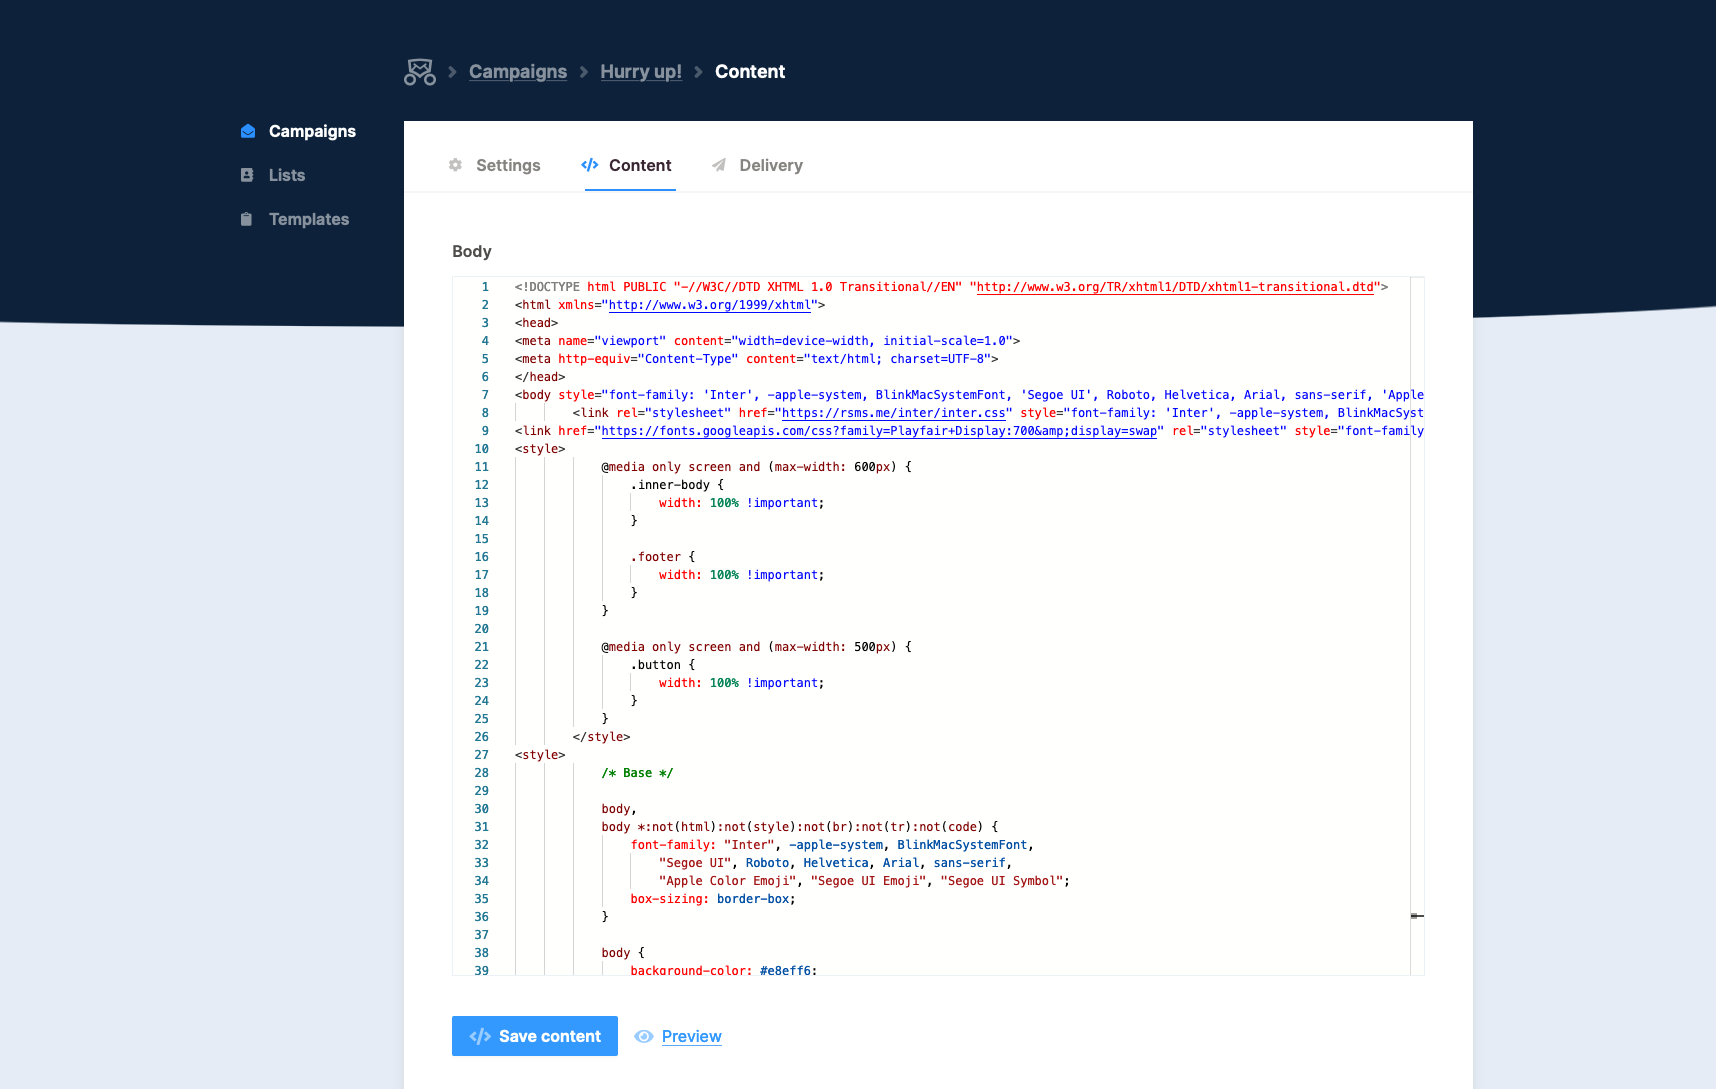
Monaco, a powerful code editor
Monaco is a powerful code editor created by Microsoft. It provides code highlighting, auto-completion, and much more.
Installing this package is dead simple too. Just require the package...
composer require spatie/laravel-mailcoach-monaco
Install the assets...
php artisan vendor:publish --tag mailcoach-monaco-assets --force
Set the editor in the mailcoach.app config file...
'editor' => \Spatie\MailcoachMonaco\MonacoEditor::class,
And you're good to go!
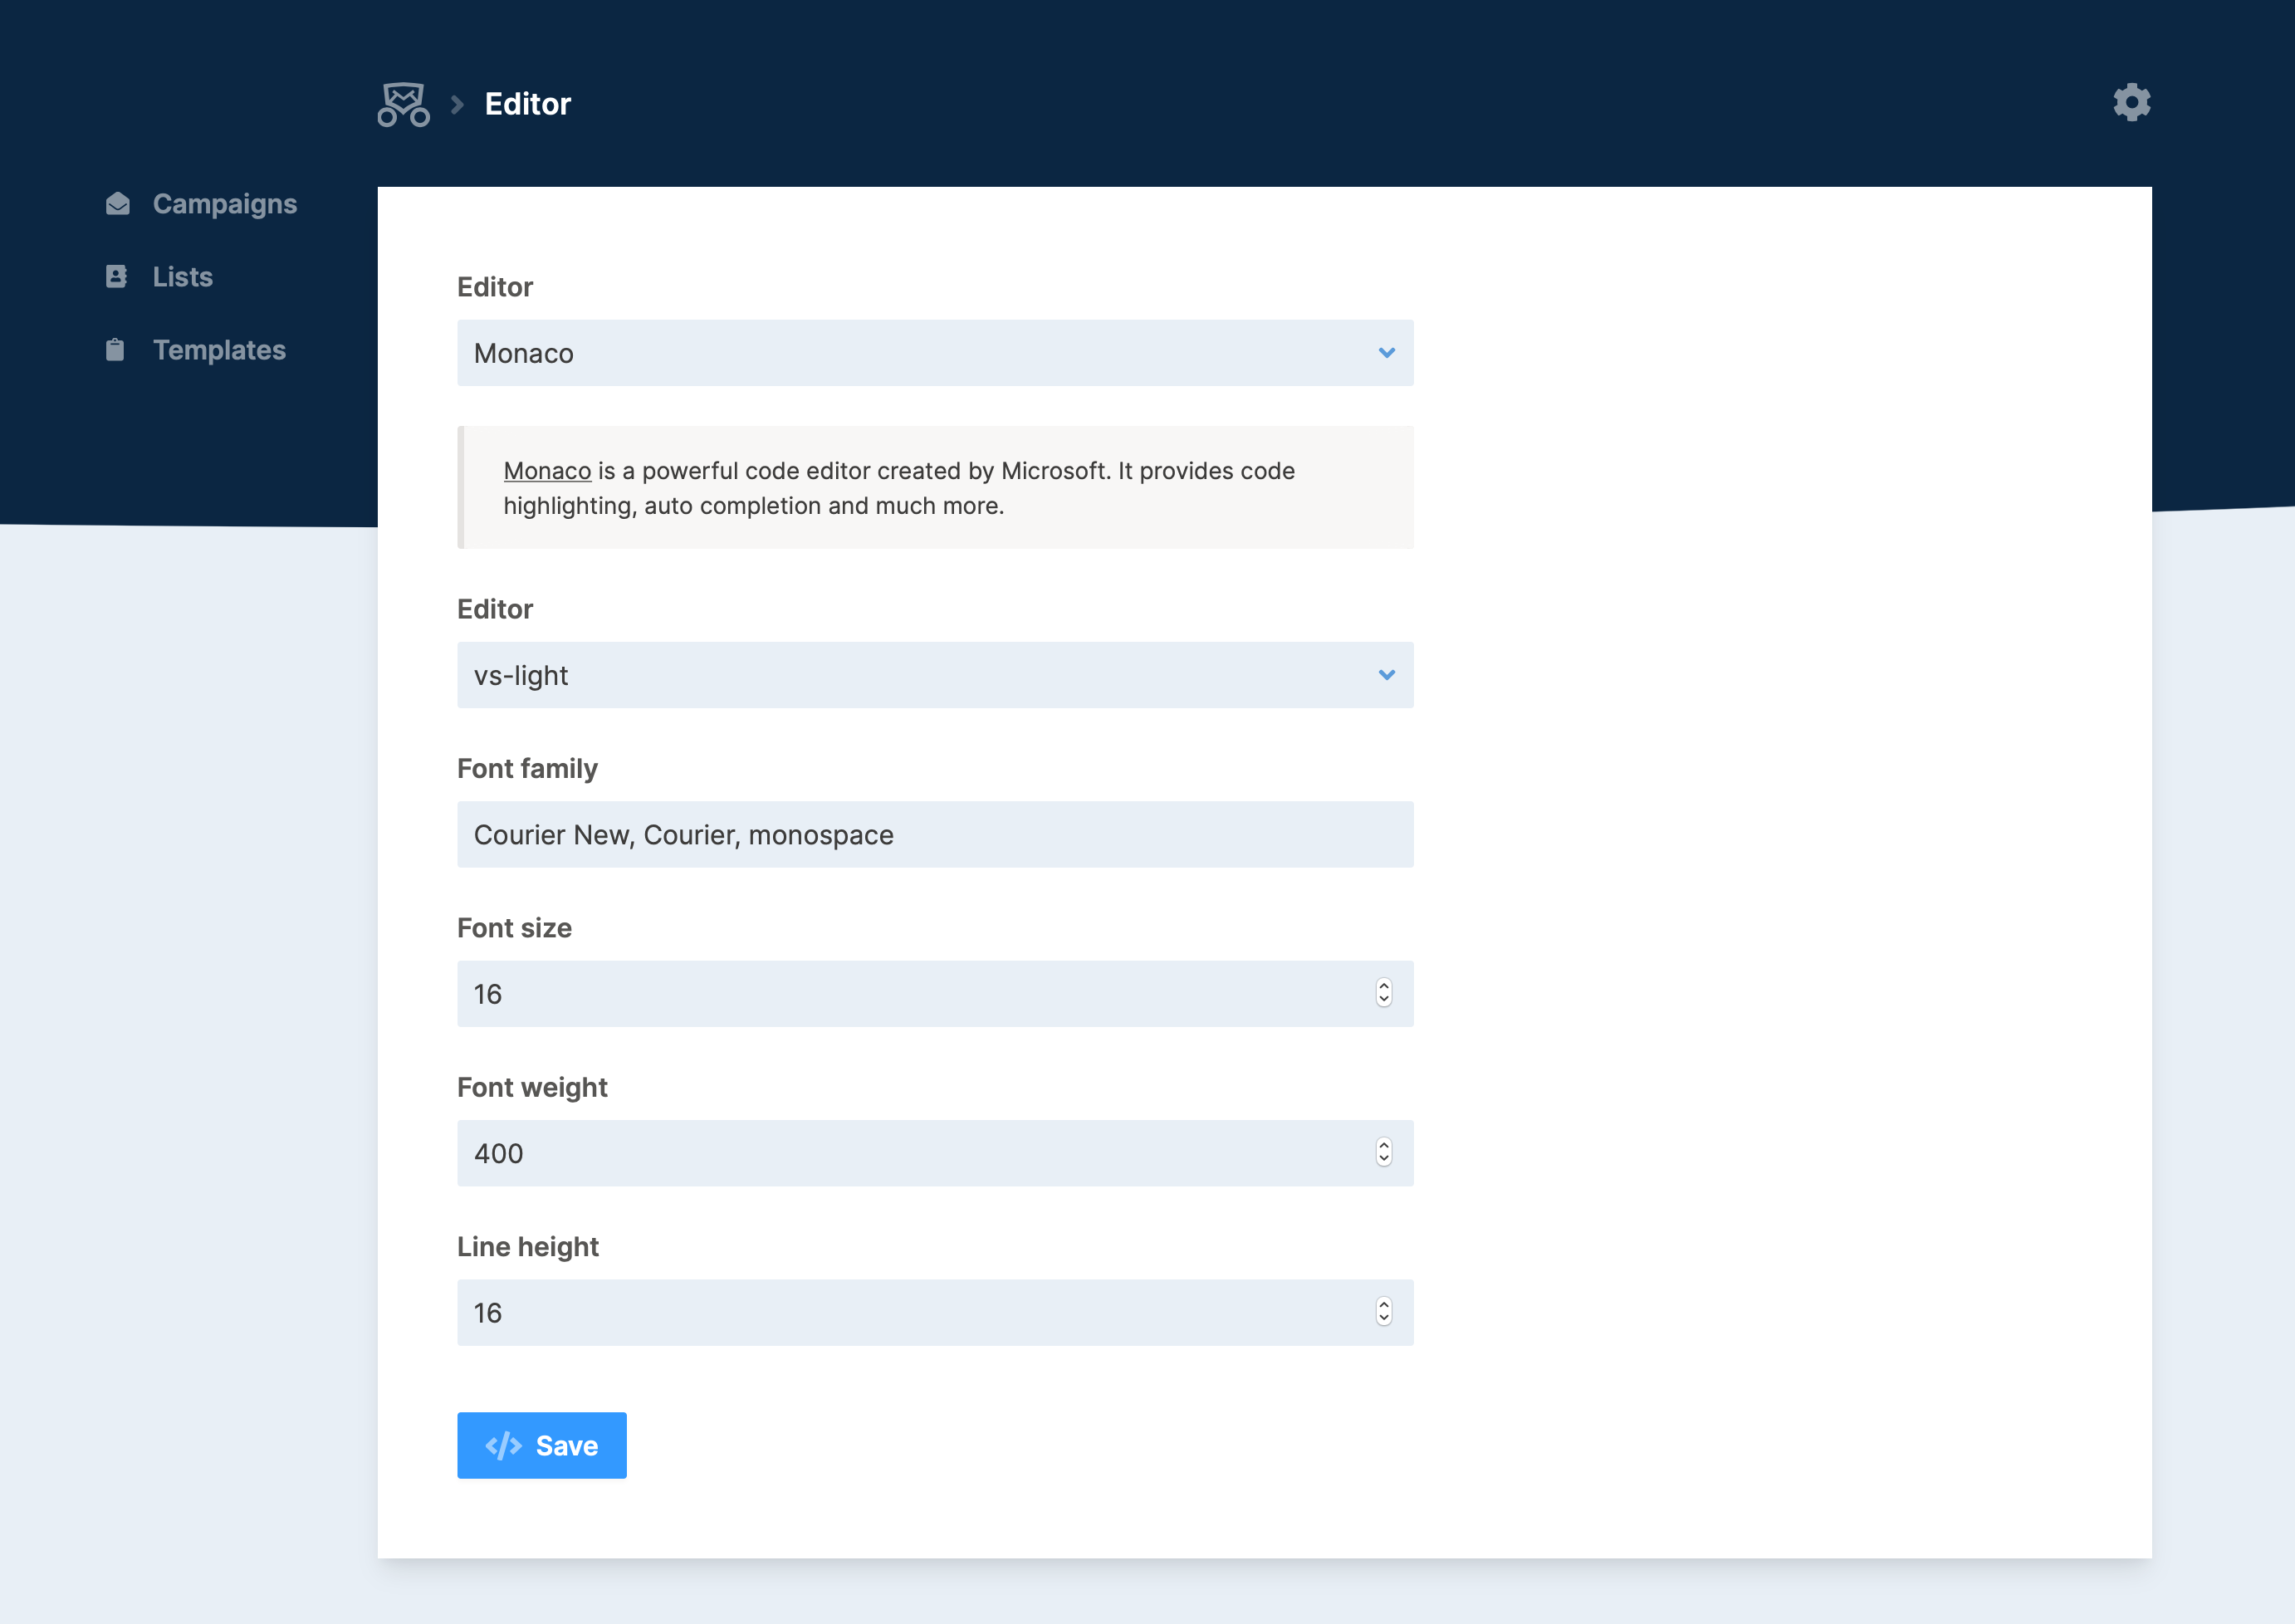
Optionally, you can customize the looks of Monaco by specifying some options in the monaco key of the mailcoach.php config file.
'monaco' => [
    'theme' => 'vs-light', // vs-light or vs-dark
    'fontFamily' => 'Jetbrains Mono',
    'fontLigatures' => true,
    'fontWeight' => 400,
    'fontSize' => '16', // No units
    'lineHeight' => '24' // No units
],
When using Mailcoach as a stand-alone app, you can configure these options on the editor screen.
How editors are implemented in Mailcoach
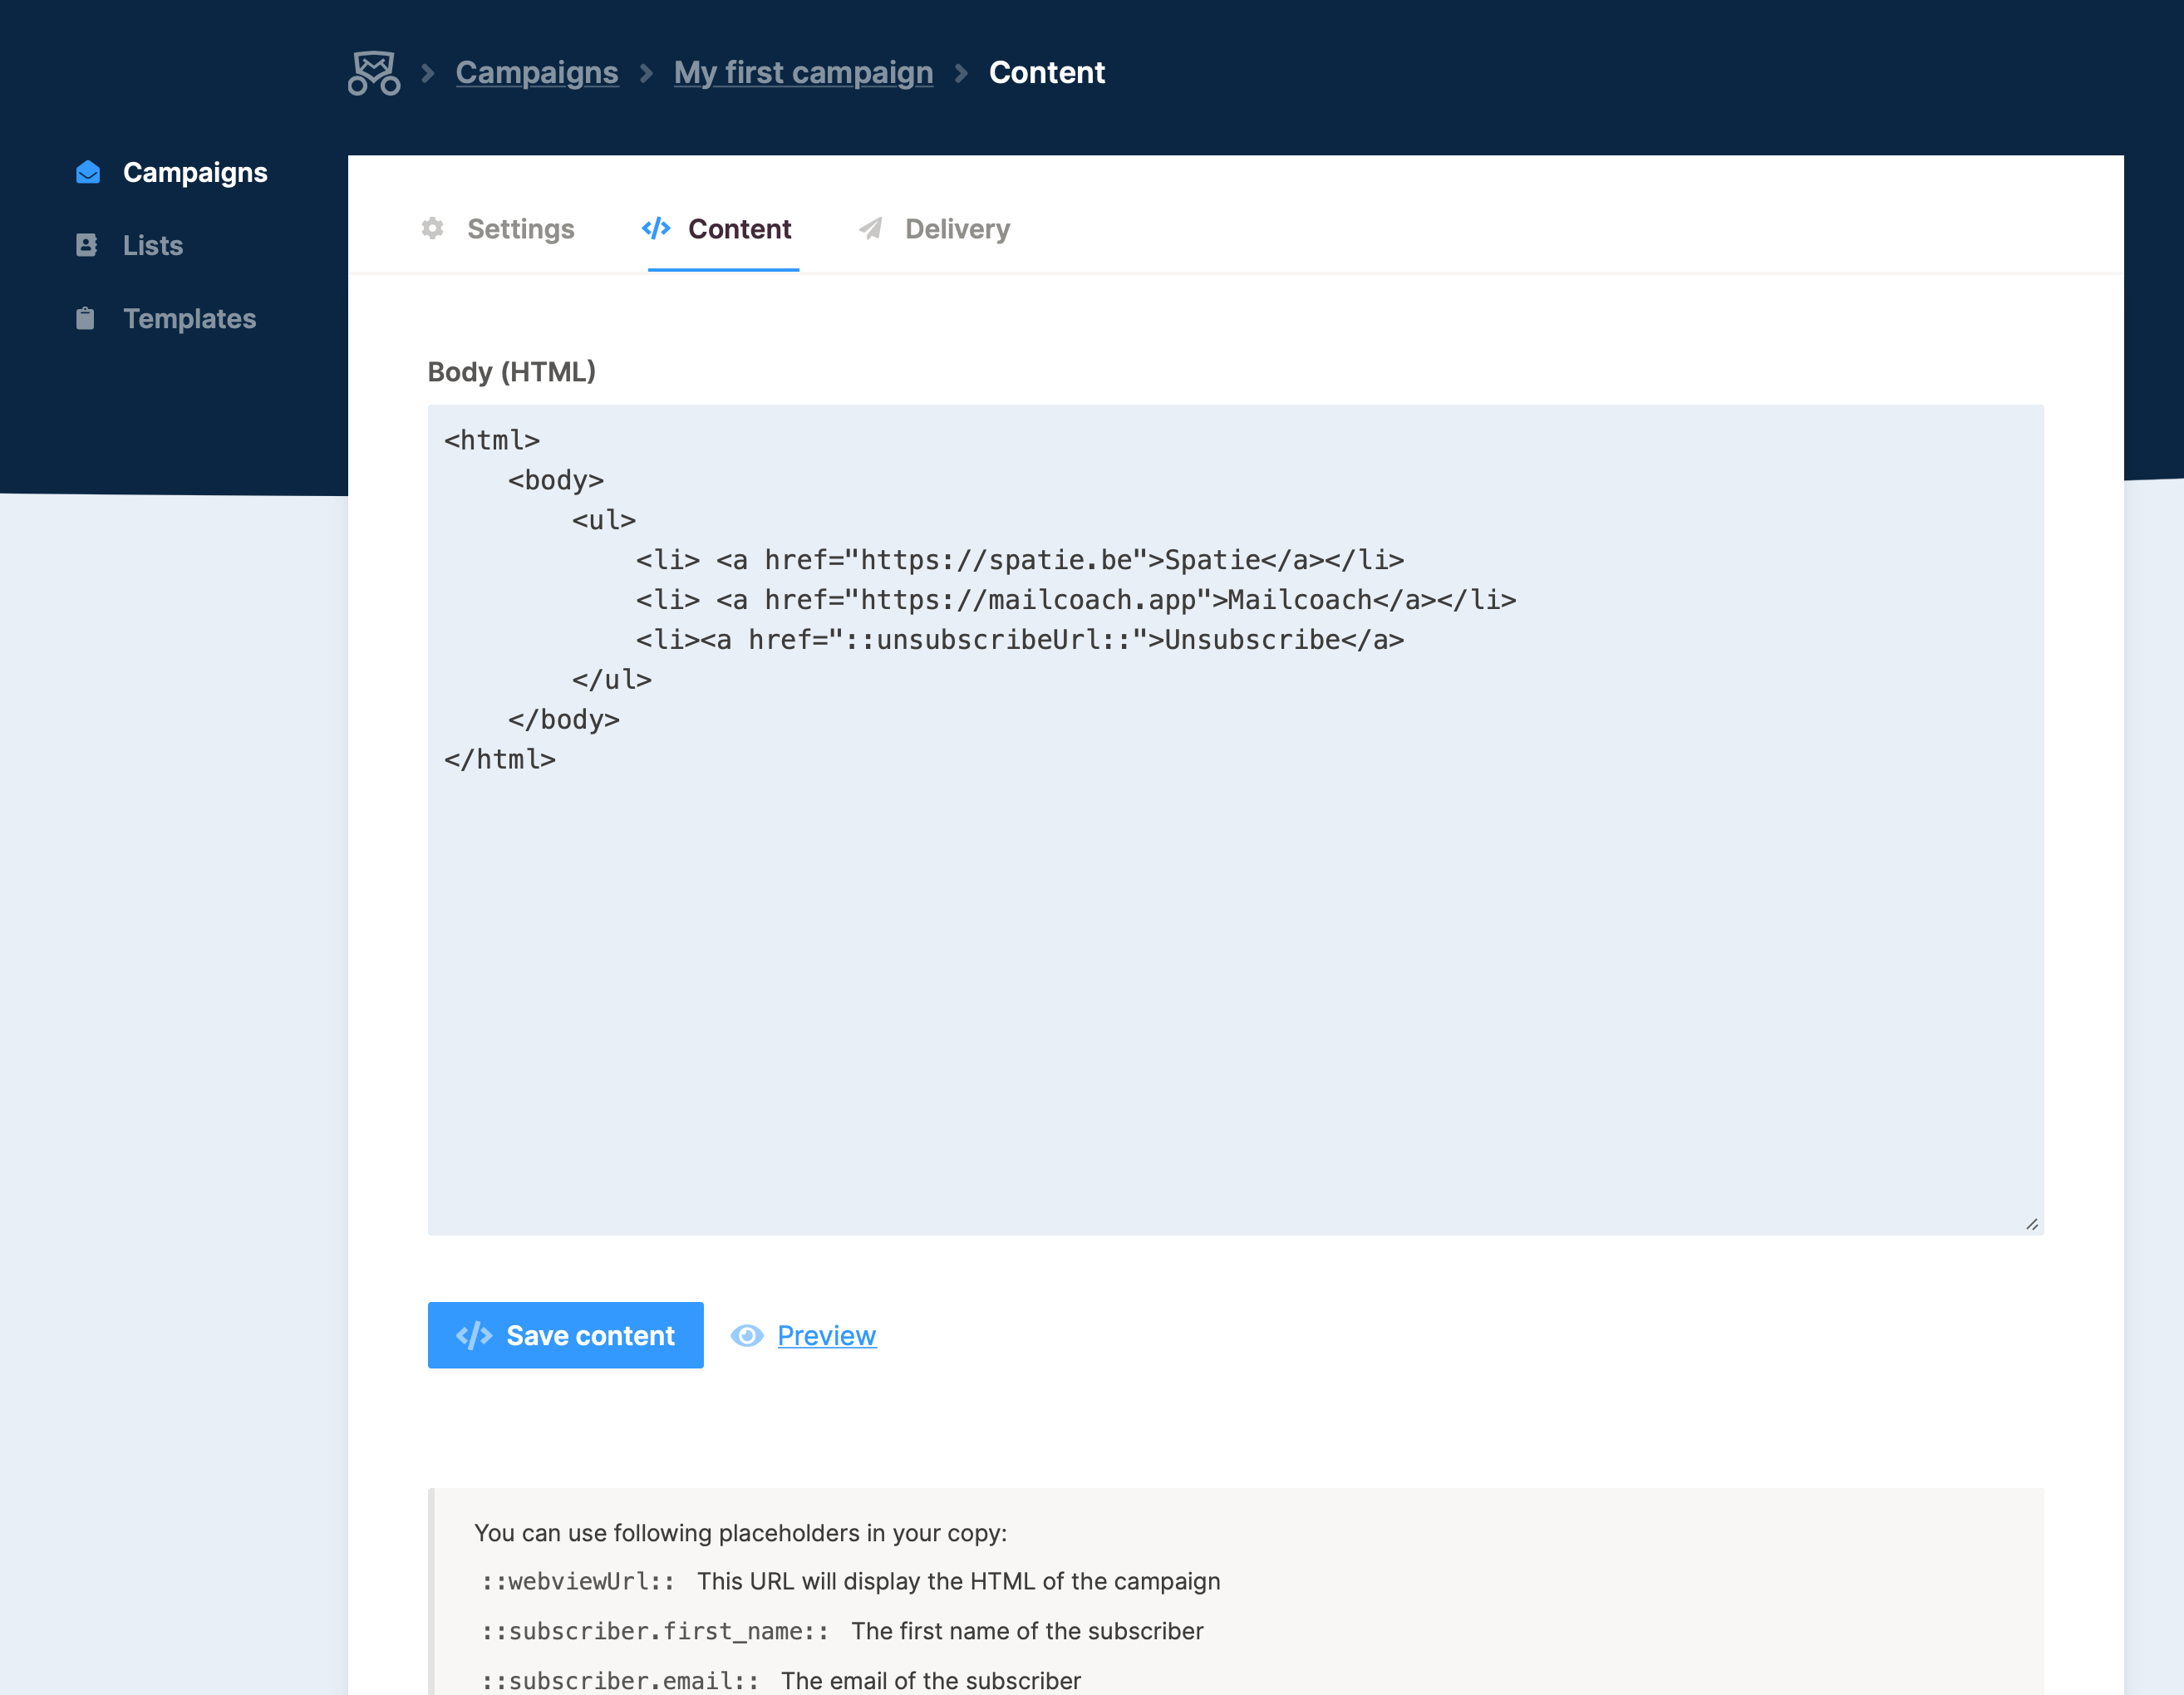
By default, Mailcoach displays a plain text area field to edit campaigns and templates. Let's take a look at how that is implemented.
In Mailcoach, you must specify the class name of an editor in the editor config key of the mailcoach.app config file. By default, Spatie\Mailcoach\Support\Editor\TextEditor::class is used. Let's take a look at that class.
namespace Spatie\Mailcoach\Support\Editor;

use Spatie\Mailcoach\Models\Concerns\HasHtmlContent;

class TextEditor implements Editor
{
    public function render(HasHtmlContent $model): string
    {
        return view('mailcoach::app.campaigns.draft.textEditor', [
            'html' => $model->getHtml(),
        ])->render();
    }
}
As you can see, it's quite simple. We just call getHtml on the $model (which can be a campaign or a template)`, give that to a view and return the rendered view.
Here's the context of that textEditor view.
<div>
    <x-html-field label="Body (HTML)" name="html" :value="old('html', $html)"></x-html-field>
</div>

<div class="form-buttons">
    <button id="save" type="submit" class="button">
        <x-icon-label icon="fa-code" text="Save content"/>
    </button>

    <button type="button" class="link-icon" data-modal-trigger="preview">
        <x-icon-label icon="fa-eye" text="Preview"/>
    </button>
    <x-modal title="Preview" name="preview" large>
        <iframe class="absolute" width="100%" height="100%" data-html-preview-target></iframe>
    </x-modal>
</div>

<x-replacer-help-texts />
Using the new Blade components introduced in Laravel 7, we render the x-HTML-field (which is a textarea), and some buttons to submit and preview the content.
Now we only have the rendered editor, let's see how it is rendered in a form. This is the content of the content.blade.view, which renders the entire view you see in the screenshot above.
@extends('mailcoach::app.campaigns.draft.layouts.edit', [
    'campaign' => $campaign,
    'titlePrefix' => 'HTML',
])

@section('breadcrumbs')
    <li>
        <a href="{{ route('mailcoach.campaigns.settings', $campaign) }}">
            <span class="breadcrumb">{{ $campaign->name }}</span>
        </a>
    </li>
    <li><span class="breadcrumb">Content</span></li>
@endsection

@section('campaign')
    <form
        class="form-grid"
        action="{{ route('mailcoach.campaigns.updateContent', $campaign) }}"
        method="POST"
        data-dirty-check
    >
        @csrf
        @method('PUT')
        {!! app(config('mailcoach.editor'))->render($campaign) !!}
    </form>
@endsection
The important line is the one with app(config('mailcoach.editor'))->render($campaign). As you can see, we simply get the class name of the configured editor, instantiate it, and render it.
This all makes creating support for another editor is rather straightforward. You should have to create a class, let it implement Spatie\Mailcoach\Models\Concerns\HasHtmlContent interface, and specify its fully qualified class name to the config. And that is exactly what our add on packages are doing. Here's the code of the MonacoEditor class in the laravel-mailcoach-monaco package.
namespace Spatie\MailcoachMonaco;

use Spatie\Mailcoach\Models\Concerns\HasHtmlContent;
use Spatie\Mailcoach\Support\Editor\Editor;

class MonacoEditor implements Editor
{
    public function render(HasHtmlContent $model): string
    {
        return view('mailcoach-monaco::editor', [
            'html' => $model->getHtml(),
        ])->render();
    }
}
The JavaScript side of the setup happens in the mailcoach-monaco::editor view. An interesting note is that we use the @push blade directive to add a script to the endHead stack of the Mailcoach layout view.
Using multiple mailers
Some email providers have very strict rules on sending mails. They require to keep a low bounce rate at all times. Confirmation emails have a higher chance of bouncing because they are sent to unverified email addresses.
Mailcoach v1 was built on Laravel v6. In that version of the framework, you could only define one mailer. In Laravel v7 support for multiple mailers was introduced. Mailcoach makes use of that feature to allow confirmation mails to be sent using a different mailer.
In the mailcoach.php config file, there are a couple of values that govern which mailer should be used.
return [

    /*
     * The mailer used by Mailcoach for password resets and summary emails.
     * Mailcoach will use the default Laravel mailer if this is not set.
     */
    'mailer' => null,

    /*
     * The default mailer used by Mailcoach for sending campaigns.
     */
    'campaign_mailer' => null,

    /*
     * The default mailer used by Mailcoach for confirmation and welcome mails.
     */
    'transactional_mailer' => null,

    // ...
];
On the settings screen of an email list, you can also specify which mailer should be used for that particular list.
Building Mailcoach
While building Mailcoach, I've recorded a video course on how to use Mailcoach, and how it was built. You can use these techniques to improve your projects as well. I've made a couple of videos available for free.
When creating a function, it's a good idea to keep the number of arguments as low as possible. In this video, you'll learn a technique on how to do this.
Most developers have probably have seen complex conditionals in legacy code. In this video, I show you how to refactor those.
Want to see more videos like this? Then head over to the video course page on Mailcoach.
Even if you don't require a self-hosted email solution, you could still benefit from purchasing it. Mailcoach is a labor of love, and our team polished it a lot. You can probably learn some nice things and pick up some tricks by reading the source code. The test suite of Mailcoach has been opensource, you can view it in this repo on GitHub.
In closing
Mailcoach v2 has a few smaller new features too, such as adding a delay for a welcome mail, some new customization options when sending mail, support for the latest version of laravel-medialibrary, support for Postmark ...
I'd like to thank my colleague Rias, who has done a lot getting v2 ready.
If you want to know more about Mailcoach, check out the extensive documentation. If you like what you see, consider getting your license.
Here are some more blog posts on Mailcoach
- The origin story or Mailoach.
- Take a look at how I added and tested a feature to delete unconfirmed users automatically.
- My colleague Sebastian blogged about how JavaScript is used in the Mailcoach UI.
Mailcoach is probably the best package I've worked on. I use it myself to send my own newsletter. I hope you'll like it too!