
Using Laravel Sanctum to create dynamic abilities
In Oh Dear, we recently added the ability to create fine-grained API tokens that are scoped by a model. Behind the scenes, it uses Laravel Sanctum to create and verify abilities.
In this blog post, I'd like to give you a peek behind the scenes and show how we set this up.
Oh Dear's fine-grained tokens
Oh Dear has an extensive API that powers various powerful integrations.
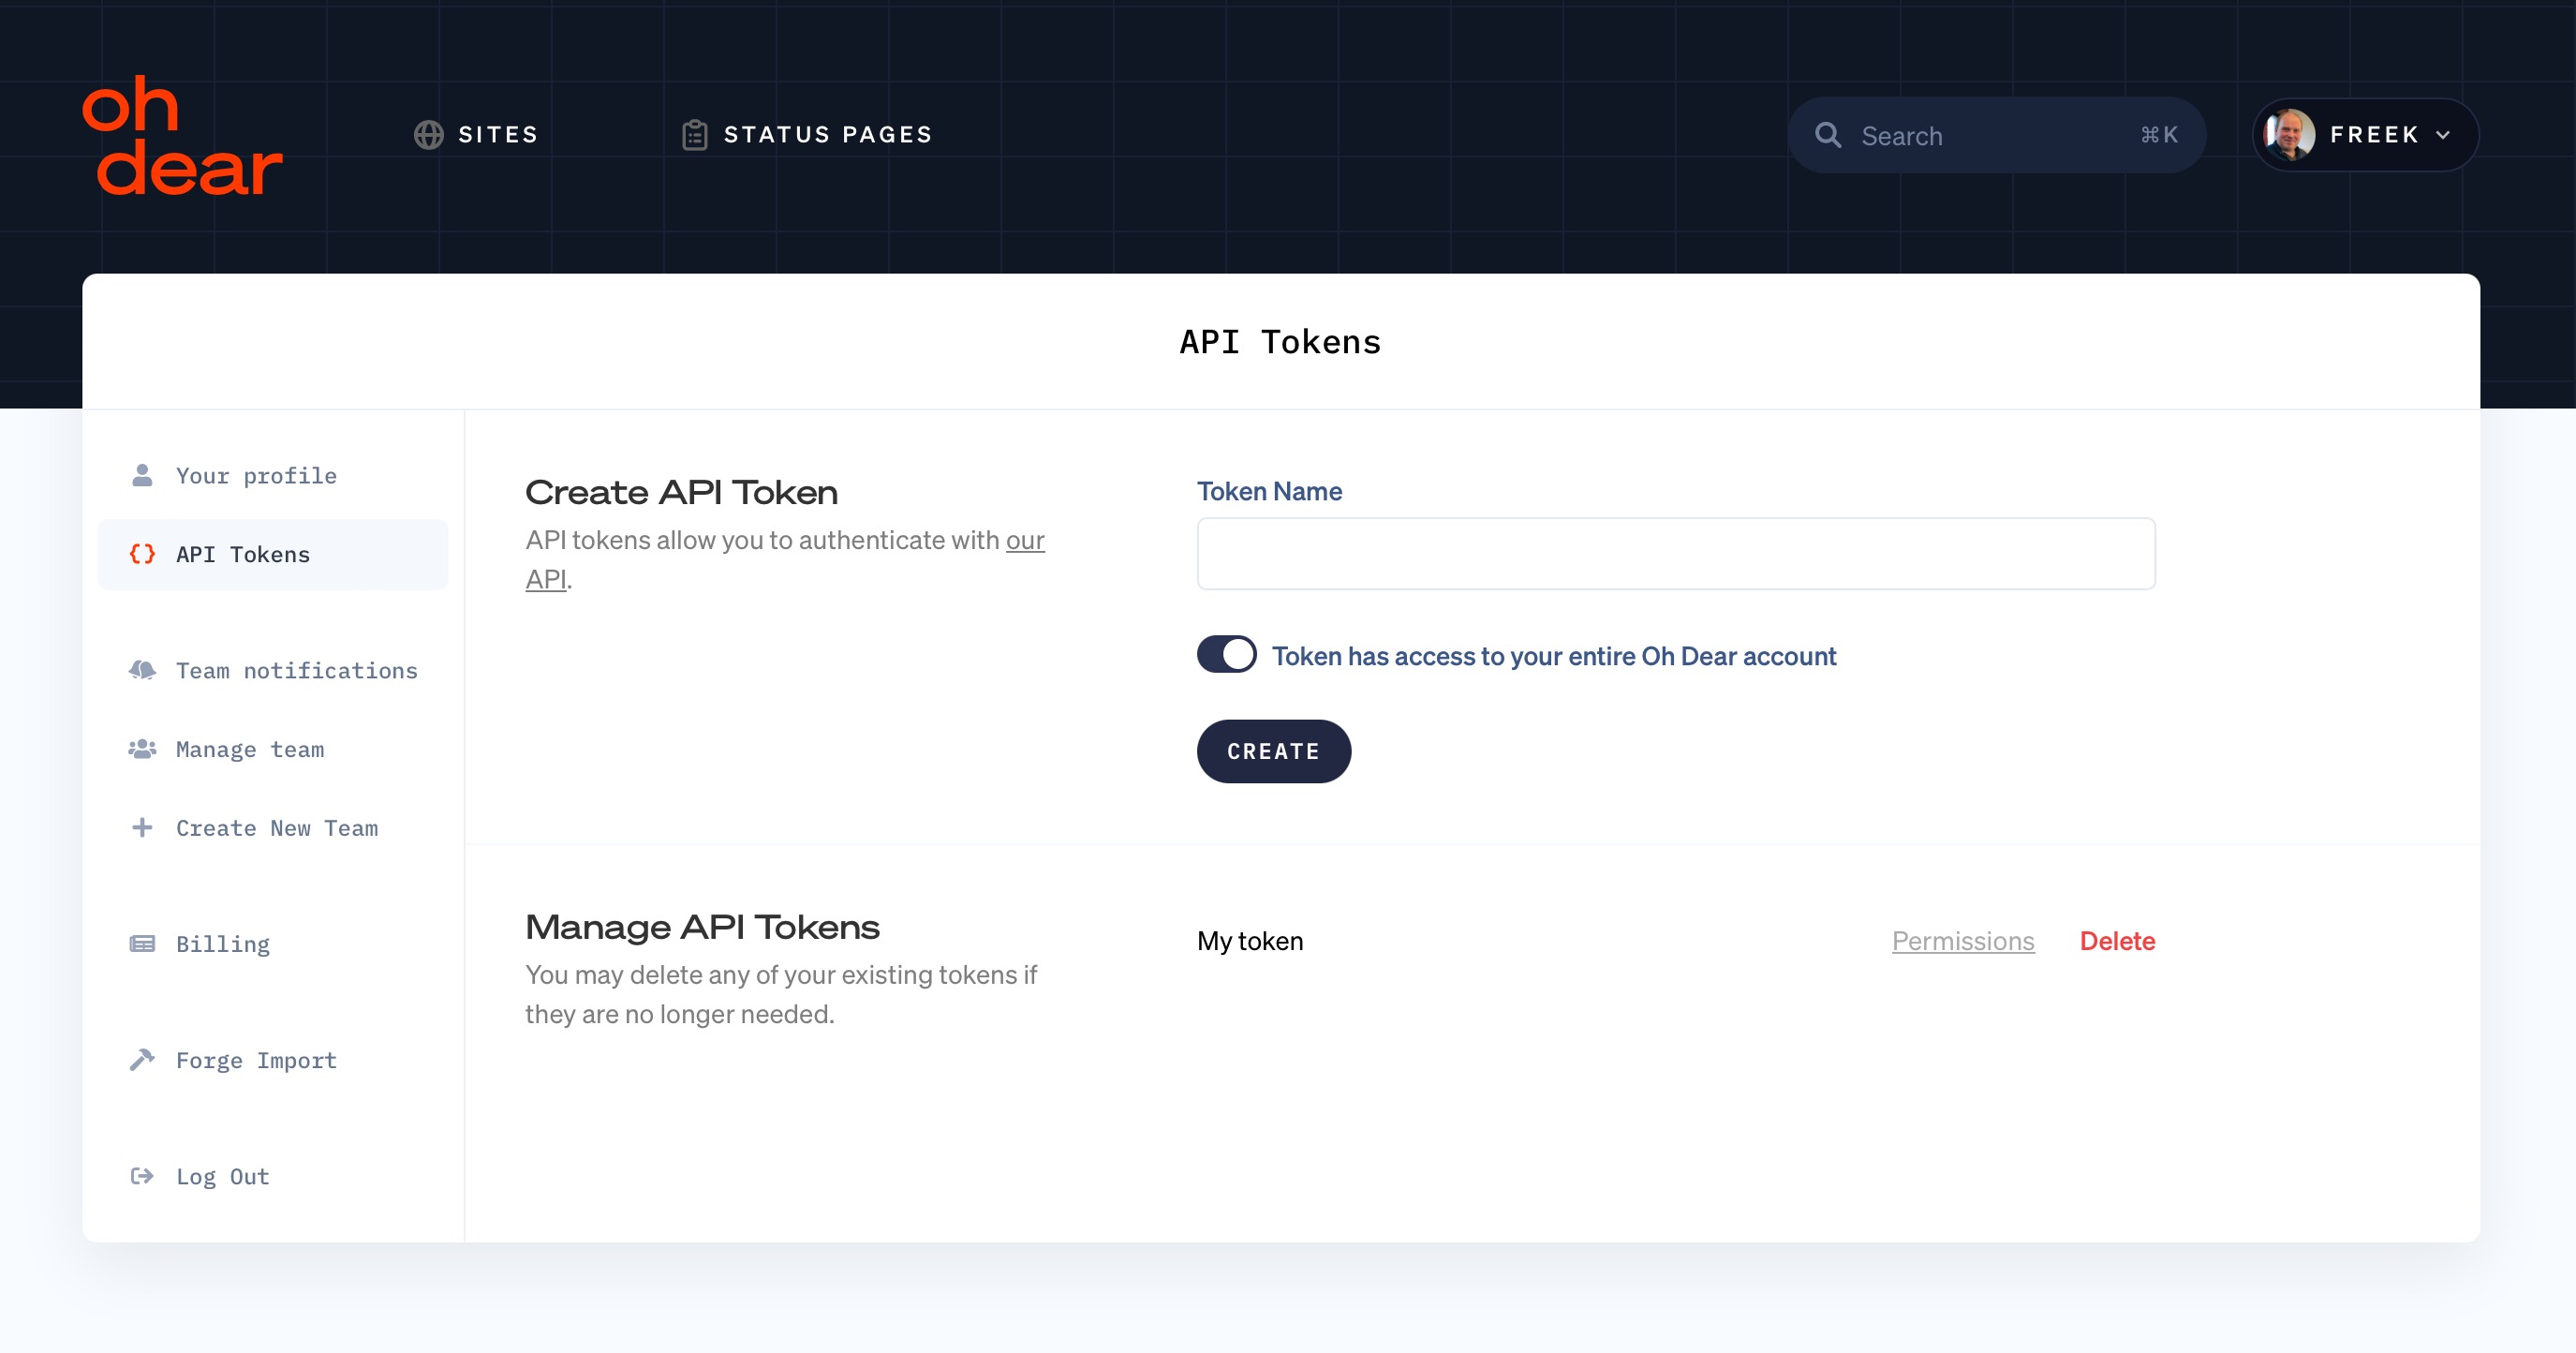
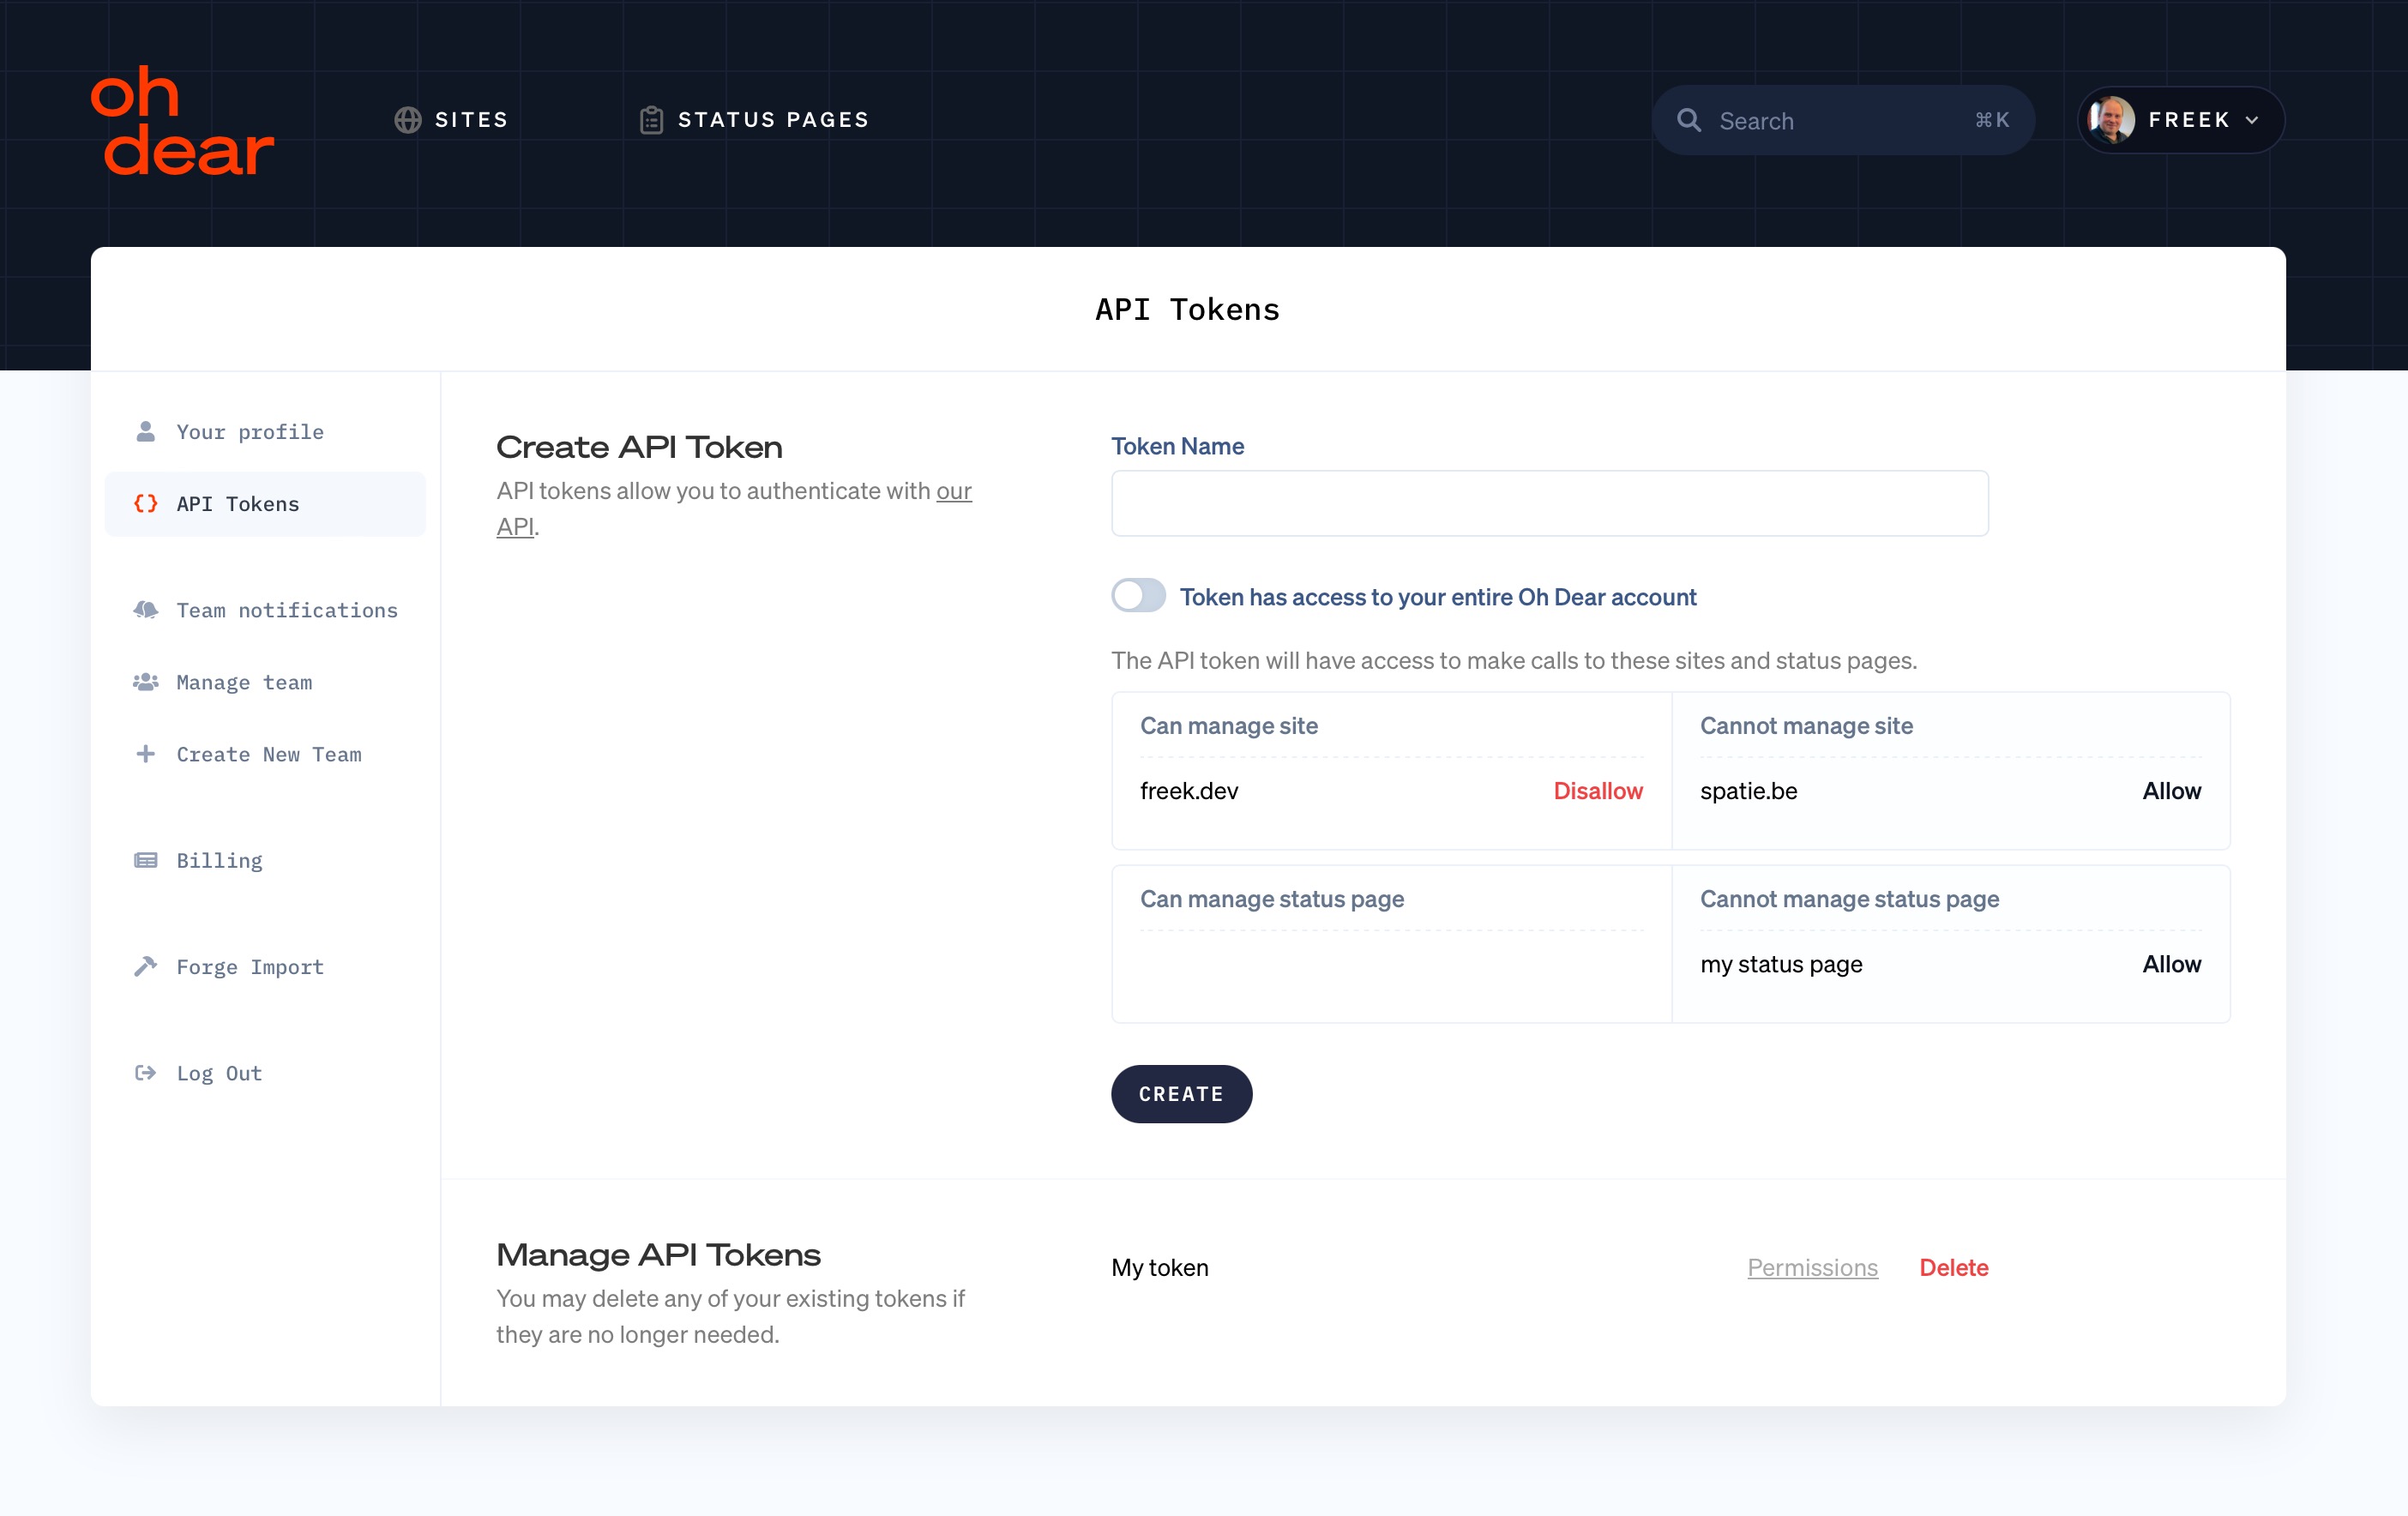
To use the API, you first need to create an API Token in the Oh Dear UI. Previously, such a token could make API calls to any site or status page in your Oh Dear account.
We noticed that some of Oh Dear's users are agencies that use Oh Dear to monitor their clients' sites. When such an agency passes an Oh Dear API Token to one of their clients, then that client could potentially use the broadly scoped token to view the results and settings of other clients of that agency.
In general, it's best practice to scope down the abilities of the token to the bare minimum it needs to do in the integration where it will be used.
That's why we launched the ability to scope an API Token by site or status page. When creating a token, you can pick the sites and status pages it should have access to.
Using Laravel Sanctum to create dynamic abilities
To power our API tokens, the Oh Dear code base uses Laravel Sanctum. This powerhouse package can create tokens, and add and verify abilities associated with those tokens.
You'll find an example of how to do this in the Laravel Sanctum docs.
return $user->createToken('token-name', ['server:update'])
In the JetStream documentation, which provides a UI for these tokens, you'll find this example on how to define permissions.
Jetstream::role('admin', 'Administrator', [
    'server:create',
    'server:read',
    'server:update',
    'server:delete',
])->description('Administrator users can perform any action.');

Jetstream::role('support', 'Support Specialist', [
    'server:read',
])->description('Support specialists can read server information.');
Both of these examples have in common that they showcase static abilities. An ability is just a string with no variation at all.
Oh Dear uses dynamic abilities: there's an ability per site and status page. They look like this: site:9421, statusPage:833 (so the string site: or statusPage: followed with the id).
Let's look again at the screen where an API Token can be created.
 .
.
In Oh Dear, the above screen is implemented as a Livewire component provided by Laravel Jetstream. In JetStream's default implementation, static abilities are used, but in Oh Dear we made some slight modifications. The most significant modification is that we added a tokenAbilities method, which returns the ability names for the token that will be created.
Let's take a look at the code.
// code simplified a bit  for brevity

public function createApiToken()
{
	$this->user->createToken(
	    $this->createApiTokenForm['name'],
	    $this->tokenAbilities(),
	));
}

protected function tokenAbilities(): array
{
    if ($this->canUseEntireApi) {
		    // `*` means that this token has every ability
        return ['*'];
    }

    $siteAbilities = collect($this->selectedSiteIds)
	    ->map(fn (int $siteId) => "site:{$siteId})
	    ->toArray();

    $statusPageAbilities = collect($this->selectedStatusPageIds)
		    ->map(fn (int $statusPageId) => "statusPage:{$statusPageId})
			->toArray();

    return array_merge($siteAbilities, $statusPageAblities);
}
With this code in place, when a user creates a token, that token will have abilities like site:123 and statusPage:456 for each selected site and status page. Sanctum will create a row in the personal_access_tokens table with the new token, and the abilities column will contain the selected ability names.
Verifying abilities
Now that you know how a token is created and how abilities are stored, let's look at how we verify an incoming API call has a token with the correct ability for the action performed.
Out of the box, Laravel Sanctum comes with the \Laravel\Sanctum\Http\Middleware\CheckAbilities::class middleware (which is suggested to be registered as route middleware with a key abilities).
This is a slightly modified example from the docs on how to use it.
Route::get('/orders', function () {
    // Token has both "check-status" and "place-orders" abilities...
})->middleware(['abilities:check-status,place-orders']);
Notice that this example uses static ability names.
Let's try to use the middleware for our use case. Here are the routes registered in the API of Oh Dear, and again I simplified the code for brevity.
Route::prefix('/sites/{site}')->group(function() {
	// all site-specific API endpoints
});

Route::prefix('/status-pages/{statusPage}')->group(function() {
	// all status page-specific API endpoints
});
The problem with the abilities middleware of Sanctum, is that you can only pass static strings to it, there's no way of letting that middleware know that it should perform a check using the id of the site or status page of an incoming API request.
// this doesn't work

Route::prefix('/sites/{site}')->middleware('abilities:<something dynamic>->group(function() {
	// all site-specific API endpoints
});
Since using Laravel Sanctum's native abilities middleware doesn't work for our use case, we will create a middleware of our own.
Here's the simplified code of our CheckTokenAbilities middleware that will use the site or statusPage coming in via the route parameters.
namespace App\Http\Middleware;

use Closure;
use Illuminate\Auth\AuthenticationException;
use Illuminate\Http\Request;
use Laravel\Sanctum\Exceptions\MissingAbilityException;

class CheckTokenAbilities
{
    public function handle(Request $request, Closure $next)
    {
        if (! $currentUser = $request->user()) {
            throw new AuthenticationException;
        }

        if ($currentUser->tokenCan('*')) {
            return $next($request);
        }

        if ($site = $request->route('site')) {
            $ability = "site:{$site->id}";

            if (! $currentUser->tokenCan($ability)) {
                throw new MissingAbilityException($ability);
            }

            return $next($request);
        }

        if ($statusPage = $request->route('statusPage')) {
            $ability = "statusPage:{$statusPage->id}";

            if (! $currentUser->tokenCan($ability)) {
                throw new MissingAbilityException($ability);
            }

            return $next($request);
        }

        return $next($request);
    }
}
So whenever a request comes in with site or statusPage as the route parameters, our middleware will verify if the request was made with a token with the correct ability.
After registering this middleware in the HTTP kernel as checkTokenAbilities, it can easily be applied to all routes with such route parameters in our API.
Route::middleware('checkTokenAbilities')->group(function() {
	Route::prefix('/sites/{site}')->group(function() {
			// all site-specific API endpoints
		});

	Route::prefix('/status-pages/{statusPage}')->group(function() {
		// all status page-specific API endpoints
	});
})
Here are some of the tests that make sure our middleware works correctly.
use App\Domain\Site\Models\Site;
use App\Domain\Team\Models\User;
use Laravel\Sanctum\Sanctum;
use Tests\TestSupport\Factories\UserFactory;

beforeEach(function () {
    $this->user = UserFactory::createWithTeamOnPlan();

    $this->site = Site::factory()->create([
        'url' => 'https://test.be',
        'team_id' => $this->user->teams->first()->id,
    ]);
});

it('will allow to see the site if the token has all abilities', function () {
    logInToApi($this->user, ['*']);

    $this
        ->get("/api/sites/{$this->site->id}")
        ->assertSuccessful();
});

it('will allow to see the site if the token has the specific ability', function () {
    logInToApi($this->user, ["site:{$this->site->id}"]);

    $this
        ->get("/api/sites/{$this->site->id}")
        ->assertSuccessful();
});

it('will not allow to see the site if the token has not got the right ability', function () {
    logInToApi($this->user, ['site:1234578']);

    $this
        ->get("/api/sites/{$this->site->id}")
        ->assertForbidden();
});

function logInToApi(User $user, $abilities): User
{
    Sanctum::actingAs(
        $user,
        $abilities,
    );

    return $user;
}
Customising the access token class
Our API also has an endpoint that displays a list of all sites in the account.
This is the URL of that endpoint:
https://ohdear.app/api/sites
Of course, there is no {site} being bound here, so our checkTokenAbilities won't work in this context. Still, the endpoint should only return sites allowed by the token.
We're using the spatie/laravel-query-builder package to convert the incoming request to a query. Sanctum provides a method currentAccessToken that returns the token used by the current user when the request was made. In the controller handling the request, we will use the currentAccessToken to get to the token.
use Spatie\QueryBuilder\QueryBuilder;

class SitesController
{
    use SendsApiResponses;
    use AuthorizesRequests;

    public function index(IndexSitesRequest $request)
    {
        $sites = QueryBuilder::for(Site::class)
            ->when(!currentUser()->tokenCan('*'), function (Builder $query) use ($request) {
                $token = $request->user()->currentAccessToken();

                // somehow get all site ids on a token
                // and put it in $tokenSiteIds
                $tokenSiteIds = [];

                $query->whereIn('id', $tokenSiteIds);
            })
            ->allowedSorts('url', 'created_at', 'updated_at')
            ->jsonPaginate();

        return SiteResource::collection($sites);
    }
}
By using when we're only going to modify our query if the token isn't allowed to do everything. The big question is, of course, how we will get all the site ids from the token.
In the code above, $request->user()->currentAccessToken() will return an instance of Laravel\Sanctum\PersonalAccessToken, which is the model that is stored in the DB for the token.
In the code above, we could do this to get the correct value for $tokenSiteIds:
// in the controller

$tokenSiteIds = collect($token->abilities)
    ->filter(fn(string $ability) => str_starts_with($ability, 'site:'))
    ->map(fn(string $ability) => Str::after($ability, 'site:'))
    ->toArray();
That would work nicely, but ideally, the controller would have no knowledge about how abilities are stored on the token.
We can solve this by creating a PersonalAccessToken model of our own that extends Sanctum's one. On our own model, we'll add a function to get the site ids on a token.
namespace App\Domain\Team\Models;

use Laravel\Sanctum\PersonalAccessToken as BasePersonalAccessToken;

class PersonalAccessToken extends BasePersonalAccessToken
{
    public function siteIds(): array
    {
        return collect($this->abilities)
            ->filter(fn(string $ability) => str_starts_with($ability, 'site:'))
            ->map(fn(string $ability) => Str::after($ability, 'site:'))
            ->toArray();
    }
}
Next, we want $request->user()->currentAccessToken() to return our PersonalAccessToken instead of the default one.
This can be achieved by adding this line in a service provider:
use Laravel\Sanctum\Sanctum;
use App\Domain\Team\Models\PersonalAccessToken;

Sanctum::usePersonalAccessTokenModel(PersonalAccessToken::class);
With all this in place, we can use the siteIds function on our model in the controller.
use Spatie\QueryBuilder\QueryBuilder;

class SitesController
{
    use SendsApiResponses;
    use AuthorizesRequests;

    public function index(IndexSitesRequest $request)
    {
        $sites = QueryBuilder::for(Site::class)
            ->when(!currentUser()->tokenCan('*'), function (Builder $query) use ($request) {
                $token = $request->user()->currentAccessToken();

                $query->whereIn('id', $$token->siteIds());
            })
            ->allowedSorts('url', 'created_at', 'updated_at')
            ->jsonPaginate();

        return SiteResource::collection($sites);
    }
}
Nice and clean!
You should still use policies to check for authorization
In all above code examples, we've used tokens to check if a user can see the requested site or status page. In addition to checking a token, you should also definitely still use a policy (or another kind of authorization check) after you checked a token to verify if a user has access to the resource. Let's explain why!
At Oh Dear, when a user creates a token in the UI, that user can select the sites and status pages that user can see at that moment. Maybe at the time, the user is a member of team A and team B, and the token has abilities to see some sites of both team A and team B.
Somewhere in the future, the user might be removed from team A. The created token will still have the ability to view the selected sites from team A. If you would only verify the token's abilities, the user would still be allowed to see sites of a team that user doesn't belong to anymore.
That's why you should definitely, after checking the abilities of a token, use a policy. In Oh Dear's codebase, the SitePolicy contains the logic that a user should belong to the team that owns the site.
After the user was removed from team A, we could have updated the abilities of all tokens. In some cases, updating the abilities of a token would be an option. But this might not be an option if you have more complex business logic in the policy.
So rule of thumb: after checking the token abilities, definitely do a policy check as well to make sure you're using the latest business logic to determine if a user can view the resource.
In closing
Laravel Sanctum is an excellent package for creating and managing API tokens. Static abilities are provided out of the box, but the package is flexible enough to handle dynamic abilities as well.
To see all the things described in this post in action, head over to Oh Dear to start your free 10-day trial. We monitor uptime, SSL certificates, broken links, scheduled tasks, application health, DNS, domain expiry and much more. We send notifications when something's wrong. All that paired with a developer friendly API and kick-ass documentation.
What are your thoughts on "Using Laravel Sanctum to create dynamic abilities"?